Exploring Sound
Tuning fork (nickylarson974, iStockphoto)

Tuning fork (nickylarson974, iStockphoto)
How does this align with my curriculum?
| Grade | Course | Topic |
|---|
Students will learn about and explore the properties of sound through activity centres.
Overview
| Activities | Timing | Student Grouping | Description |
|---|---|---|---|
| Minds-On: Introduction to Sound | 10-15 minutes | Large group | Students will learn about how sound is produced |
| Action: Sound Exploration Centres | 4 x 15 min. each (60 minutes total) | Small group | Students will participate in centre activities about the properties of sound |
| Consolidation: Exploring Sound Reflection | 20 - 30 minutes | Individual | Students will discuss the connection between pitch/loudness and how sound travels through different materials. |
Students will:
- Explore the properties of sound (pitch and loudness) using different tools and materials
- Explore how the pitch and loudness of sound can be modified
Learning Goals
Students will:
- Explore the properties of sound (pitch and loudness) using different tools and materials
- Explore how the pitch and loudness of sound can be modified
Students can:
- Predict and observe properties of sound (pitch and loudness)
- Identify properties of sound (pitch and loudness)
- Effectively communicate their understanding of the properties of sound and how sound can be modified while at centres and during large group discussions
Success Criteria
Students can:
- Predict and observe properties of sound (pitch and loudness)
- Identify properties of sound (pitch and loudness)
- Effectively communicate their understanding of the properties of sound and how sound can be modified while at centres and during large group discussions
This icon indicates potential assessment opportunities.
Observations
- Observe and record anecdotally students’ responses to questions asked about the video or book about sounds (Minds-on)
- Observe and record anecdotally students’ participation and sharing of predictions during the activity centres (Action)
Conversations
- Listen to and record students as they share observations at the centres (Action)
Products
- Students could complete Predict and Observe reproducible as they complete activities at each centre (Action)
Evidence of Student Learning
This icon indicates potential assessment opportunities.
Observations
- Observe and record anecdotally students’ responses to questions asked about the video or book about sounds (Minds-on)
- Observe and record anecdotally students’ participation and sharing of predictions during the activity centres (Action)
Conversations
- Listen to and record students as they share observations at the centres (Action)
Products
- Students could complete Predict and Observe reproducible as they complete activities at each centre (Action)
Students will:
- Explore the properties of sound (pitch and loudness) using different tools and materials
- Explore how the pitch and loudness of sound can be modified
Learning Goals
Students will:
- Explore the properties of sound (pitch and loudness) using different tools and materials
- Explore how the pitch and loudness of sound can be modified
Students can:
- Predict and observe properties of sound (pitch and loudness)
- Identify properties of sound (pitch and loudness)
- Effectively communicate their understanding of the properties of sound and how sound can be modified while at centres and during large group discussions
Success Criteria
Students can:
- Predict and observe properties of sound (pitch and loudness)
- Identify properties of sound (pitch and loudness)
- Effectively communicate their understanding of the properties of sound and how sound can be modified while at centres and during large group discussions
This icon indicates potential assessment opportunities.
Observations
- Observe and record anecdotally students’ responses to questions asked about the video or book about sounds (Minds-on)
- Observe and record anecdotally students’ participation and sharing of predictions during the activity centres (Action)
Conversations
- Listen to and record students as they share observations at the centres (Action)
Products
- Students could complete Predict and Observe reproducible as they complete activities at each centre (Action)
Evidence of Student Learning
This icon indicates potential assessment opportunities.
Observations
- Observe and record anecdotally students’ responses to questions asked about the video or book about sounds (Minds-on)
- Observe and record anecdotally students’ participation and sharing of predictions during the activity centres (Action)
Conversations
- Listen to and record students as they share observations at the centres (Action)
Products
- Students could complete Predict and Observe reproducible as they complete activities at each centre (Action)
Materials and Preparation
| Material/Technology/Setting | Quantity |
|---|---|
|
For all centres
|
1 set per centre |
|
NOTE: You may wish to have students do all or only some of the centre activities. |
|
|
Centre Activity 1: Musical Elastic Bands
|
1 set per student at centre |
|
Centre Activity 2: Musical Straws
|
1 set per student at centre |
|
Centre Activity 3: Musical Water Jars
|
1 set per group |
|
Centre Activity 4: Musical Bowls
|
1 set per student at centre |
|
1 per student |
|
For teacher use |
Materials
| Material/Technology/Setting | Quantity |
|---|---|
|
For all centres
|
1 set per centre |
|
NOTE: You may wish to have students do all or only some of the centre activities. |
|
|
Centre Activity 1: Musical Elastic Bands
|
1 set per student at centre |
|
Centre Activity 2: Musical Straws
|
1 set per student at centre |
|
Centre Activity 3: Musical Water Jars
|
1 set per group |
|
Centre Activity 4: Musical Bowls
|
1 set per student at centre |
|
1 per student |
|
For teacher use |
- Laminate the Centre Activities Instruction Card or put them in plastic sleeves. When setting up stations, place each card at its corresponding activity centre.
- Set up materials for centre activities and familiarize yourself with how the activities are done.
Preparation
- Laminate the Centre Activities Instruction Card or put them in plastic sleeves. When setting up stations, place each card at its corresponding activity centre.
- Set up materials for centre activities and familiarize yourself with how the activities are done.
- Working independently at a centre.
- Working safely and carefully with water.
Student Prior Knowledge and Skills
- Working independently at a centre.
- Working safely and carefully with water.
| Material/Technology/Setting | Quantity |
|---|---|
|
For all centres
|
1 set per centre |
|
NOTE: You may wish to have students do all or only some of the centre activities. |
|
|
Centre Activity 1: Musical Elastic Bands
|
1 set per student at centre |
|
Centre Activity 2: Musical Straws
|
1 set per student at centre |
|
Centre Activity 3: Musical Water Jars
|
1 set per group |
|
Centre Activity 4: Musical Bowls
|
1 set per student at centre |
|
1 per student |
|
For teacher use |
Materials
| Material/Technology/Setting | Quantity |
|---|---|
|
For all centres
|
1 set per centre |
|
NOTE: You may wish to have students do all or only some of the centre activities. |
|
|
Centre Activity 1: Musical Elastic Bands
|
1 set per student at centre |
|
Centre Activity 2: Musical Straws
|
1 set per student at centre |
|
Centre Activity 3: Musical Water Jars
|
1 set per group |
|
Centre Activity 4: Musical Bowls
|
1 set per student at centre |
|
1 per student |
|
For teacher use |
- Laminate the Centre Activities Instruction Card or put them in plastic sleeves. When setting up stations, place each card at its corresponding activity centre.
- Set up materials for centre activities and familiarize yourself with how the activities are done.
Preparation
- Laminate the Centre Activities Instruction Card or put them in plastic sleeves. When setting up stations, place each card at its corresponding activity centre.
- Set up materials for centre activities and familiarize yourself with how the activities are done.
- Working independently at a centre.
- Working safely and carefully with water.
Student Prior Knowledge and Skills
- Working independently at a centre.
- Working safely and carefully with water.
Teaching and Learning Activities
This icon indicates potential assessment opportunities.
Minds-On: Introduction to Sound (10-15 min.)
| Instructions | Teaching Tips |
|---|---|
| Have students watch a video such as How do instruments make music? | We The Curious (2:42 min.) or read a book such as Sounds All Around (a read aloud can also be viewed here) to learn about how sound is created. |
LanguageConsider creating a word wall of terminology that students will encounter over the course of this lesson such as, frequency, soundwave, hertz, pitch, etc. Images and VideosFor students with visual impairments, pause to describe images in the video or book and use closed captioning. |
|
Show students the Properties of Sound interactive presentation [html] [Google slides] [pptx] [PDF]. Properties of sound home page (©2022 Let’s Talk Science.) |
DiscussionsDiscussion prompts can include:
|
Action: Sound Exploration Centres (40 - 60 min.)
| Instructions | Teaching Tips |
|---|---|
|
Divide students into groups to do centre activities. Activities could be done concurrently or sequentially. Provide students with the Predict and Observe reproducible [Google doc] [Word doc] [PDF]. Go over the questions with them and explain that they will need to fill out each section at the corresponding centre. 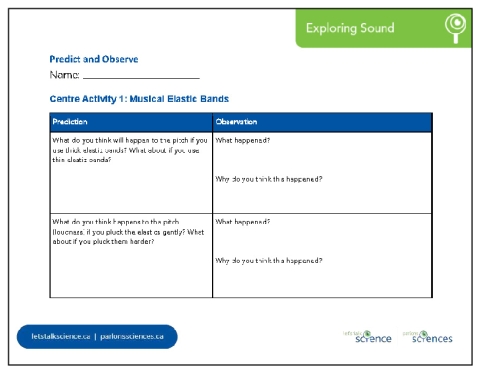
|
LanguageReview what a prediction is to ensure students understand the concept before beginning the activities. Suggested prompts can include:
|
|
Centre Activity 1: Musical Elastic Bands Students explore sound by wrapping a variety of elastic bands around different sized containers and plucking them to hear the different sounds they make. 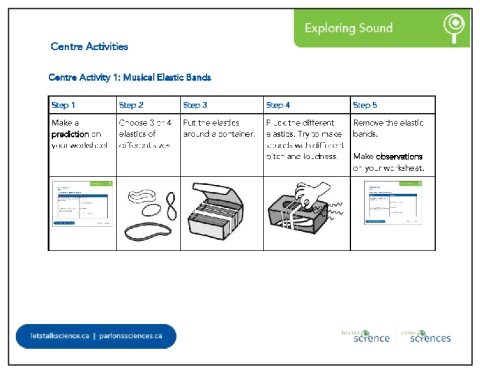
Have conversions with students about how they modified sound using the different containers and sizes of elastic bands. |
IdeaStudents could watch this video of someone plucking elastic bands on various containers in addition to reading the instructions on the activity card. |
|
Centre Activity 2: Musical Straws Students explore sound by cutting straws into different sizes and blowing over them to hear the differences. Students independently follow the steps on Centre Activity #2 from the Exploring Sound Activity Cards reproducible [Google doc] [Word doc] [PDF]. 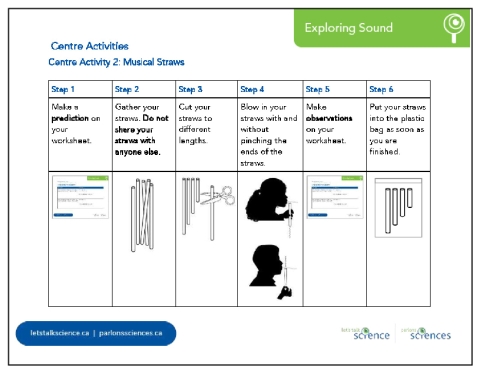
Have conversations with students about how the pitch of the sound was related to the length of the straw. |
SafetyStudents should not share drinking straws. DiscussionsDiscussion prompts can include:
|
|
Centre Activity 3: Musical Water Jars Students explore the sounds jars make when filled with different amounts of water. Prompt students to share their observations. Set out empty jars, things to tap with, and a pitcher of water at the centre. Students independently follow the steps on Centre Activity #3 from the Exploring Sound Activity Cards reproducible [Google doc] [Word doc] [PDF]. 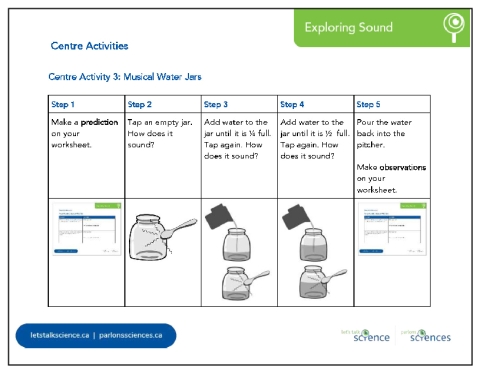
You can see a similar demonstration in this video. Have conversations with students about how the pitch of the sound was related to the amount of water in the jar. |
SafetyAny spilled water should be cleaned up immediately. Have gloves on hand as well should one of the jars break and require cleanup. Encourage students to tap the jars gently and not to hit other things with the tapping tools. DiscussionsDiscussion prompts can include:
|
|
Centre Activity 4: Musical Bowls Students explore the sounds bowls make when formed into drums. Prompt students to share their observations. Students independently follow the steps on Centre Activity #4 from the Exploring Sound Activity Cards reproducible [Google doc] [Word doc] [PDF]. 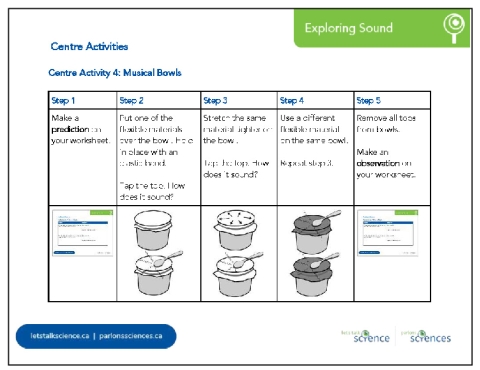
Have conversations with students about how the pitch of the sound was related to the type of material and how tightly it was stretched across the bowl. You can also get them to demonstrate for you how they make sounds of different pitch and loudness with the same bowl setup. |
DiscussionsDiscussion prompts can include:
|
|
You could also collect the completed Predict and Observe reproducible. |
Consolidation: Exploring Sound Reflection (20 - 30 min.)
| Instructions | Teaching Tips |
|---|---|
|
As a class, discuss the connection between pitch/loudness and how sound travels through different materials. You could do this by showing students images of wavelengths as you talk about what happened at the centres. Below are explanations for your reference. Elastics: the tighter the elastic band or the thinner the elastic band, the higher the pitch. When the elastic is tighter, the waves can travel faster through the material, which results in shorter wavelengths. Drums: When the surface of a drum gets stretched, the same thing happens as with the elastics. 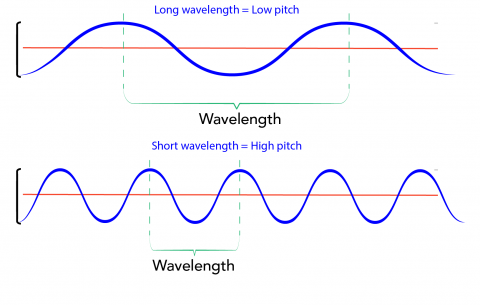
Image- Text VersionShown are colour diagrams of two waves, with different wavelengths. Straws: In an open ended tube, what is known as a standing wave is created. The longer the tube, the larger the standing wave. A larger standing wave has a longer frequency. 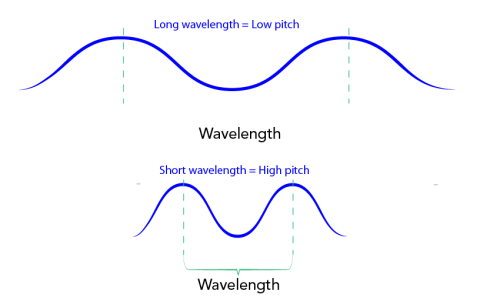
Image - Text VersionShown are colour diagrams of two waves, with different wavelengths, inside straws. Jars: When jars are tapped, they vibrate and produce sound. The faster they vibrate, the higher the pitch of the sound. When the jar is empty, it can vibrate easily, since it is only pushing against air. This allows the jar to make a high-pitched sound. As water gets added, it makes it harder for the jar to vibrate since it is pushing against both air and water. This causes the jar to make a sound with a lower pitch. |
DiscussionsDiscussion prompts can include:
|
|
Students could also independently complete this edpuzzle about sound by Peekaboo Kidz (3:54 min.). If you are unfamiliar with edpuzzles, check out the edpuzzle Getting Started page. |
Images and VideosEncourage students to pause and replay sections before answering the questions. Students can turn on the closed captioning so that they can see the text while listening to the dialogue. For students with visual impairments, pause to describe images in the video. LanguageStudents can use speech-to-text software to fill out the reflection. |
Background Information for Teachers
Sound is all around us!
Humans hear sound when our ears and brain process sound waves produced by an object. The object produces sound waves by vibrating.
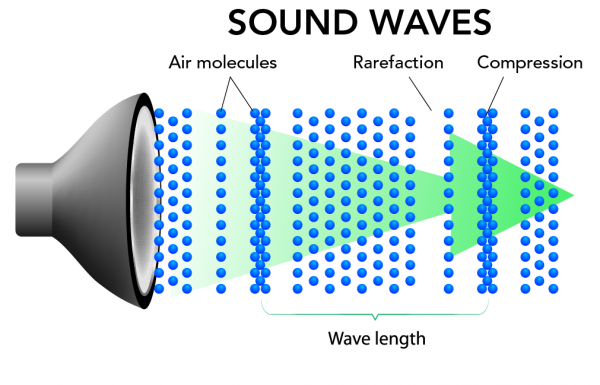
Image - Text Version
Shown is a colour diagram showing air molecules in front of a speaker.
The diagram is titled "Sound Waves" in black capital letters. Below, a black and grey conical speaker is on the left side of the diagram. Extending from it, across the diagram, is a large green arrow, overlaid with blue spheres. These spheres are labelled "Air molecules."
The spheres are arranged in a repeating pattern of vertical lines. Starting at the speaker, there are three evenly spaces lines. Then there is a gap the width of two lines. This is followed by a single line of spheres, followed by another gap. Next, three lines of spheres are layered on top of each other. This is followed by a gap and eight lines. Next is a gap, a single line, another gap and three layered lines. The pattern ends with three lines, as it began.
The gaps in the pattern are labelled "Rarefaction." The layered lines are labelled "Compression." Below, the distance between one compression and the next is marked with a green bracket labelled "Wavelength."
Wavelength is the distance between waves. This distance determines a sound’s frequency. The shorter the wavelength, the higher the frequency of the sound.
Frequency determines the pitch of a sound. High-pitched sounds have a high frequency. Low-pitched sounds have a low frequency.
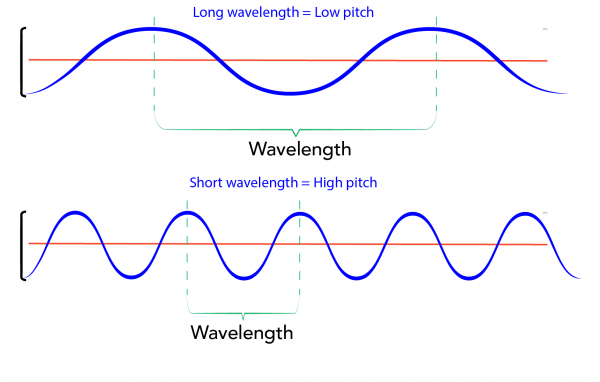
Image- Text Version
Shown are colour diagrams of two waves, with different wavelengths.
The top diagram shows a blue line curving above and below a straight, red, horizontal line. The blue line has two peaks and three valleys across the width of the illustration. The distance between the highest points of two consecutive peaks is marked by a green bracket. This is labelled "Wavelength," below. Another label, above, marks reads "Long wavelength = Low pitch."
The bottom diagram shows another blue line over a red one. This blue line has five peaks and six valleys across the width of the illustration. The distance between two consecutive peaks is also marked with a bracket here. The label above the bracket reads "Short wavelength = High pitch."
Amplitude determines the loudness of a sound. Amplitude refers to a sound wave’s size, or height.
Volume is directly related to amplitude. Volume refers to a sound wave’s intensity.
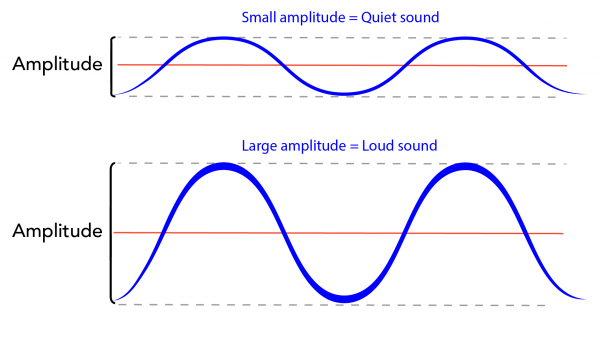
Image - Text Version
Shown are two colour diagrams of waves with different amplitudes.
The top diagram is labelled "Small amplitude = Quiet sound, "in blue letter. It shows a blue line curving above and below a straight, red, horizontal line. The blue line has two peaks and three valleys across the width of the illustration. There is a grey, dotted, horizontal line across the tops of the peaks and the bottoms of the valleys. These are equal distances above and below the central red line. The distance between the tops of the peaks and the bottoms of the valleys is marked with a bracket, on the left, labelled "Amplitude."
The bottom diagram is labelled "Large amplitude = Loud sound." It shows another blue line curving above and below a straight, red, horizontal line. The blue line has two peaks and three valleys across the width of the illustration. These peaks are much higher and these valleys are much lower than in the top diagram. The distance between the tops of the peaks and the bottoms of the valleys is marked with a bracket, on the left, labelled "Amplitude." This bracket is about twice the height of the one above.
Additional Resources
Reproducibles
- Exploring Sound Activity Cards reproducible [Google doc] [Word doc] [PDF]
- Predict and Observe reproducible [Google doc] [Word doc] [PDF]
Media
- Properties of Sound interactive presentation [html] [Google slides] [pptx] [PDF]
- Edpuzzle about sound by Peekaboo Kidz (online)
Books
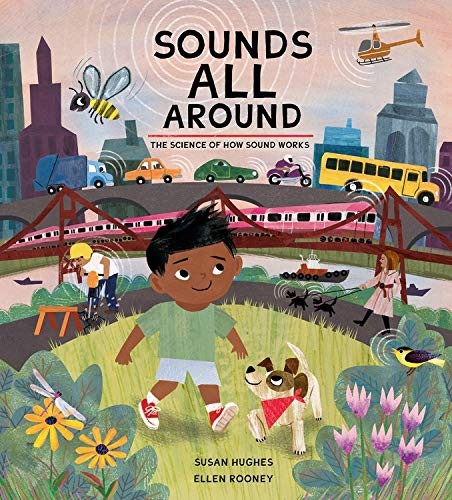
Sounds All Around: The Science of How Sounds Works
By Susan Hughes
A comprehensive exploration of sound for young children that's friendly, fun and easy to digest.
ISBN: 1525302507
Videos
How do instruments make music? | We The Curious (2014)
This video (2:24 min.), from We The Curious demonstrates how musical instruments make sound.
Sounds All Around (2020)
This video (8:03 min.), from Zest2Teach is a read aloud version of the book Sounds All Around from Susan Hughes.
Reproducibles and Media
Reproducibles
- Exploring Sound Activity Cards reproducible [Google doc] [Word doc] [PDF]
- Predict and Observe reproducible [Google doc] [Word doc] [PDF]
Media
- Properties of Sound interactive presentation [html] [Google slides] [pptx] [PDF]
- Edpuzzle about sound by Peekaboo Kidz (online)
Books
Sounds All Around: The Science of How Sounds Works
By Susan Hughes
A comprehensive exploration of sound for young children that's friendly, fun and easy to digest.
ISBN: 1525302507

Videos
How do instruments make music? | We The Curious (2014)
This video (2:24 min.), from We The Curious demonstrates how musical instruments make sound.
Sounds All Around (2020)
This video (8:03 min.), from Zest2Teach is a read aloud version of the book Sounds All Around from Susan Hughes.
Science
- Students can tape their straws together in order of length then blow through them like a pan flute. In this video you can see an example of a pan flute being made from drinking straws.
- Students could set up a series of identical glass jars and add different volumes of water to them to create a water xylophone.
- Have students relate the function of the musical bowls to their own ear drums.
- Students could learn about careers that involve sound in this lesson.
- Students can apply the learning from this lesson in the Design & Build a Musical Instrument lesson.
- Students can try another hands-on activity about how sound can travel along a string.
- Students could participate in the Light and Sound Inventions that Changed the World lesson.
- Students can learn how a stethoscope works and explore the history of the stethoscope by exploring an artifact from Ingenium. In the teaching suggestions you will also find SDL files for 3D printing your own stethoscope modelled on the artifact.
Literacy
- Have students explain to their peers in their own words why the activities yielded the results that they did.
- Students could write their own “Sounds All Around” style storybook.
Mathematical Thinking
- Relate lessons to volume and measurements
- Students measure straws in increments and note what happens with each change
- Students measure the volume of water in the jars and relate to the pitch.
Extensions
Science
- Students can tape their straws together in order of length then blow through them like a pan flute. In this video you can see an example of a pan flute being made from drinking straws.
- Students could set up a series of identical glass jars and add different volumes of water to them to create a water xylophone.
- Have students relate the function of the musical bowls to their own ear drums.
- Students could learn about careers that involve sound in this lesson.
- Students can apply the learning from this lesson in the Design & Build a Musical Instrument lesson.
- Students can try another hands-on activity about how sound can travel along a string.
- Students could participate in the Light and Sound Inventions that Changed the World lesson.
- Students can learn how a stethoscope works and explore the history of the stethoscope by exploring an artifact from Ingenium. In the teaching suggestions you will also find SDL files for 3D printing your own stethoscope modelled on the artifact.
Literacy
- Have students explain to their peers in their own words why the activities yielded the results that they did.
- Students could write their own “Sounds All Around” style storybook.
Mathematical Thinking
- Relate lessons to volume and measurements
- Students measure straws in increments and note what happens with each change
- Students measure the volume of water in the jars and relate to the pitch.
Can You Hear Sound In Space? (2018)
This video (2:40 min.) from Curious Thought explains what happens to sound in space.
Sound vs. Noise
Learn about the difference between sound and noise including how noise can affect your hearing?
Sound (2021)
This page explores the science of sound in detail, and includes practical examples.
Learn More
Can You Hear Sound In Space? (2018)
This video (2:40 min.) from Curious Thought explains what happens to sound in space.
Sound vs. Noise
Learn about the difference between sound and noise including how noise can affect your hearing?
Sound (2021)
This page explores the science of sound in detail, and includes practical examples.
Saini, H. (2019). What Is Sound, And How Do We Hear It? Let's Talk Science.
References
Saini, H. (2019). What Is Sound, And How Do We Hear It? Let's Talk Science.
Reproducibles
- Exploring Sound Activity Cards reproducible [Google doc] [Word doc] [PDF]
- Predict and Observe reproducible [Google doc] [Word doc] [PDF]
Media
- Properties of Sound interactive presentation [html] [Google slides] [pptx] [PDF]
- Edpuzzle about sound by Peekaboo Kidz (online)
Books
Sounds All Around: The Science of How Sounds Works
By Susan Hughes
A comprehensive exploration of sound for young children that's friendly, fun and easy to digest.
ISBN: 1525302507

Videos
How do instruments make music? | We The Curious (2014)
This video (2:24 min.), from We The Curious demonstrates how musical instruments make sound.
Sounds All Around (2020)
This video (8:03 min.), from Zest2Teach is a read aloud version of the book Sounds All Around from Susan Hughes.
Reproducibles and Media
Reproducibles
- Exploring Sound Activity Cards reproducible [Google doc] [Word doc] [PDF]
- Predict and Observe reproducible [Google doc] [Word doc] [PDF]
Media
- Properties of Sound interactive presentation [html] [Google slides] [pptx] [PDF]
- Edpuzzle about sound by Peekaboo Kidz (online)
Books
Sounds All Around: The Science of How Sounds Works
By Susan Hughes
A comprehensive exploration of sound for young children that's friendly, fun and easy to digest.
ISBN: 1525302507

Videos
How do instruments make music? | We The Curious (2014)
This video (2:24 min.), from We The Curious demonstrates how musical instruments make sound.
Sounds All Around (2020)
This video (8:03 min.), from Zest2Teach is a read aloud version of the book Sounds All Around from Susan Hughes.
Science
- Students can tape their straws together in order of length then blow through them like a pan flute. In this video you can see an example of a pan flute being made from drinking straws.
- Students could set up a series of identical glass jars and add different volumes of water to them to create a water xylophone.
- Have students relate the function of the musical bowls to their own ear drums.
- Students could learn about careers that involve sound in this lesson.
- Students can apply the learning from this lesson in the Design & Build a Musical Instrument lesson.
- Students can try another hands-on activity about how sound can travel along a string.
- Students could participate in the Light and Sound Inventions that Changed the World lesson.
- Students can learn how a stethoscope works and explore the history of the stethoscope by exploring an artifact from Ingenium. In the teaching suggestions you will also find SDL files for 3D printing your own stethoscope modelled on the artifact.
Literacy
- Have students explain to their peers in their own words why the activities yielded the results that they did.
- Students could write their own “Sounds All Around” style storybook.
Mathematical Thinking
- Relate lessons to volume and measurements
- Students measure straws in increments and note what happens with each change
- Students measure the volume of water in the jars and relate to the pitch.
Extensions
Science
- Students can tape their straws together in order of length then blow through them like a pan flute. In this video you can see an example of a pan flute being made from drinking straws.
- Students could set up a series of identical glass jars and add different volumes of water to them to create a water xylophone.
- Have students relate the function of the musical bowls to their own ear drums.
- Students could learn about careers that involve sound in this lesson.
- Students can apply the learning from this lesson in the Design & Build a Musical Instrument lesson.
- Students can try another hands-on activity about how sound can travel along a string.
- Students could participate in the Light and Sound Inventions that Changed the World lesson.
- Students can learn how a stethoscope works and explore the history of the stethoscope by exploring an artifact from Ingenium. In the teaching suggestions you will also find SDL files for 3D printing your own stethoscope modelled on the artifact.
Literacy
- Have students explain to their peers in their own words why the activities yielded the results that they did.
- Students could write their own “Sounds All Around” style storybook.
Mathematical Thinking
- Relate lessons to volume and measurements
- Students measure straws in increments and note what happens with each change
- Students measure the volume of water in the jars and relate to the pitch.
Can You Hear Sound In Space? (2018)
This video (2:40 min.) from Curious Thought explains what happens to sound in space.
Sound vs. Noise
Learn about the difference between sound and noise including how noise can affect your hearing?
Sound (2021)
This page explores the science of sound in detail, and includes practical examples.
Learn More
Can You Hear Sound In Space? (2018)
This video (2:40 min.) from Curious Thought explains what happens to sound in space.
Sound vs. Noise
Learn about the difference between sound and noise including how noise can affect your hearing?
Sound (2021)
This page explores the science of sound in detail, and includes practical examples.
Saini, H. (2019). What Is Sound, And How Do We Hear It? Let's Talk Science.
References
Saini, H. (2019). What Is Sound, And How Do We Hear It? Let's Talk Science.