
Recycling Yarn Part 2: Spinning
Duration
30 minutes
What You Need
For the hook:
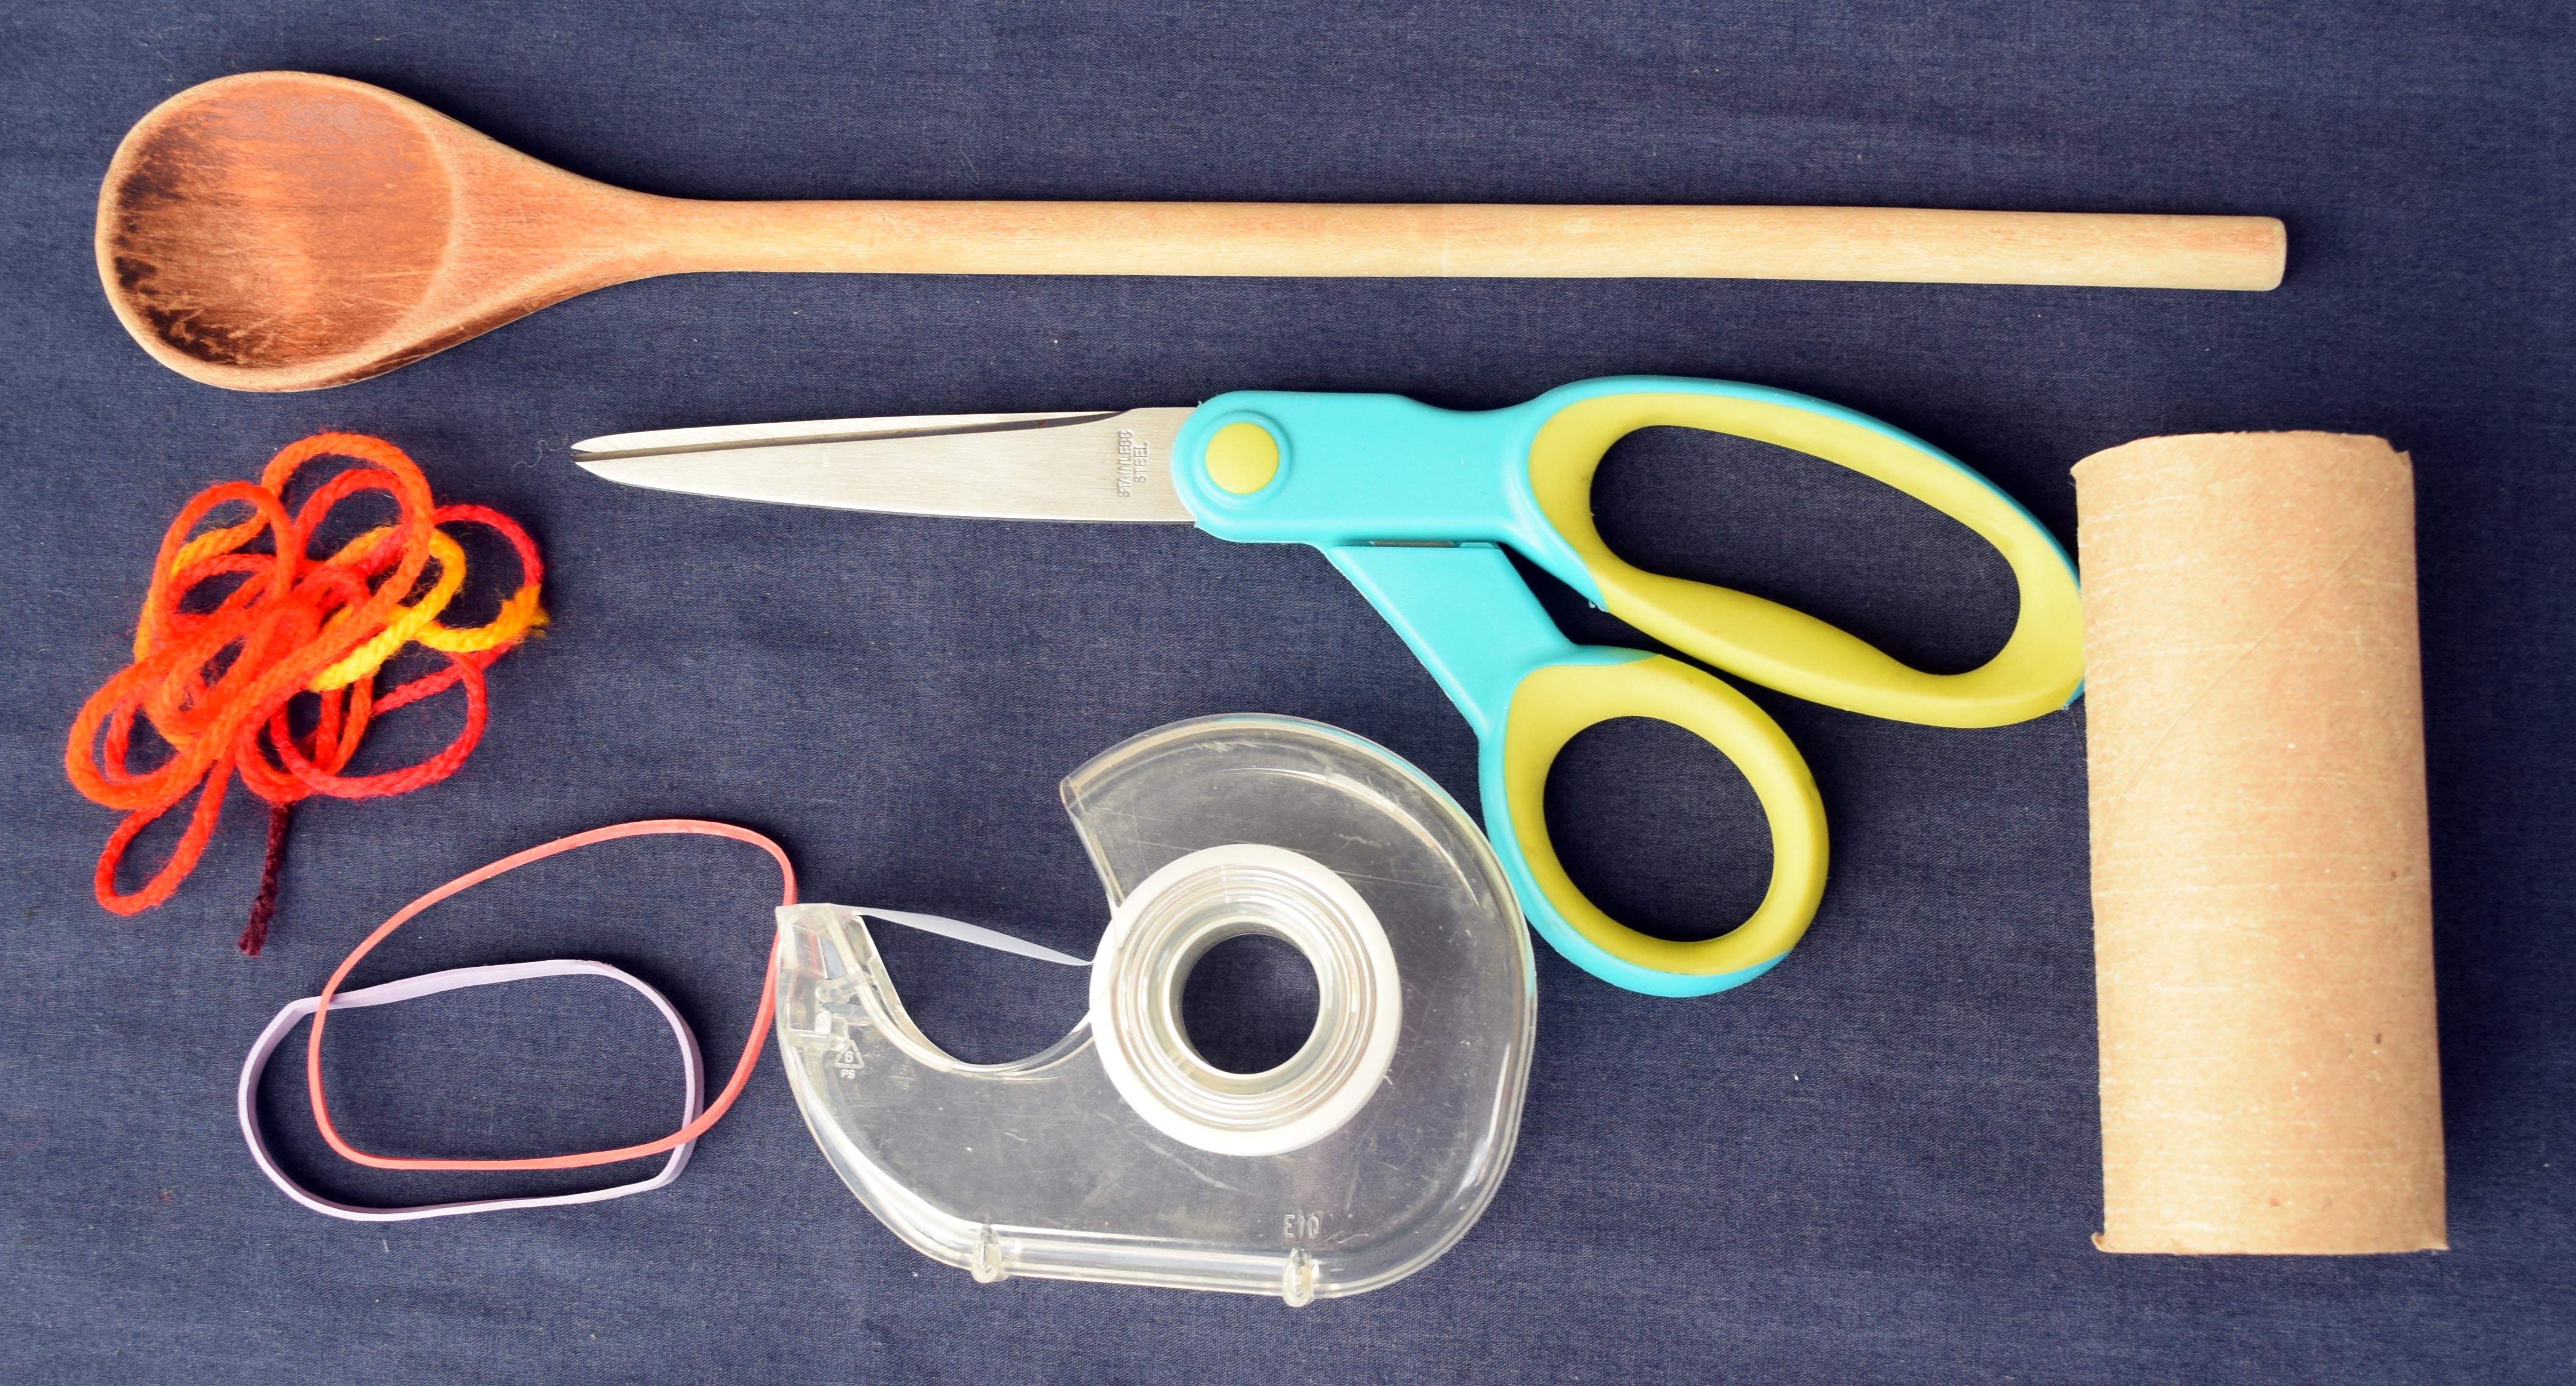
- 1 small paperclip
Got another paperclip? Check out this video for how to turn a paperclip into a spinning top!
One of the following for the shaft:
- Round (not flat) chopstick
- Unsharpened pencil
- Rigid plastic drinking straw from a reusable cold drink cup
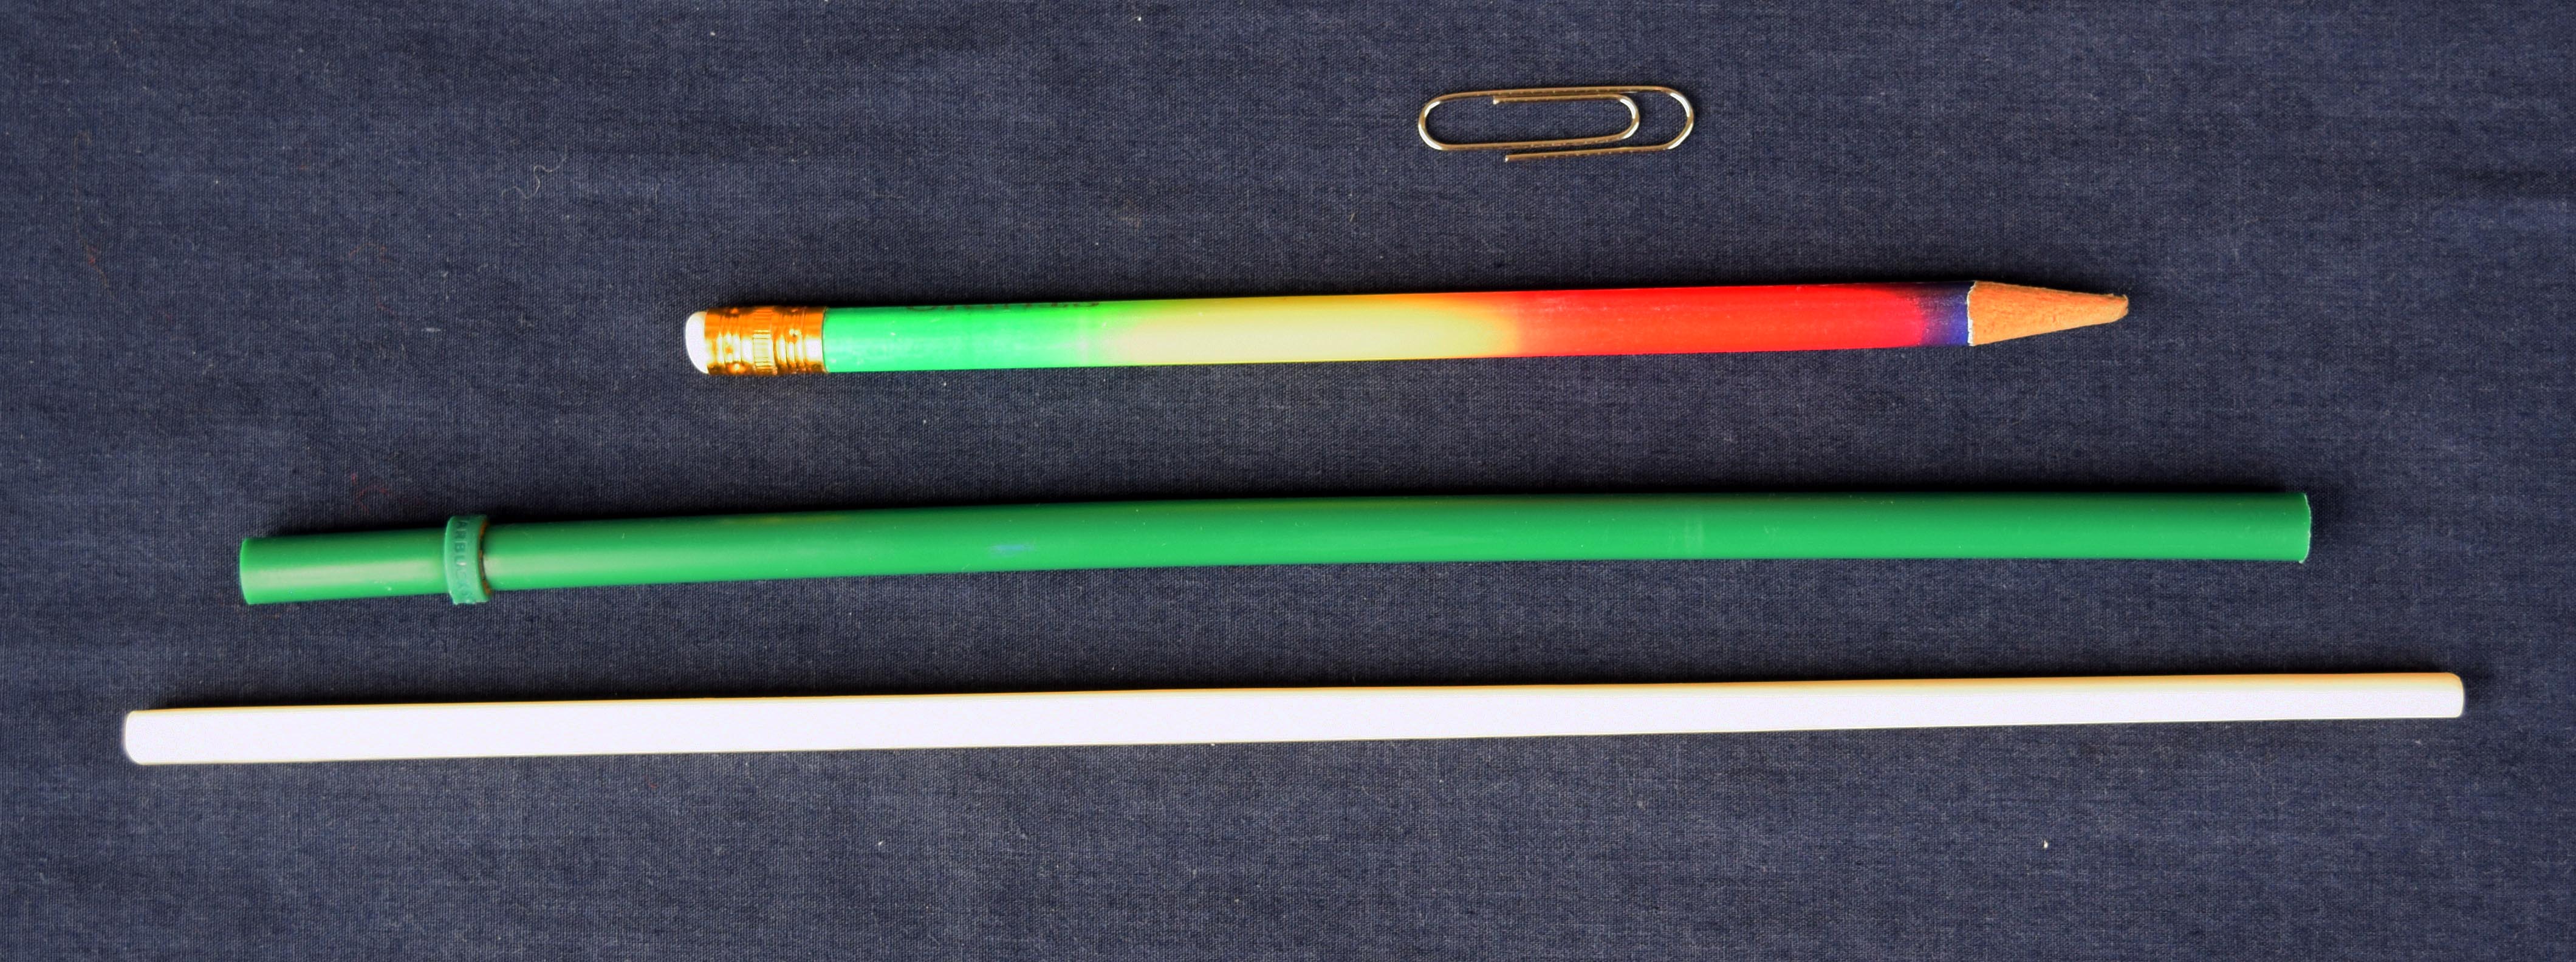
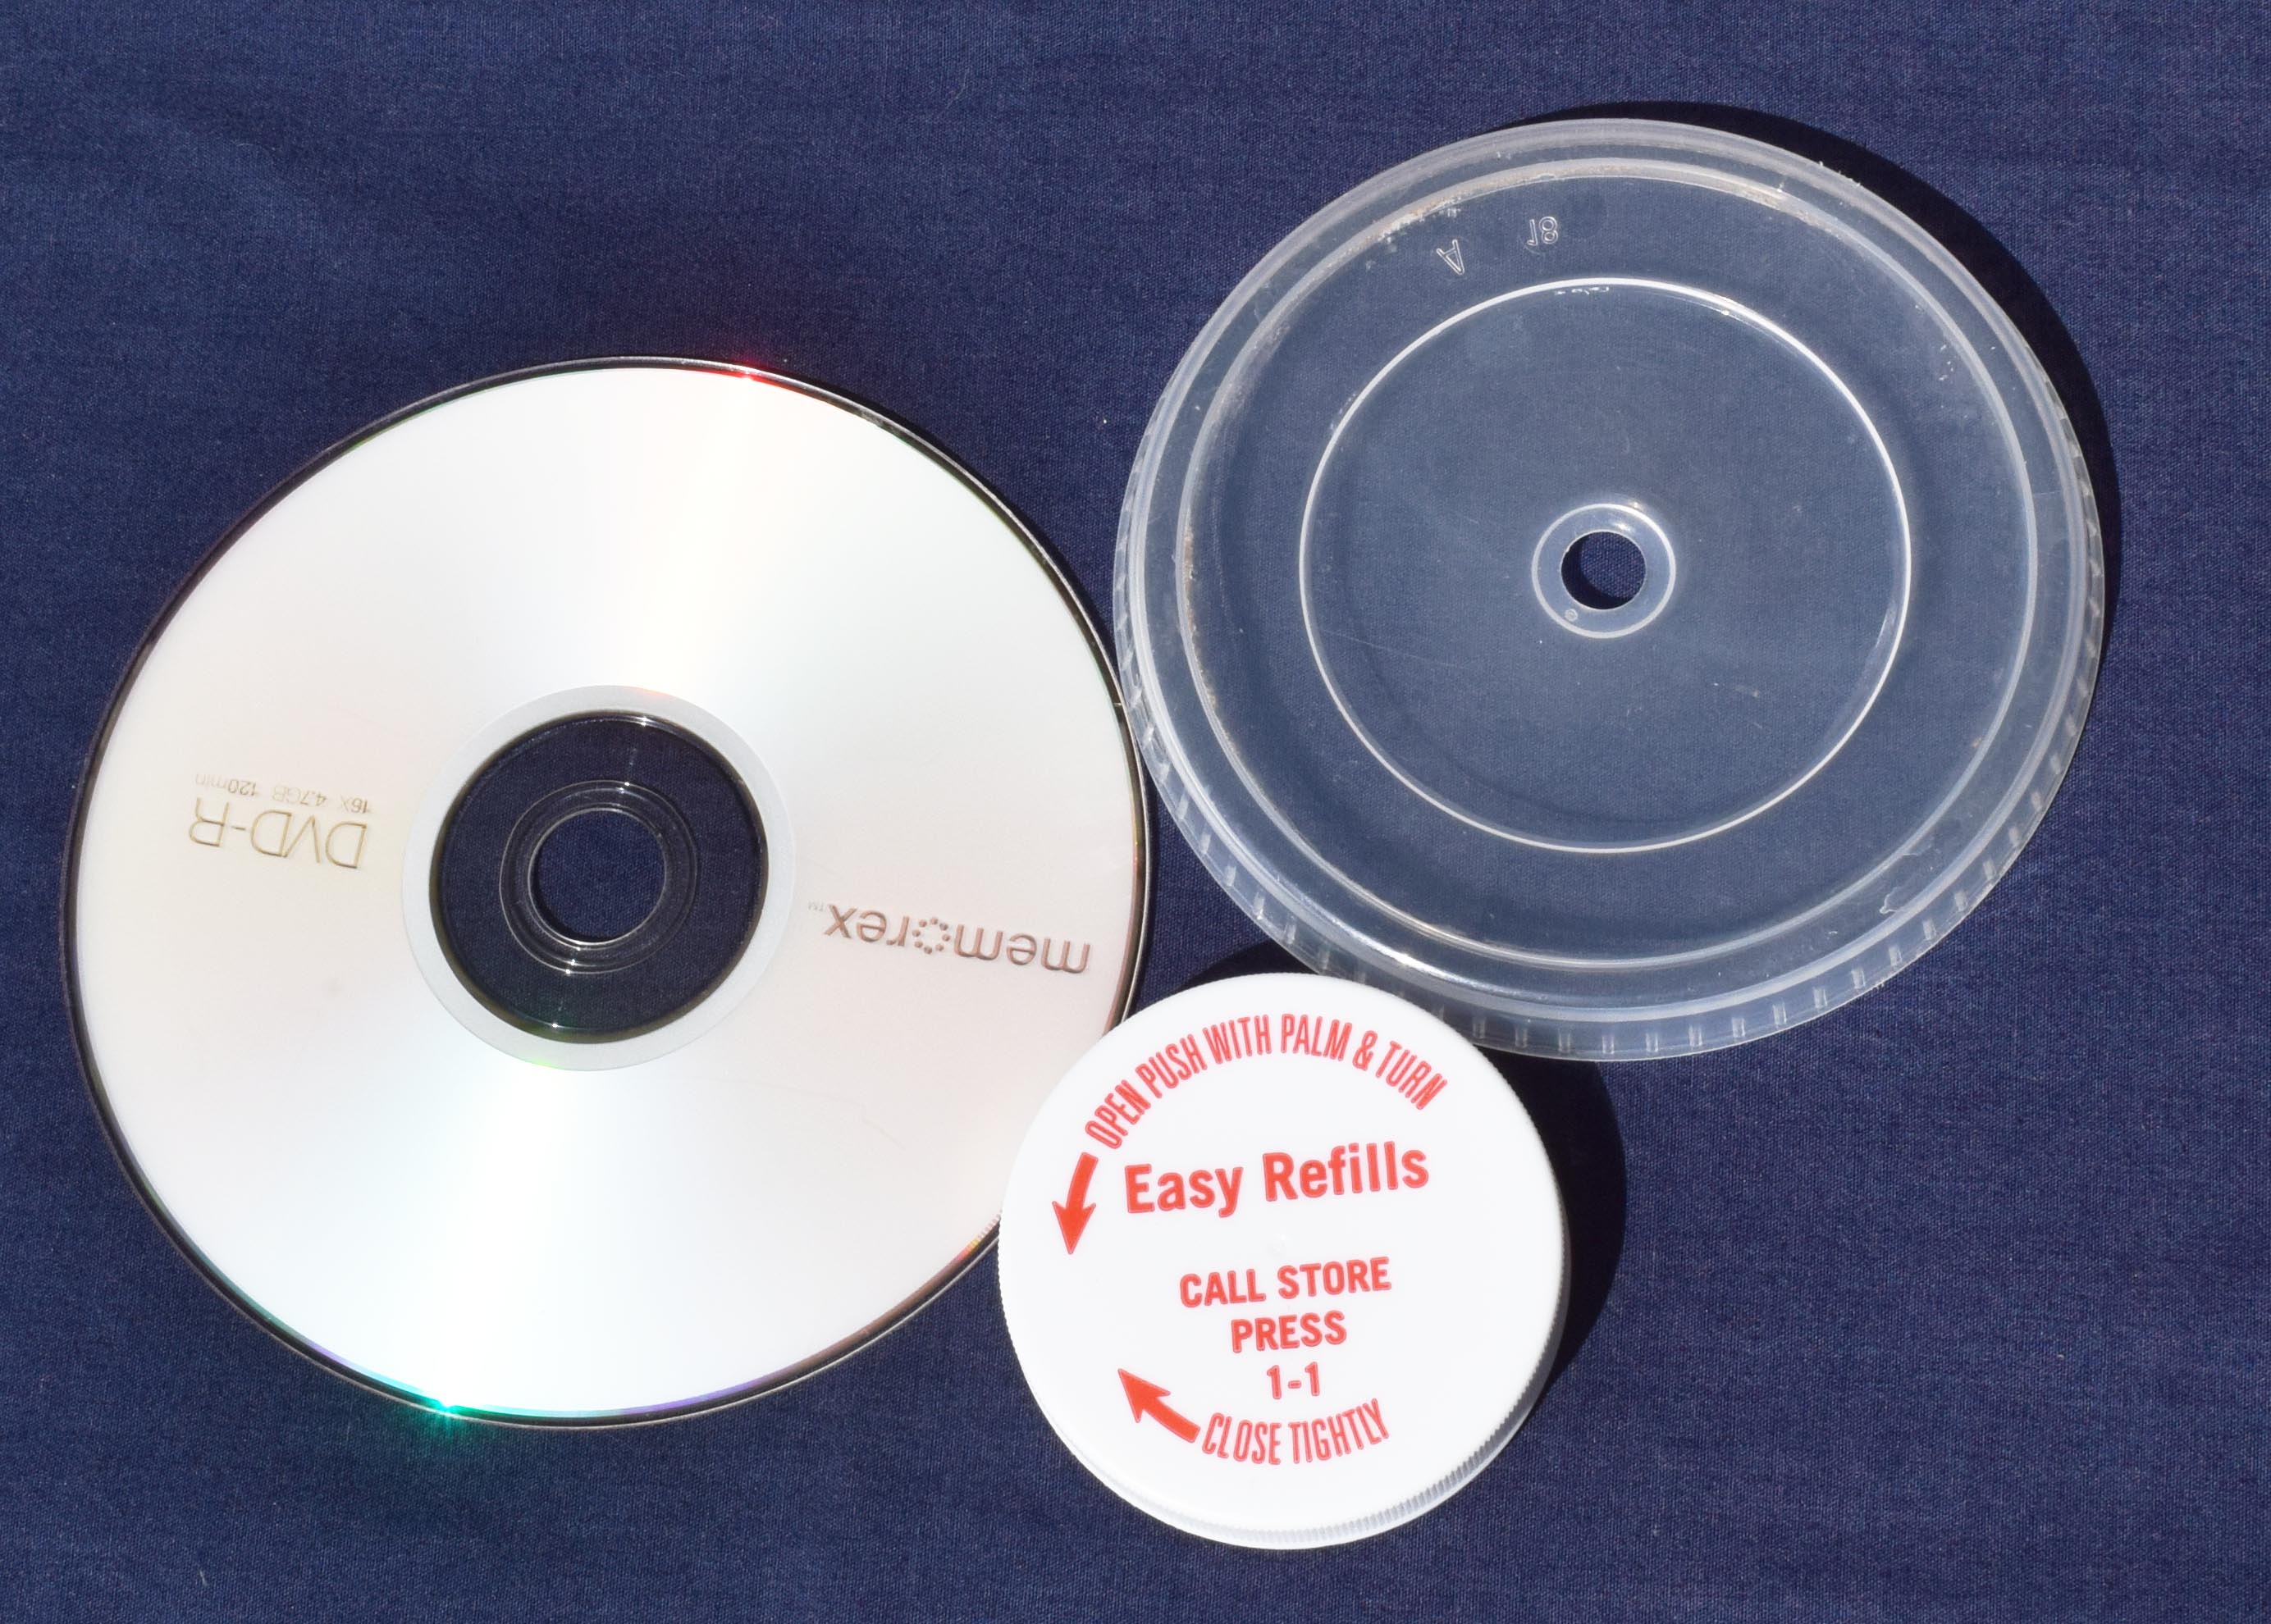
One of the following for the whorl:
- Old CD
- Medicine bottle lid
- Lid with hole for straw from reusable cold drink cup
- Another type of whorl you make yourself (e.g., made from clay, 3D printed, etc.)
- 2 elastic bands
- Piece of yarn - approximately 80 cm
- Pair of strong scissors
- Tape
- Hammer, large nail and safety glasses (optional)
- Wooden spoon or other short cylindrical object like a marker or paper towel roll
See the Recycling Fibres for Spinning hands-on activity to prepare your own recycled yarn for spinning.
Making the Drop Spindle
-
 (©2021 Let’s Talk Science)
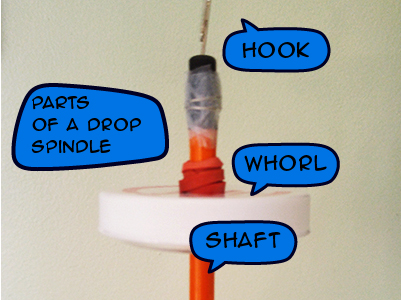
Parts of a drop spindle
There are three main parts to a drop spindle: the hook, the whorl and the shaft. You will need to decide what you are going to use for each.
In this example we have used a paperclip for the hook, a lid from a medicine bottle for the whorl and a pencil for the shaft.
-
 (©2021 Let’s Talk Science)
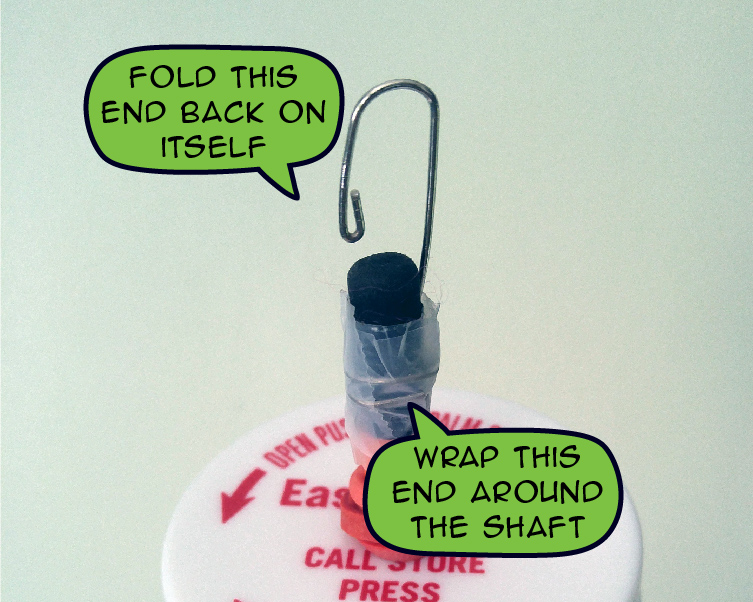
Step 1: Bend the paperclip
Carefully bend the paperclip open. Fold back one of the ends on itself. You may need help from an adult to do this.
Carefully bend the other end of the paperclip around the top part of the shaft and tape in place.
-
 (©2021 Let’s Talk Science)
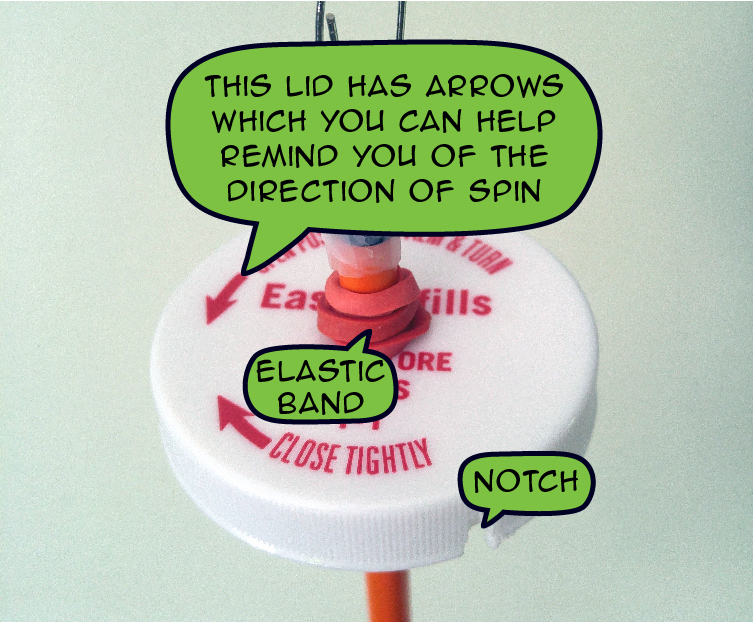
Step 2: Make the whorl
The whorl should be a round, flat object that has a hole in the middle. Ideally your whorl has some mass to it so that it helps the spindle spin, which is its job!
If using a lid or something similar that does not already have a hole, you will need to punch a hole in the middle. You can do this using the hammer and nail. The hole must be big enough for the shaft to fit into, but not too big. It should be a snug fit.
Also, if you can, cut two small notches in the whorl opposite from each other. These will be useful when you start spinning fibres.
-
 (©2021 Let’s Talk Science)
Safety First
Always wear safety goggles when using a hammer.
-
 (©2021 Let’s Talk Science)
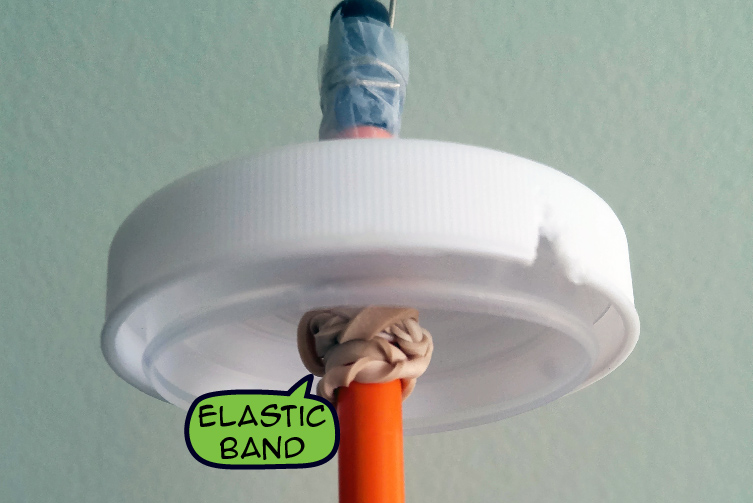
Step 3: Add elastic bands
Wrap one elastic band around the end of the shaft by the hook. Push it down so that it rests tightly against the whorl. Do the same thing on the other end of the shaft.
-
 (©2021 Let’s Talk Science)
Did You Know?
The type of drop spindle you made is called a top or high whorl because the whorl is near the top of the shaft.
-
 (©2021 Let’s Talk Science)
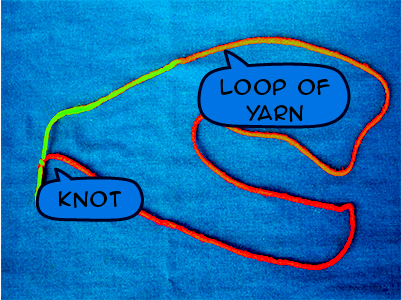
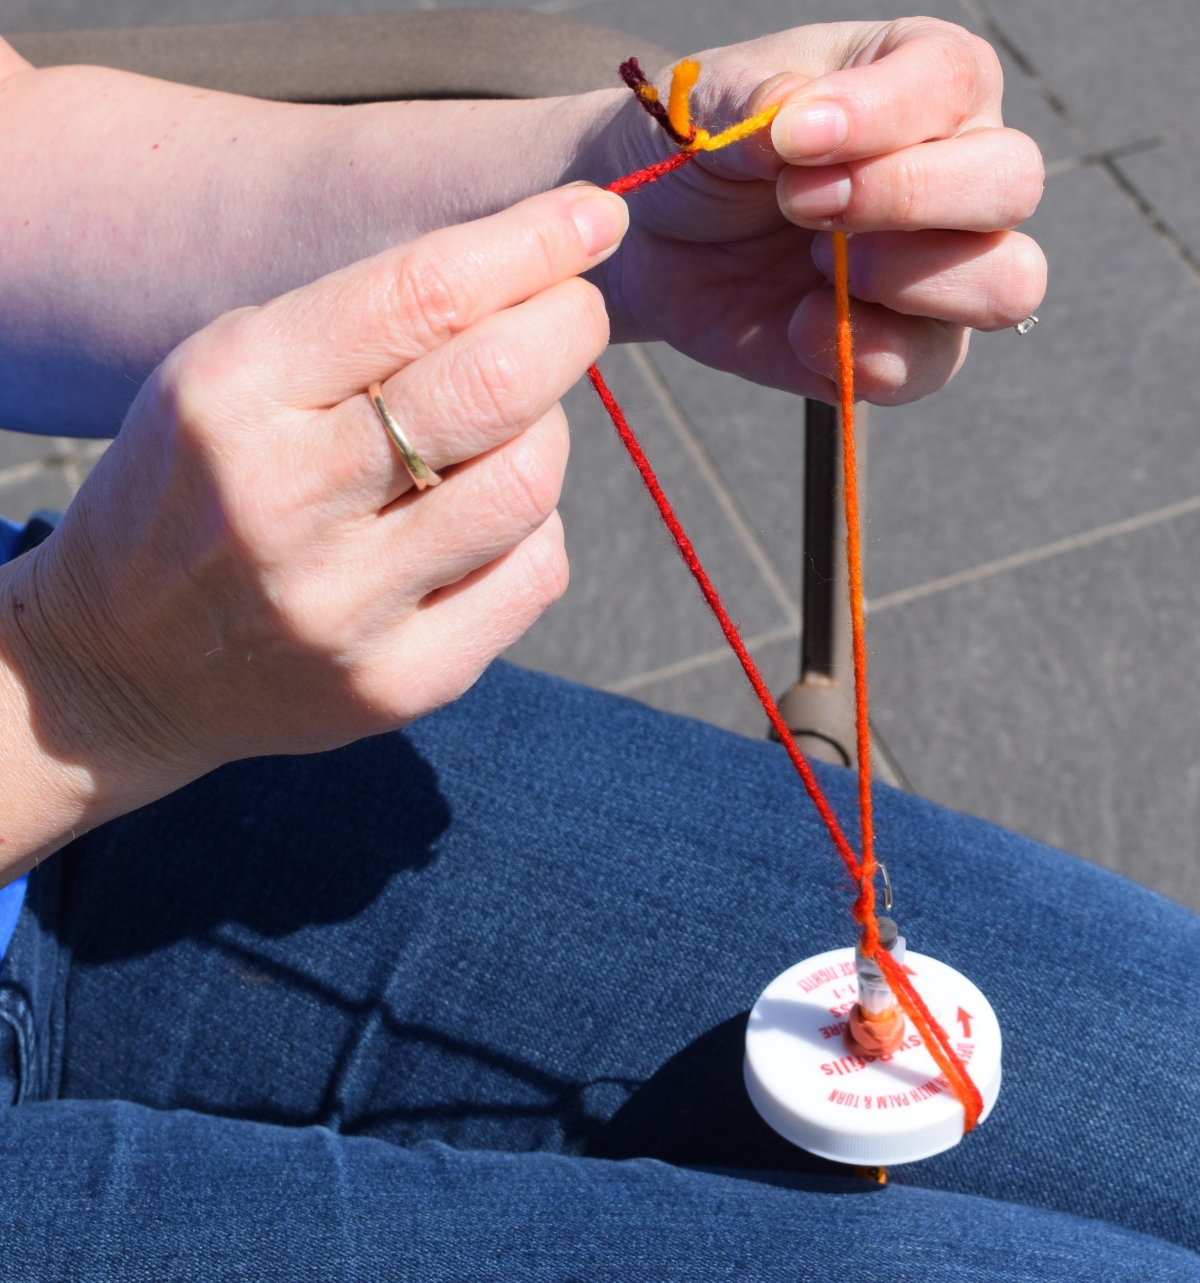
Step 4: Make the leader
Take the piece of yarn and tie the ends together so that it forms a long loop. This yarn is called the leader.
-
 (©2021 Let’s Talk Science)
Step 5: Attach the leader
Wrap the loop around the shaft and pull one end of the loop through the other.
Pull the loop so that the yarn is snug on the shaft.
Hold the yarn onto the shaft with one hand and wind about half of the yarn around the shaft with your other hand.
-
 (©2021 Let’s Talk Science)
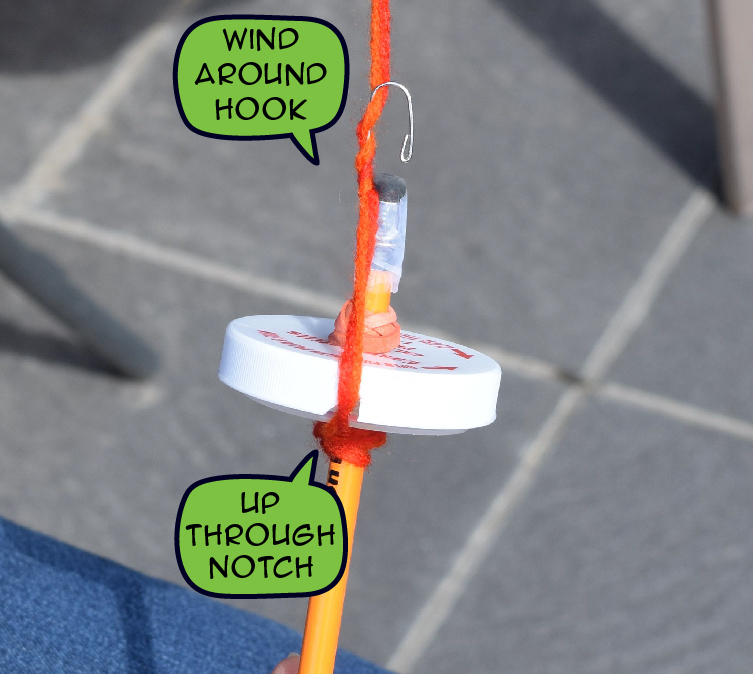
Step 6: Wrap the leader on the spindle
Pull the free end of the loop upwards and through a notch (if you have one).
Wrap the yarn around the hook three times. You are now ready to spin!
Spinning
-
 (©2021 Let’s Talk Science)
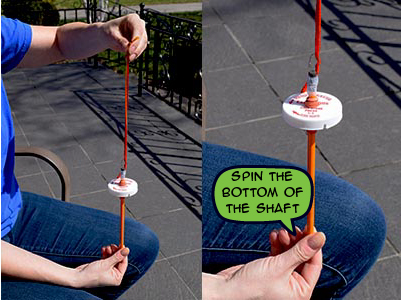
Step 1: Practice spinning the spindle
Once the leader is on, practice spinning the spindle. Hold the end of the leader string in one hand and spin the spindle with your other hand, like a top.
If you are right-handed, try holding the yarn with your left hand and spinning the spindle with your right. Try both ways to see what feels comfortable to you.
Practice spinning the spindle until you can get it to spin smoothly. When the yarn gets too twisted, let it spin the other way.
-
 (©2021 Let’s Talk Science)
Did you know?
Most yarns are spun clockwise (to the right).
-
 (©2021 Let’s Talk Science)
Step 2: Drafting the Yarn
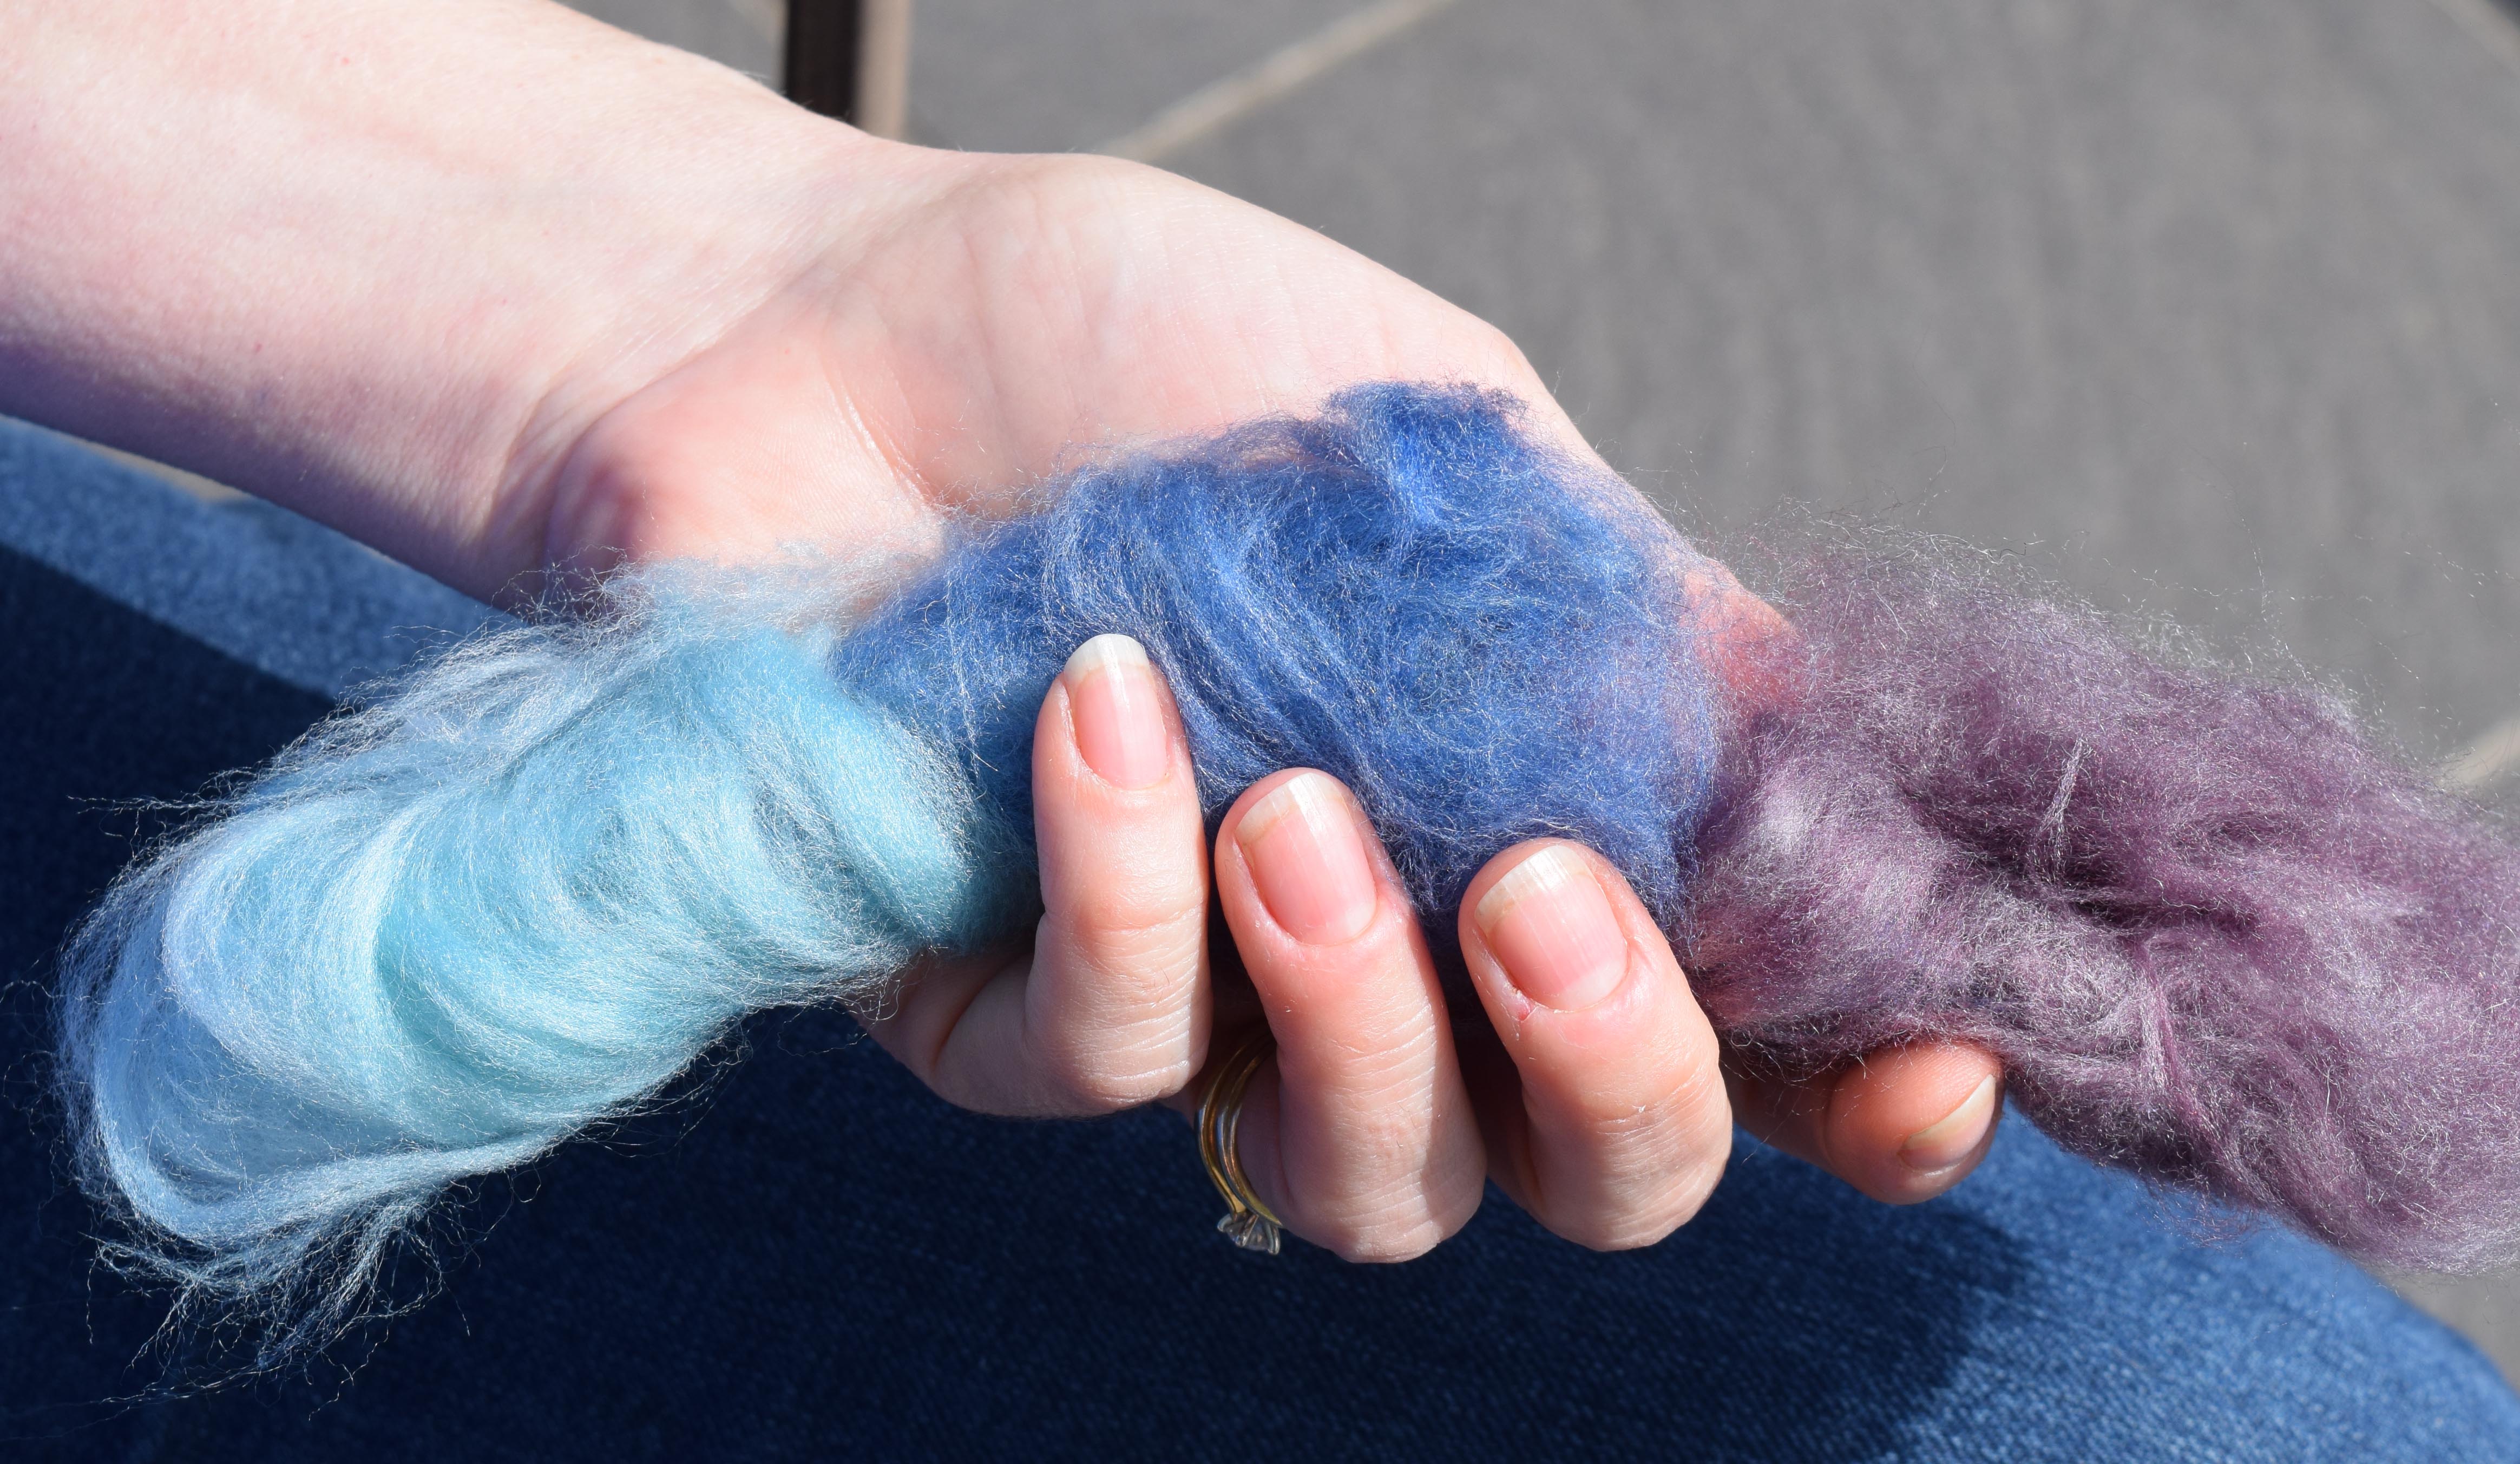
Next, practice drafting the fibres. Drafting (or drawing) is the process of pulling fibres apart before they are spun.
Take a handful of fibres in your opposite hand. Gently pull some fibres away from the rest with your dominant hand. Pinch your thumb and first finger to hold the rest of the fibres while pulling.
-
(©2021 Let’s Talk Science)
Tips for Drafting
You want to pull out a little bit at a time so that the fibres you are pulling stay connected to the mass. If you pull too hard, it will pull apart. Before this happens, stop and move your dominant hand up to your opposite hand and pinch the fibres. Now hold your dominant hand still and pull your opposite hand back.
Practice pulling the fibres and moving your hands.
-
(©2021 Let’s Talk Science)
Did you know?
You determine the size of the yarn by how much fibre you draft. If you draft a lot of fibre, the yarn will be thick. If you draft a little bit of fibre, the yarn will be thin.
-
 (©2021 Let’s Talk Science)
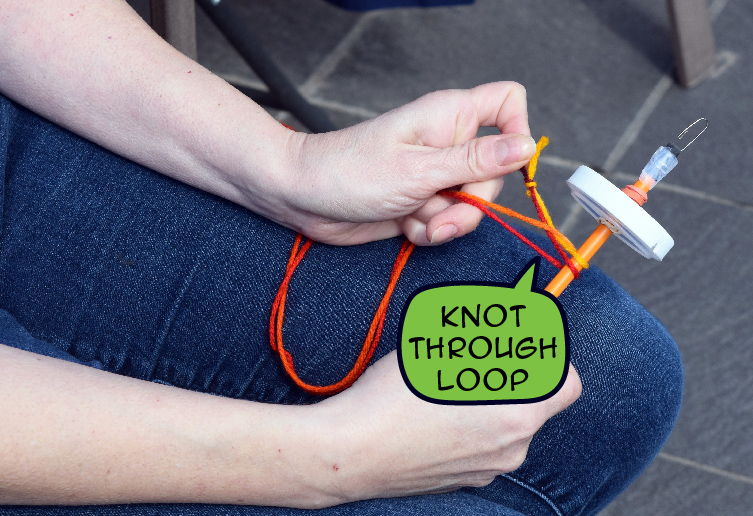
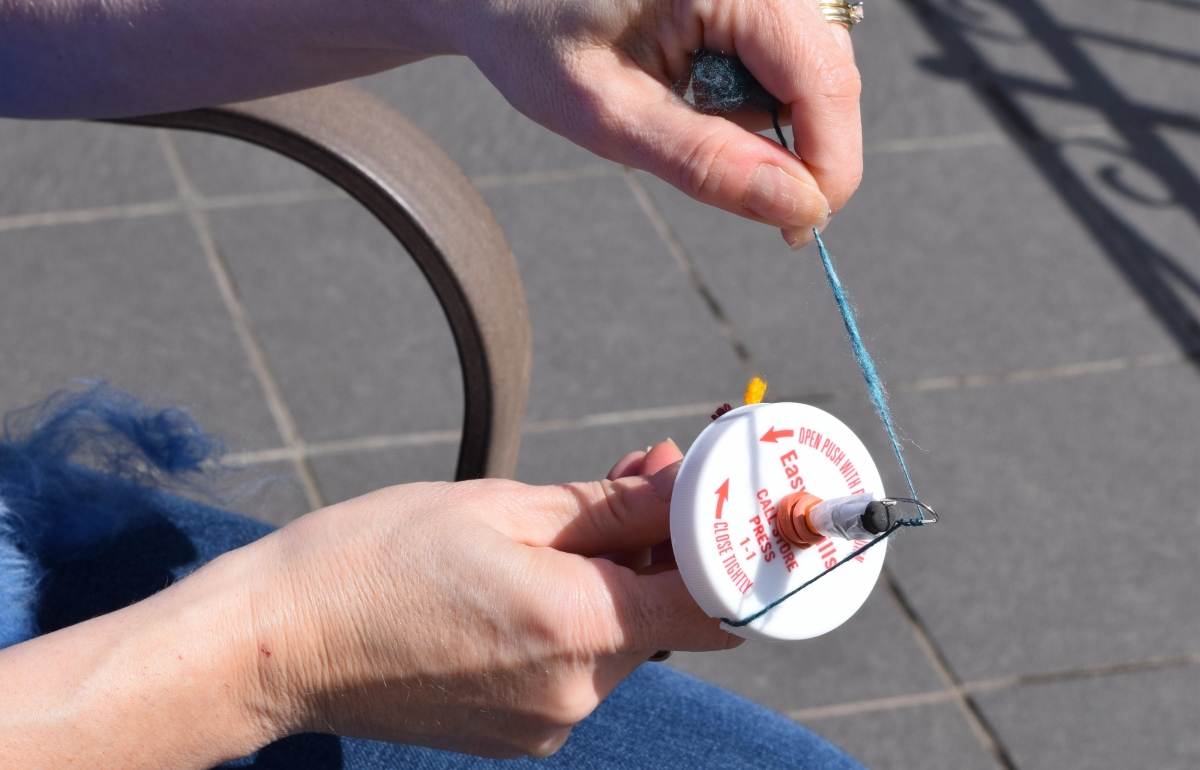
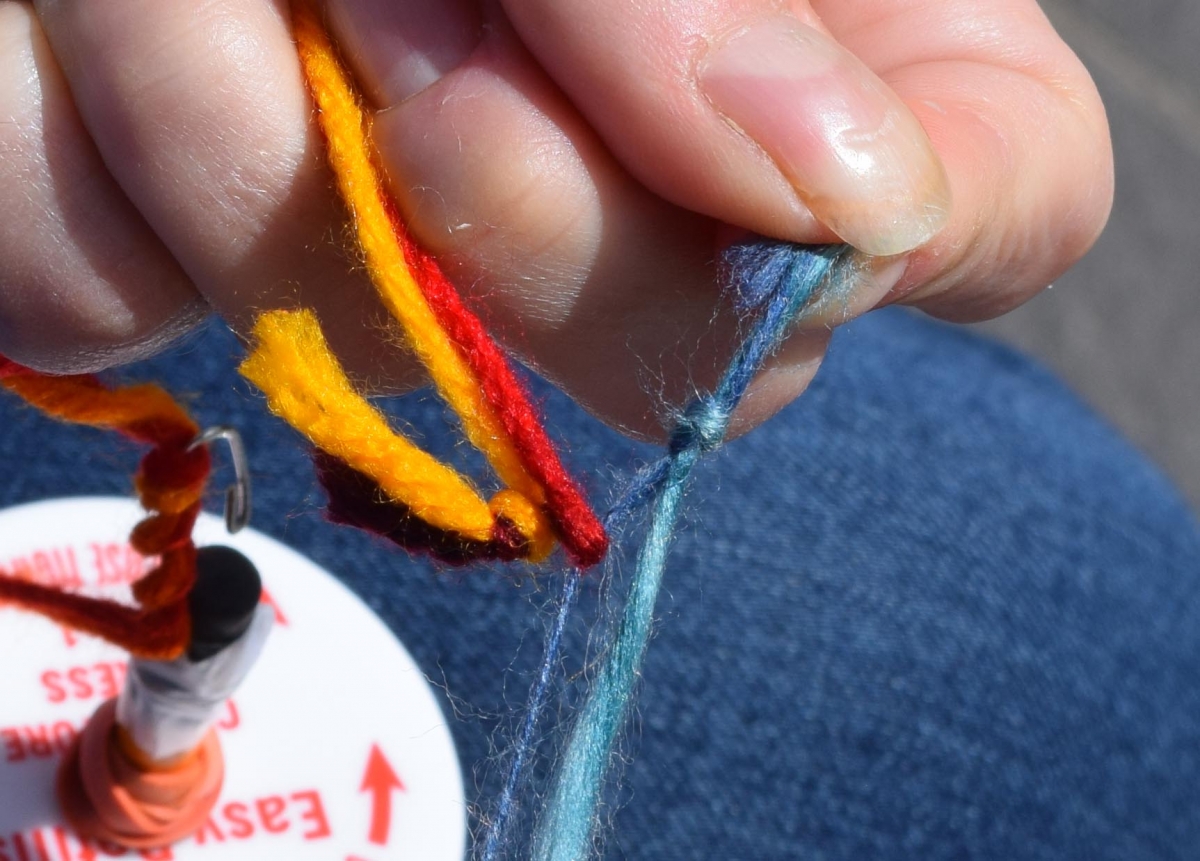
Step 3: Open up the leader
When you are comfortable with this, it is time to add the spin to the fibres. Adding spin to the fibres is what makes them yarn!
You will want to be sitting down for this part.
Hold the spindle between your knees and open up the end of the leader yarn.
-
 (©2021 Let’s Talk Science)
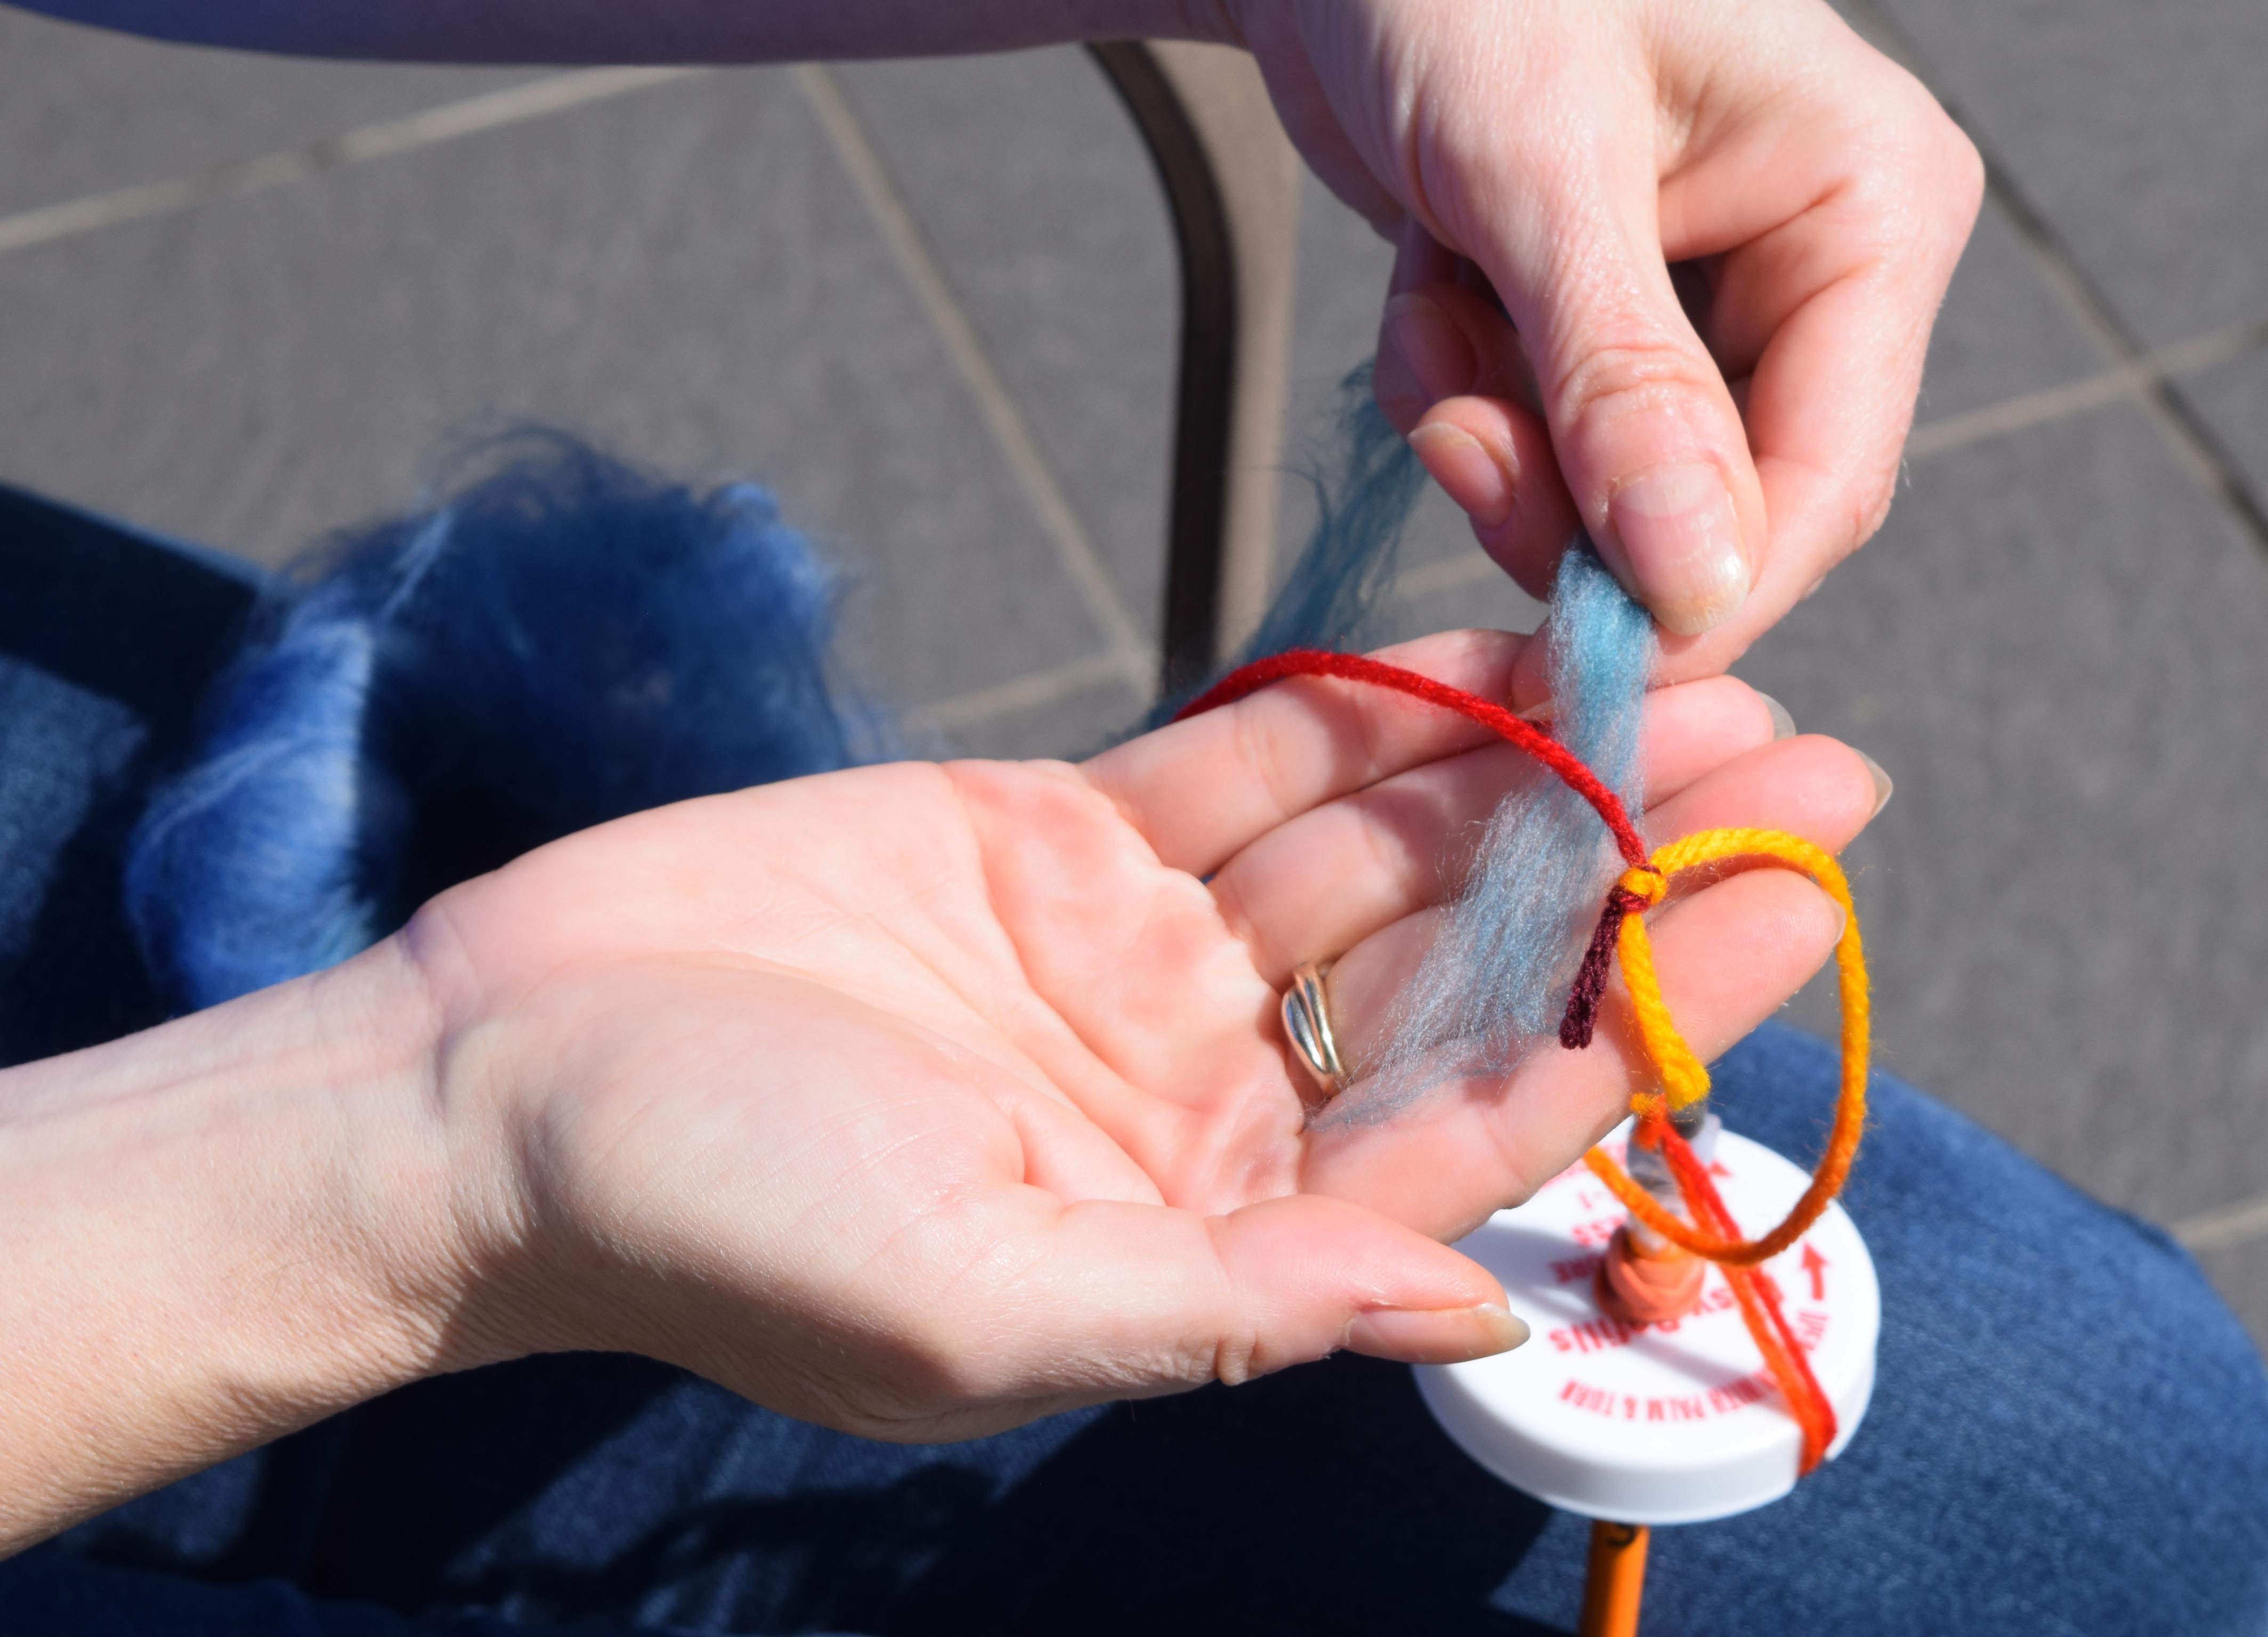
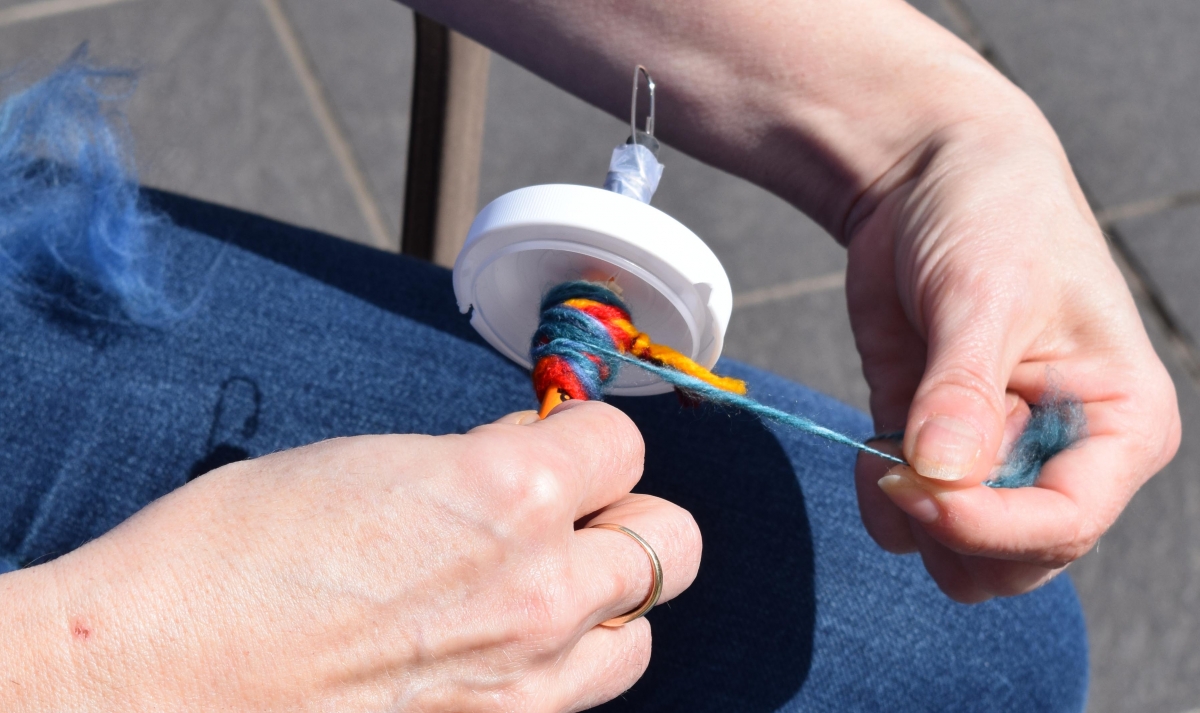
Step 4: Thread fibre through the loop
Draw out a bit of fibre and thread it through the loop of the leader yarn.
-
 (©2021 Let’s Talk Science)
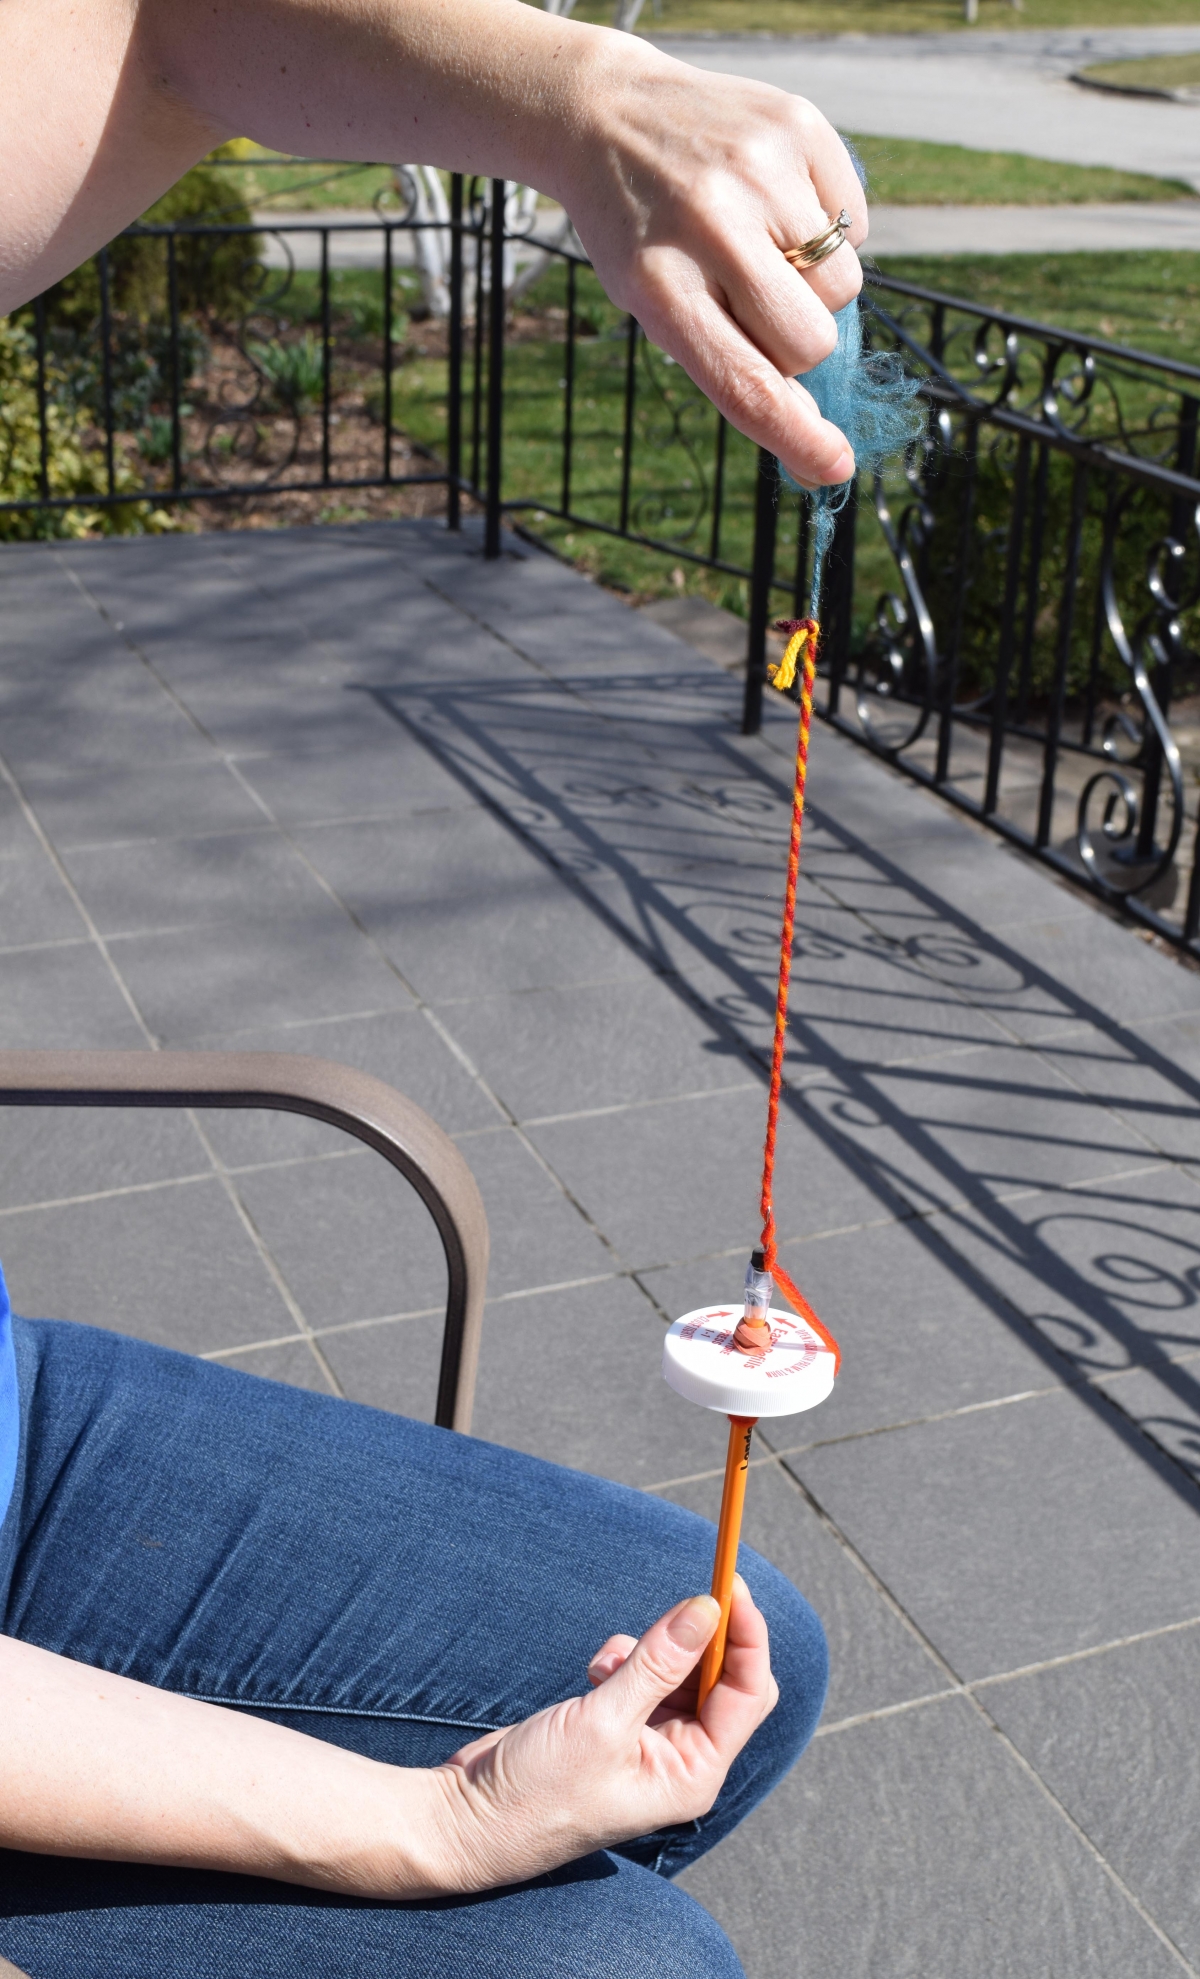
Step 5: Spinning and Parking
Pinch the fibres just above the leader and give the spindle a bit of spin.
When the fibres have begun to twist together, stop the spindle and place it back between your knees. You have just made a join. Stopping the spindle like this is also known as parking the spindle.
-
(©2021 Let’s Talk Science)
Spinning Dos and Don’ts
DO
- Keep the yarn taut between your hand and the spindle or else it will want to twist onto itself.
- Always spin the fibres in the same direction. Draw an arrow on the whorl if you need a reminder.
- Keep the fibres in your hand from getting twisted. If the twist moves into the fibre ball, it can make it harder to draft the fibre. Remove any twist you see before drafting the next section.
DON’T
- Do not have too much fibre in your hand at once, it can get tangled, which can make it hard to draft.
- Do not let your fibre near your freshly spun yarn as- it can pull it right on!
-
 (©2021 Let’s Talk Science)
Step 6: Continue spinning
Continue to spin, park and draft until the yarn becomes so long that it is hard to work with or you run out of fibre.
If you run out of fibre and want to add more, draft a piece of new fibre and hold it beside the end of the old fibre. When you let go, make sure that they twist together.
Winding
-
 (©2021 Let’s Talk Science)
Step 1: Unwind the leader
At this point, it’s time to wind the yarn onto the spindle.
While keeping the yarn taut, unwind the yarn and leader string from the hook.
-
 (©2021 Let’s Talk Science)
Step 2: Wind onto spindle
Keeping the yarn taut, wind it on the spindle just below the whorl.
The neater you wind the yarn, the easier it will be to remove from the spindle at the end.
-
 (SteveLuker via iStockphoto)
Step 3: Forming a Centre-pull ball
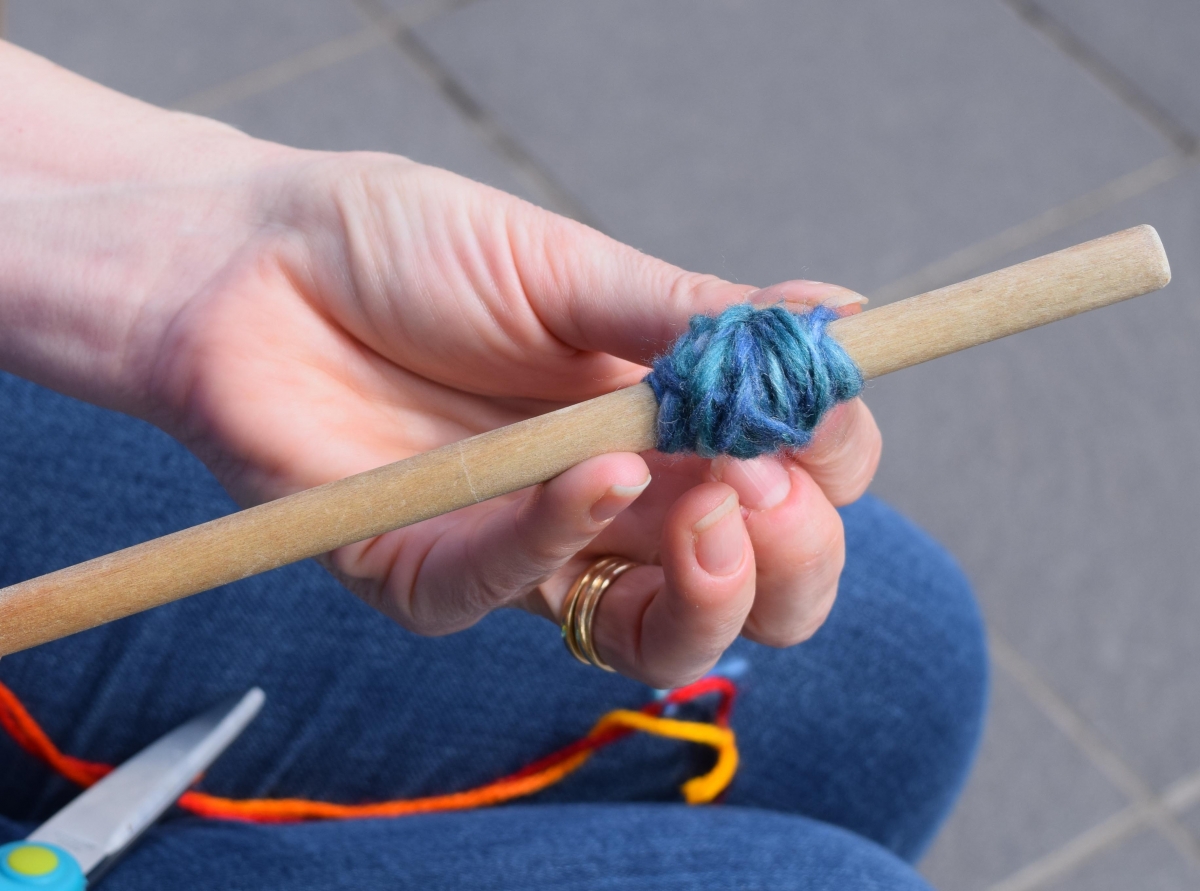
Once you are finished spinning, you will need to take the yarn off the spindle and wind it into a centre-pull ball.
For this you will need a wooden spoon or something else short and cylindrical, like a marker. A paper towel tube would also work.
This object is going to act as a nostepinne. A nostepinne is a tool that helps us to wind a tidy ball of yarn like the ones that you see here.
-
(©2021 Let’s Talk Science)
Did You Know?
Nostepinne is a Scandinavian word that means “nest-stick”. Can you see why?
-
(©2021 Let’s Talk Science)
Using a nostepinne
Tie one end of your yarn to one end of your “nostepinne.”
Follow the directions in this video to wind the yarn off of your spindle and onto your nostepinne. You will then be ready for the final step, which is plying.
Plying
-
 (Paperkites via iStockphoto)
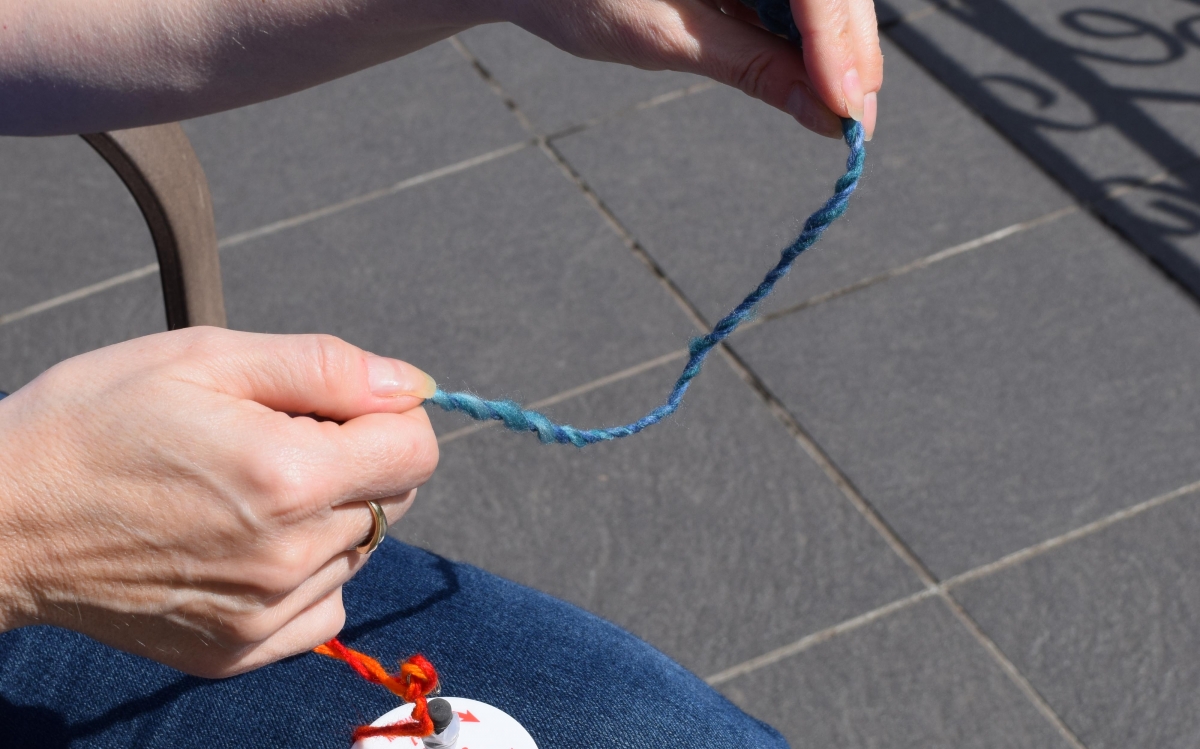
What is "plying"?
If you were to pull apart the yarn in this photo, you would see that it is made of two strands. These strands are the ply of the yarn.
-
 (©2021 Let’s Talk Science)
Question
Now that you have made a single ply of yarn, why do you think most yarns are two-ply?
-
 (©2021 Let’s Talk Science)
Step 1: Tie ends together
Find both ends of the single-ply yarn you made.
Tie the two ends onto the leader yarn of your spinner.
-
 (©2021 Let’s Talk Science)
Step 2: Spin in the opposite direction
This time you are going to spin the spindle in the OPPOSITE DIRECTION. This will spin the two strands together. Lucky for us, they want to do this anyway.
This is because there is a lot of energy stored in the twist of each strand. Once they are in contact with each other, they use this energy to spin themselves together.
To see if the yarn now has no more twist, hold a section out with some slack. If it still has a twist, you will see it trying to twist onto itself. Unwind a bit in the opposite direction and check again.
-
 (micheldenijs via iStockphoto)
All done!
Once it is good, you can wind it onto the spindle as you did before.
When you are finished plying the yarn, wind onto your nostepinne.
You now have some usable yarn for your craft projects!
Learn More
There is a lot of physics involved in getting a drop spindle to spin well. Much of it has to do with the mass and shape of the spindle. We make the spindle spin by applying a force to the shaft. Rotational inertia, also called the moment of inertia, is what keeps it spinning. This is explained by Newton’s First Law. An object moving in a straight line at the same speed will continue until an outside force acts upon it. Likewise, a rotating object will continue to rotate exactly the same way until acted upon.
The moment of inertia is mainly determined by the mass and radius of the whorl. The relationship between the moment of inertia (I) and mass (m) and radius (r) can be represented as:
I = ½mr2
This means that a wider whorl has a greater moment of inertia. For example, increasing the radius of a whorl from 1 cm to 3 cm increases its moment of inertia by a factor of nine.
The bigger the whorl, the longer it spins
A wider whorl needs more force upfront to get it to accelerate, but this means that it also needs more force to get it to decelerate.
The moment of inertia is also directly proportional to its mass. If you double the mass of the whorl, you also double the moment of inertia.
The heavier the whorl, the longer it spins
Unlike with linear motion, moment of inertia is also dependent on where the mass is. The farther the mass is from the axis of rotation (in our case, the shaft), the greater the moment of inertia.
The farther the mass is from the shaft, the longer it spins
There are two things trying to slow the spindle down - the twisting yarn and gravity. Much of the kinetic energy of the spindle is transferred to the yarn, converting it into potential energy. With less kinetic energy, there is less spin.
Spin becomes twist
Gravity impacts the spindle through gravitational torque. Gravitational torque is produced when the mass is not perfectly centered on the axis of rotation, or when the axis of rotation is not vertical. These imperfections in balance will pull the top over and create a wobble. This wobble is called precession.
The more wobble there is, the quicker the spindle will slow down
This tends to be more a problem with top whorl spindles because the mass is further from the ground. Bottom whorl spindles tend to be more stable, but they can make it harder to wind the yarn. So there are trade offs when making the best spindle for spinning.
What's happening?
There is a lot of physics involved in getting a drop spindle to spin well. Much of it has to do with the mass and shape of the spindle. We make the spindle spin by applying a force to the shaft. Rotational inertia, also called the moment of inertia, is what keeps it spinning. This is explained by Newton’s First Law. An object moving in a straight line at the same speed will continue until an outside force acts upon it. Likewise, a rotating object will continue to rotate exactly the same way until acted upon.
The moment of inertia is mainly determined by the mass and radius of the whorl. The relationship between the moment of inertia (I) and mass (m) and radius (r) can be represented as:
I = ½mr2
This means that a wider whorl has a greater moment of inertia. For example, increasing the radius of a whorl from 1 cm to 3 cm increases its moment of inertia by a factor of nine.
The bigger the whorl, the longer it spins
A wider whorl needs more force upfront to get it to accelerate, but this means that it also needs more force to get it to decelerate.
The moment of inertia is also directly proportional to its mass. If you double the mass of the whorl, you also double the moment of inertia.
The heavier the whorl, the longer it spins
Unlike with linear motion, moment of inertia is also dependent on where the mass is. The farther the mass is from the axis of rotation (in our case, the shaft), the greater the moment of inertia.
The farther the mass is from the shaft, the longer it spins
There are two things trying to slow the spindle down - the twisting yarn and gravity. Much of the kinetic energy of the spindle is transferred to the yarn, converting it into potential energy. With less kinetic energy, there is less spin.
Spin becomes twist
Gravity impacts the spindle through gravitational torque. Gravitational torque is produced when the mass is not perfectly centered on the axis of rotation, or when the axis of rotation is not vertical. These imperfections in balance will pull the top over and create a wobble. This wobble is called precession.
The more wobble there is, the quicker the spindle will slow down
This tends to be more a problem with top whorl spindles because the mass is further from the ground. Bottom whorl spindles tend to be more stable, but they can make it harder to wind the yarn. So there are trade offs when making the best spindle for spinning.
Spinning may seem like a very old-fashioned activity, but spinning by hand still goes on today. In some countries it is still an important way of producing thread and yarn. Even in Canada, spinning is a hobby enjoyed by many people.
Spinning is not only fun, it is also a very low impact way of transforming fibre into yarn. Spinning by hand with a spindle or with a foot-powered spinning wheel requires no electricity and produces no greenhouse gases!

Why does it matter?
Spinning may seem like a very old-fashioned activity, but spinning by hand still goes on today. In some countries it is still an important way of producing thread and yarn. Even in Canada, spinning is a hobby enjoyed by many people.
Spinning is not only fun, it is also a very low impact way of transforming fibre into yarn. Spinning by hand with a spindle or with a foot-powered spinning wheel requires no electricity and produces no greenhouse gases!
- Try moving the whorl to the bottom of the shaft. How does it affect the stability and motion of the spindle? How would you wind the yarn onto the spindle in this case?
- Design a spindle that spins for the longest possible time.
- Try spinning a cotton ball. How does it compare to the fibre you used?
- Compare the strength of a single-ply yarn to a two-ply yarn.
- 3D print your own drop spindle using an existing pattern from Thingiverse or design and print your own.
- There is more than one type of drop spindle. Explore some of the other types such as low whorl spindles, navajo spindles, and Turkish spindles and try making a different type. How do they compare in terms of spin and balance? Which do you like using the most?
- Find out about different kinds of spinning wheels and how they differ from drop spindles.
- Make your own recycled fibres by following the instructions in Recycling Yarn Part 1: Preparing the Fibres
Investigate Further
- Try moving the whorl to the bottom of the shaft. How does it affect the stability and motion of the spindle? How would you wind the yarn onto the spindle in this case?
- Design a spindle that spins for the longest possible time.
- Try spinning a cotton ball. How does it compare to the fibre you used?
- Compare the strength of a single-ply yarn to a two-ply yarn.
- 3D print your own drop spindle using an existing pattern from Thingiverse or design and print your own.
- There is more than one type of drop spindle. Explore some of the other types such as low whorl spindles, navajo spindles, and Turkish spindles and try making a different type. How do they compare in terms of spin and balance? Which do you like using the most?
- Find out about different kinds of spinning wheels and how they differ from drop spindles.
- Make your own recycled fibres by following the instructions in Recycling Yarn Part 1: Preparing the Fibres
- Find out if there is a hand-spinning guild (aka club) in your area. Below is a list of guilds in Canada:
- Edmonton Weavers' Guild - Alberta
- Handweavers, Spinners & Dyers of Alberta- Alberta
- The Heritage Weavers and Spinners Guild of Calgary- Alberta
- Ontario Handweavers and Spinners - There are over 50 guilds in Ontario!
- Salt Spring Island Weavers and Spinners Guild - British Columbia
- Sydney Weavers' Guild - Cape Breton Island
Learn more about spinning using both a drop spindle and a spinning wheel.
In this video learn how to wind yarn using a paper towel roll and an electric mixer.
Follow the instructions here to make a nostepinne out of paper.
Web Links
- Find out if there is a hand-spinning guild (aka club) in your area. Below is a list of guilds in Canada:
- Edmonton Weavers' Guild - Alberta
- Handweavers, Spinners & Dyers of Alberta- Alberta
- The Heritage Weavers and Spinners Guild of Calgary- Alberta
- Ontario Handweavers and Spinners - There are over 50 guilds in Ontario!
- Salt Spring Island Weavers and Spinners Guild - British Columbia
- Sydney Weavers' Guild - Cape Breton Island
Learn more about spinning using both a drop spindle and a spinning wheel.
In this video learn how to wind yarn using a paper towel roll and an electric mixer.
Follow the instructions here to make a nostepinne out of paper.