Step 1
In this activity, you will find and describe your heartbeat.
- Put your hand on your chest to feel your heartbeat.
- How can you describe the rhythm of your heartbeat?
Now that you have found your heartbeat, you will learn how to find your pulse and calculate your resting heart rate:
- Find your pulse by placing two fingers over your wrist. Once you have found it, count the number of pulses in 15 seconds.
- Multiply this by 4 to calculate your resting heart rate in beats per minute (bpm).
- Optional: Do some sort of physical activity that gets your heart really pumping, like running on the spot for 1 minute. What is your heart rate now?
Step 2
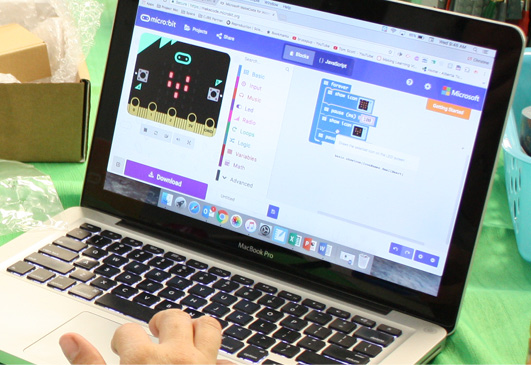
In this activity, you will code a heartbeat simulation using MakeCode and a micro:bit.
- Go to http://makecode.microbit.org/ or open the micro:bit app.
Instructions for this coding activity are in the video as well as in the chart below.
Instructions
Once on http://makecode.microbit.org/ click on the New Project button under the heading My Projects.

You will see two blocks in the working area when you start a new project.
Delete the on start block. You can do this by right-clicking and choosing the Delete Block option or by dragging the block to the left over the menu where a trashcan will appear.

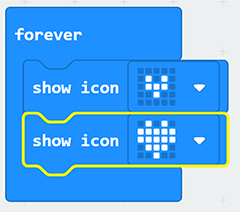
Under Basic, click and drag a show icon block inside of the forever block.
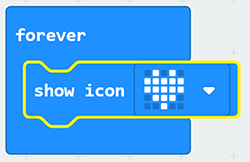
The show icon block defaults to an image of a big heart. If you click on the small downward arrow beside the heart, you will see all of the pre-made icons you can use.
Select the small heart (top row).
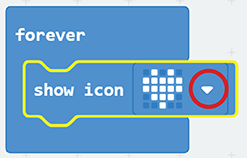
Under Basic, click and drag another show icon block beneath the first show icon block. It already has the big heart, which is what you want.
You should now see on the simulator micro:bit that the image switches between the little heart and the big heart.
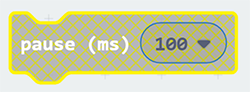
To make this more like a real heartbeat, you can incorporate pause blocks. Under Basic, select a pause block. You will notice that the block looks different than the others.
Tip
A block will be “grayed out” until you place it in such a way that it can function.
Place a pause block after each heart icon. This will cause the hearts to remain displayed for a specific amount of time measured in milliseconds (ms). The default time is set to 100 ms.
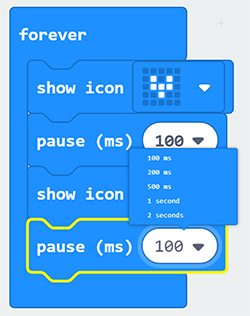
Think about the sound of a heart beat (lub dub) and adjust the pause block values by clicking on each number. You can choose a value from the dropdown menu, or type in your own value.
Did you know?
1000 milliseconds = 1 second
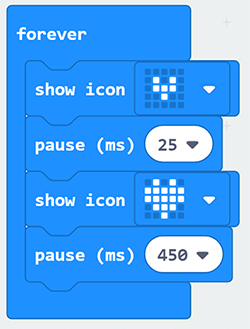
Your final simulation should look something like this.
Step 3
Make sure that your teacher has reviewed how to safely use the micro:bit before uploading your code.
Instructions for saving and uploading your Makecode to a micro:bit are available below.
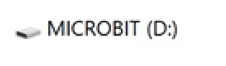
Plug the micro:bit in to your computer’s USB port using the micro USB cable that came with the micro:bit. The micro:bit should show up as a USB storage device, much in the same way as a flash drive.
Below the working area you will see a space beside the save icon where you can name your project.
After you have given your project a name, click on the save button. This will save your program to your Downloads folder.

Below the Download button you should see the name of your file.
Click on the pull down arrow beside the file name.
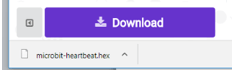
From the menu, select Show in folder. This will take you to your Downloads folder.
Select the file you wish to upload onto the micro:bit and drag it into the micro:bit folder on the left side.
As the program is copied onto the micro:bit, you will see that the light on the back of the micro:bit is flashing. This means that the program is in the process of being uploaded onto the micro:bit.
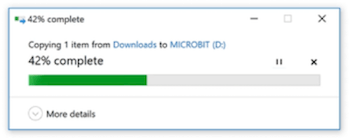
Once the lights are no longer flashing, your program should be running on your micro:bit.
Note: You need to go through this saving and uploading process every time you make changes or make a new micro:bit program.