Step 1
Physical Activity in Space
There is more to a treadmill than meets the eye! In 2019, Canadian Astronaut David Saint-Jacques completed a mission aboard the ISS. Keep the following questions in mind as you watch the video below, where David describes physical activity in space:
- Why is exercising in space essential for astronauts?
- What three pieces of exercise equipment are used on the ISS?
- How is the stationary bicycle on the ISS different than a stationary bicycle on Earth?
- How are astronauts able to run on the ISS treadmill without floating away?
Step 2
In the next activity, you will be coding a step counter.
First, we need to think about the micro:bit sensor that allows us to do this. Answer the following questions to discover how step counting devices work:
- What does “acceleration” mean?
- What do you think an accelerometer measures?
- In what devices might you find an accelerometer?
- What do we call devices that sense changes in the environment?
- How would an astronaut know how far she/he had run on the treadmill?
Step 3
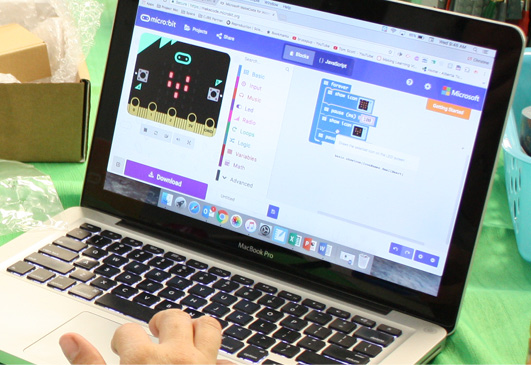
In this activity, you will code a step-counter using MakeCode and the accelerometer that is built into the micro:bit.
- Go to http://makecode.microbit.org/ or open the micro:bit app.
Instructions for this coding activity are in the video as well as below.
- Step Counter guided material
Part 1: Counting Steps
Delete any code that might be there from a previous activity or go to the top menu and select Projects and New Project.
Delete the on start block and the forever block.

First you will need to create a variable.
Under Variables, select Make a Variable
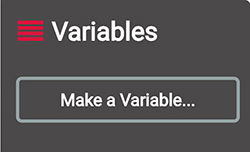
Type in the name steps and click on the Ok button.

You will now see that you have a variable called steps.

Under Variables, click and drag a change item by block onto the screen.
You will note that it is shaded out at this point.

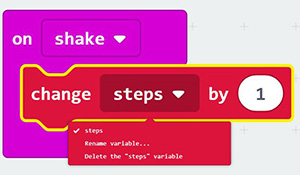
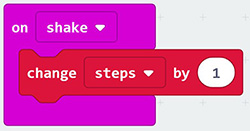
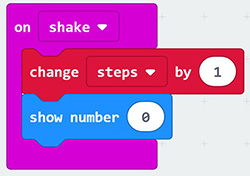
Under Input, select the on shake block and drag it on to the screen. Click on the change steps by block and snap it into the on shake block.

Tip
Always pull in a block from the right-hand side.
If you click on the small downward arrow beside the word steps you will see that the variable steps is checked.
Now every time you shake the micro:bit it will increase the number of steps by 1.
But there is no way yet to see the number of steps. For this you need to add code to display a number.
Under Basic, click and drag a show number block onto the screen and place it under the change steps by 1 block.
Under Variables, click and drag the steps variable block onto the screen and snap it into the show number block where the 0 is.
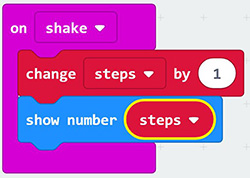
Notice how the steps variable is shaped like a puzzle piece that fits into the show number block.
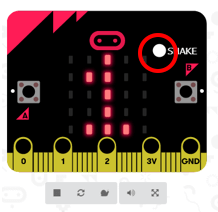
You can test out the code using the virtual micro:bit beside your working area by clicking on the white circle beside the word SHAKE. You should see the number go up by one each time you click SHAKE.
Save your work and upload the code to the micro:bit.
Part 2: Showing a Message
In this next part, you will add a way to give the user an encouraging message.
Under Input select the on button A pressed block and drag it into the empty space on your working area.

Did you know?
In coding, a “string” is a sequence of characters that can contain letters, numbers and punctuation.
Under Basic, select the show string block and snap it into the on button A pressed block.

Change the word “hello!” in the show string block to a word or phrase of encouragement, such as “Keep going!”
You can test this to see if it works by clicking on the A button on the micro:bit simulator. You should see the words scrolling across the screen.

Duplicate the show number block from Part 1 by right-clicking on the block and selecting Duplicate from the top of the menu. Drag the block so that it is beneath the show string block.

Save your work and upload the code to the micro:bit.
Part 3: Clearing the Screen
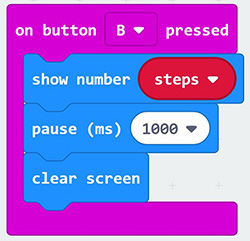
Under Input, select the on button A pressed block and drag it into an empty space on your working area. In the pull-down menu, change on button “A” pressed to on button “B” pressed.
Duplicate the show number block from Part 1 by right-clicking on the block and selecting Duplicate from the top of the menu. Snap it into the on button B pressed block.
Under Basic, select the pause (ms) block and place it beneath the show number block. Adjust the value to 1000 ms.

Under Basic and …More select the clear screen block. Snap it in beneath the pause block.
Save your work and upload the code to the micro:bit
Part 4: Resetting the Step Counter
Under Input, select the on button A pressed block and drag it into the empty space on your working area. In the pull-down menu, change on button “A” pressed to on button “A+B” pressed.
To have the display reset to 0, under Variables, select the set item to block and snap it into the on button “A+B” pressed block.
Change item to steps using the drop-down menu.
To display the value 0 to the user, duplicate the show number block from Part 1. Drag the block so that it is beneath the set steps to block.
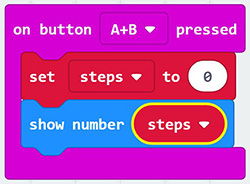
You can test this to see if it works by clicking A+B button on the simulator. A zero (0) should be displayed.
Step 4
Turn your micro:bit into a wearable step-counter by designing your own micro:bit wrist or ankle cuff.
Remember that you will need to secure the micro:bit battery pack in your design!
Materials you may need:
- micro:bit
- micro:bit battery pack and batteries
- scissors
- washi or duct tape
- velcro circles
- decorations
Use your wearable step-counter during physical activity. Is it comfortable? Is it durable? How could you improve your design?
Try predicting the number of steps you will take before doing a physical activity and then check your results when done. How close did you get to your predictions?
Did You Know?
Spaceflight osteopenia is the condition that can cause astronauts to lose more than 1% of their bone mass for every month they spend in space. This is one of the reasons that astronauts need to maintain their strength by exercising in orbit.