Step 1
Have you ever wondered about the temperature in space?
- What do you predict the temperature is outside the ISS on a side facing the sun? What about on a side not facing the sun?
- Why do you think the temperatures in space are so extreme?

Spacecraft in the Rays of Sun (Credit: 3D Sculptor)
Step 2
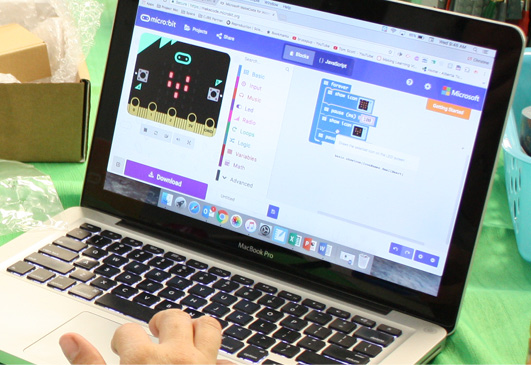
In this activity, you will be coding the micro:bit so that it functions as a thermometer.
- Go to http://makecode.microbit.org/ or open the micro:bit app.
- Follow the instructions found in the video or chart below.
- Code a Thermometer guided material
Code a Thermometer
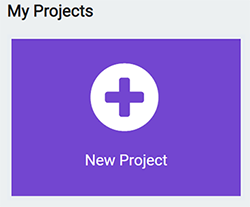
Click on the New Project button.
Delete the on start block and the forever blocks.
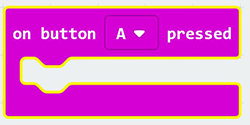
Under Input, select the on button A pressed block.
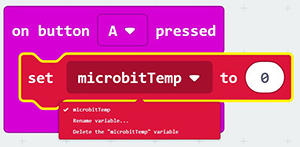
Under Variables, click on Make a Variable.
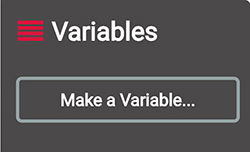
Name the variable microbitTemp and click on the Ok button.
Under Variables, select a set microbitTemp to block and snap it into place inside the on button A pressed block.
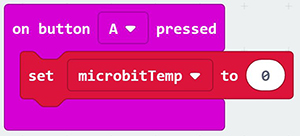
In the pull-down menu, make sure that microbitTemp is selected.
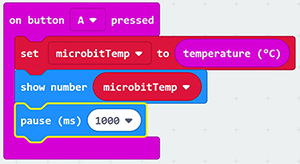
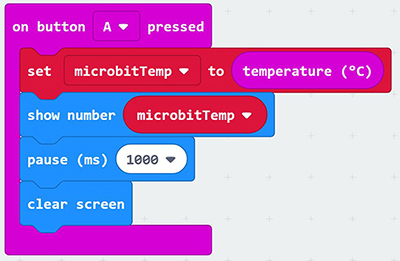
Under Input, select the temperature (°C) sensor block and place it where the zero was in the set microbitTemp to block.
This will set the microbitTemp variable to the ambient (surrounding) temperature.

Under Basic, select a show number block. Place it beneath the set microbitTemp to block.
Under Variables, select the microbitTemp block and place it where the zero is beside show number.
This will display the temperature value on the LED display.

A pause block and clear screen block can be inserted so that the temperature value is not constantly displayed.
Under Basic, select a pause (ms) block and place it beneath the show number block. Adjust the value to around 1000–1500 ms for a short pause before adding the clear screen block.
The clear screen block can be found under Basic and then More…. Place this beneath the pause (ms) block.
You now have a working micro:bit thermometer! Be sure to test out your program.

Save your work and upload the code to the micro:bit.
Step 3
Looking for an extra challenge? You can also send and receive temperature data between two micro:bits.
- Go to http://makecode.microbit.org/ or open the micro:bit app.
- Follow the instructions found in the video or chart below.
- Broadcast Temperature guided material
micro:bit Send and Receive
Go to http://makecode.microbit.org/. Start a New Project and upload your own code from the activity that allowed you to display your micro:bit’s temperature.
Or go to: https://makecode.microbit.org/42922-49310-81921-44677 and click the Edit button. (http://bit.ly/MO3-Thermometer)

This is the code you begin with, it displays your micro:bit’s temperature when you press button A.
Instructions
Part 1: Radio Group
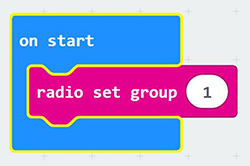
Under Basic, click and drag an on start block to your workspace.

Under Radio, click a radio set group “1” block inside the on start block. For this program we will set the radio group to 1. We will load the same program onto TWO different micro:bits and, because they have the same group ID, they will be able to talk to each other.
Did you know?
Radio is the technology of using radio waves to transmit and receive data from one device to another device that uses the same radio protocol. A micro:bit can only send or receive in one group at a time. The parameter for the group ID can be any number from 1–255. You can have multiple pairs of micro:bits communicating so long as they share the same group ID.
Part 2: Radio Send
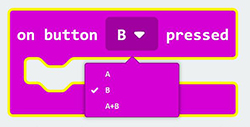
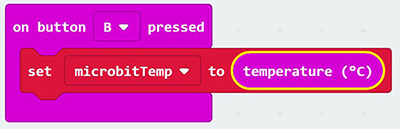
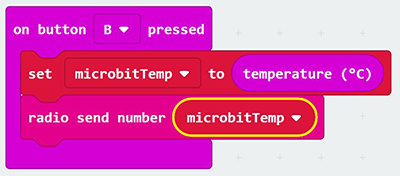
Under the Input category, select the on button A pressed block and drag it into an empty space on your working area. Click on the downward arrow beside the letter “A” to change on button A pressed to on button B pressed to enable this event handler.
Select the set item to block from the Variables category and place it inside the on button B pressed block.

Click on the downward arrow beside “item” to choose the microbitTemp variable from the drop-down menu.

To make the variable microbitTemp to equal the temperature data returned from the micro:bit, select a temperature block from the Input category and replace the zero on the right of the set microbitTempto block.
From the Radio category, drag the radio send number block and place it under the set microbitTemp to block.

Go back to the Variables category and select the microbitTemp variable and snap it into place inside the “radio send number” block where the zero appears.
Part 3: Radio Receive
Did you know?
The micro:bit has an onboard transceiver that enables you to both transmit, or send data, as well as receive data. You probably use a transceiver device every day—like when you talk on a mobile or a cordless phone.
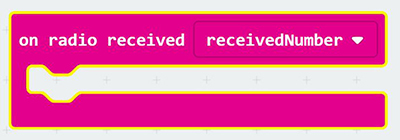
From the Radio category, drag the on radio received block with the receivedNumber block and place it in an empty area on your workspace.
From the Basic category, drag and drop a show number block and place it inside the on radio received block.
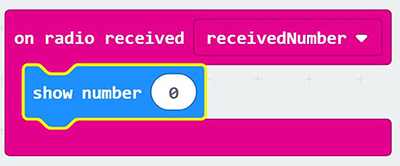
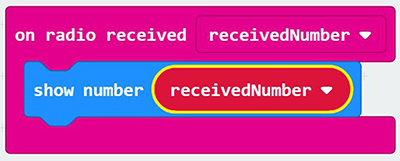
From the Variables category, select the receivedNumber variable and snap it into place inside the show number block where the zero appears.
Under the Basic category, select a pause block and snap it into place inside the on radio received block below the show number block.
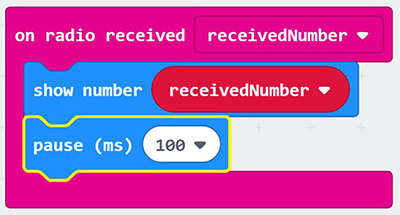
Change 100 to 1500 in the pause block so that the temperature reading is shown for one and a half seconds.
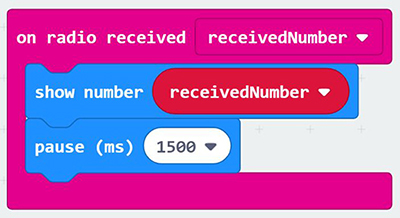
Now let’s clear the screen. Click on the Basic category and select the …More section, then select the clear screen block and snap it into place beneath the pause block.

Save your work and upload the code to the micro:bit.
Step 4
Want to tinker and remix code? Try decoding this temperature display program in MakeCode.
Instructions for this coding activity are in the guided material and chart below.
- Temperature Display guided material
Go to: https://makecode.microbit.org/_0MA8yyfjtbEr.
In this program, when the user presses button A, the ambient temperature is displayed on the LED matrix screen.

When the user presses button B, the temperature is displayed using a tens column and a ones column.
In this program, when the user presses button A, the ambient temperature is displayed on the LED matrix screen.
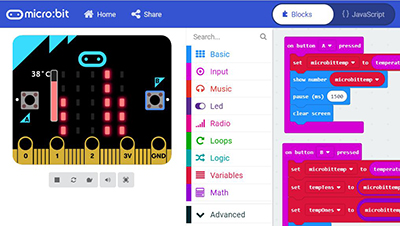
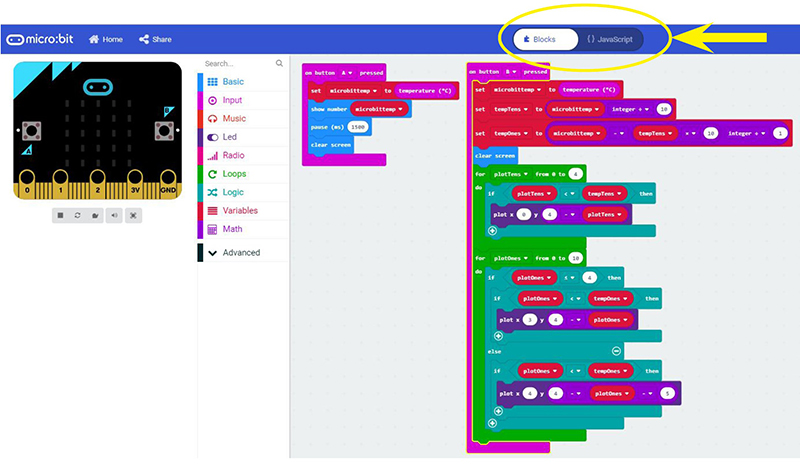
This is what the entire program looks like with the MakeCode blocks.

For this challenge, you are going to be looking at the JavaScript code for this program.
Did you know?
JavaScript is a high-level, interpreted programming language for computers. JavaScript is one of the most widely deployed languages in the world. It is often run in web browser applications for front end user code, back-end code for servers, or even game development.
Click on the {} JavaScript button at the top of your work area to view the code.
Look at the JavaScript code and try to figure out what the code is telling the computer to do.
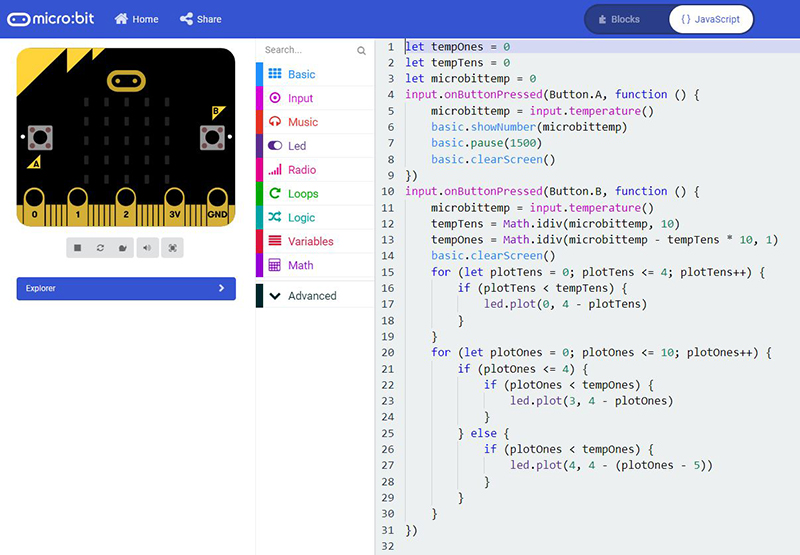
Here is the code again.
let tempOnes = 0
    let tempTens = 0
    let microbittemp = 0
    input.onButtonPressed(Button.A, () => {
        microbittemp = input.temperature()
        basic.showNumber(microbittemp)
        basic.pause(1500)
        basic.clearScreen()
    })
    input.onButtonPressed(Button.B, () => {
        microbittemp = input.temperature()
        tempTens = microbittemp / 10
        tempOnes = (microbittemp - tempTens * 10) / 1
        basic.clearScreen()
        for (let plotTens = 0; plotTens <= 4; plotTens++) {
            if (plotTens < tempTens) {
                led.plot(0, 4 - plotTens)
            }
        }
        for (let plotOnes = 0; plotOnes <= 10; plotOnes++) {
            if (plotOnes <= 4) {
                if (plotOnes < tempOnes) {
                    led.plot(3, 4 - plotOnes)
                }
            } else {
                if (plotOnes < tempOnes) {
                    led.plot(4, 4 - (plotOnes - 5))
                }
            }
        }
    })
Test your skills..
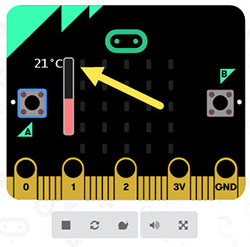
Set the temperature on the micro:bit to 21 °C
To plot numbers that will appear in the tens column, the code below tells the LED lights to begin plotting a value <=4 in the (0,4) location on the LED matrix screen.
Find this section of code in the JavaScript:
for (let plotTens = 0; plotTens <= 4; plotTens++) {
    if (plotTens < tempTens) {
      led.plot(0, 4 - plotTens)
    }
 }
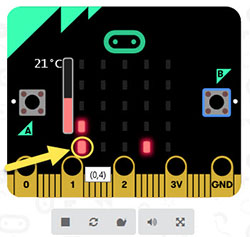
Find this section of code in the JavaScript that tells the micro:bit where to begin plotting Ones if the temperature reading is 21 °C.

Tinker & Remix
- Draw the micro:bit’s LED display if the temperature was 8°C.
- How would the program display the value -2 °C? What section of the JavaScript code would deal with this?
- How would you change the JavaScript code so that the starting point of the LED lights is at the top of the matrix?
- How could you use blocks from the Logic category to show an icon or message when the temperature is at a certain value?
- How could you use blocks from the Radio category to send or receive the bar graph temperature to other micro:bits at a different location?