How can you build your own seismograph?

Geologists with seismograph

Geologists with seismograph (CreativaImages, iStockphoto)

Geologists with seismograph

Geologists with seismograph (CreativaImages, iStockphoto)

6 7 8 9

How does this align with my curriculum?

Share on:

Build your own seismograph using common household materials.

Materials:

  • Medium-sized cardboard box
  • Paper/plastic disposable cup
  • String
  • Marker
  • Scissors
  • Long narrow piece of paper such as the back of a printed store receipt
  • Tape
  • Coins, marbles, small rocks or other small, heavy objects to use as weights

Optional

  • Graph paper

What to do!

Scientists have been noticing small earthquakes across Canada, but they don't know where they're coming from. Your challenge is to help these scientists by designing your own seismograph to help monitor seismic activities across the country.

You will need another person when it comes to the testing stage so we recommend doing this in groups of at least two.

  • Carefully cut the lid or flaps off the cardboard box and stand the box up on one of the smaller sides.
  • Near the rim of the cup, carefully poke two holes opposite from each other.
  • Tie a piece of string (slightly longer than the length of the box) through each hole.
  • Carefully pole two holes in the top of the box. They should be the same distance apart as the holes in the cup.
  • Push the two pieces of string through the holes in the box. Tie the strings together above the box so the cup hangs down inside the box. The bottom of the cup should be a few centimetres above the bottom of the box.
  • Carefully poke a hole in the center bottom of the cup. Remove the cap from the marker, and push the marker through the hole so its tip just barely touches the bottom of the box.
  • Fill the cup with coins or other small weights. Why do you think the weights are important?
  • Tape several thin strips of paper together lengthwise to form one long strip. If you have a long printed receipt, you can skip this step.
  • Carefully cut two slits on opposite sides of the cardboard box. They should be as close as possible to the bottom of the box. The slits should be wide enough to pass the paper strip through one side, across the middle of the box, and out the other side.
  • Make sure the marker is centered on the paper strip. You might need to poke different holes in the top of the box and re-hang the cup if necessary.

Now your seismograph is ready for testing!

  • Have one partner stabilize the box with their hands, while another partner slowly pulls the paper strip through the box from side to side. What does the marker draw on the paper strip?
  • Try shaking the box back and forth as your partner continues pulling the paper strip through the box, trying their best to pull at a constant speed. How did the line on the paper strip change?
  • Try pausing your shaking for a few seconds, then shaking the box harder.
  • Try pausing again and shaking the box very gently.
  • Pull the paper strip all the way out of the box and look at the line. Can you tell how hard the box was shaking based on the line? Can you tell when the box was not shaking at all?
  • Repeat with additional strips of paper as you test out different shaking amounts.
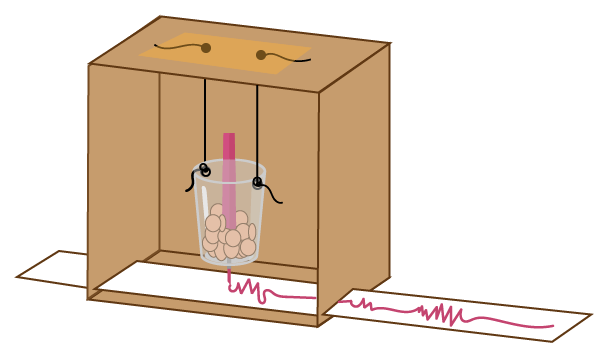
Shown is a colour illustration showing the set up for the seismograph.
Image - Text version

Shown is a colour illustration showing the set up for the seismograph. 

In the middle of the image are brown parallelograms that are arranged to form a square. This resembles a box that is open on the side facing the viewer. Two thin black lines come down from the top of the box on the interior of the box. These two lines connect to the sides of a horizontal pale gray oval. This oval represents the top of a plastic cup. Black squiggly lines in the same location represent the knots used to tie the strings to the cup. The cup looks like it is hanging just above the bottom of the box. Below the oval is a pale gray cylindrical shape. This is the rest of the plastic cup. Behind this shape is a thin, vertical pink rectangle. This represents the top of a pink marker. Below this, in the bottom of the cup, are multiple pale brown ovals. These represent coins or other objects that weigh down the cup. The tip of the marker is just visible below the bottom of the cup. In the bottom of the box shape is a thin white parallelogram. This represents a narrow piece of paper. The paper also extends to the left and to the right of the box. On the paper in the box and to the right of the box are squiggly pink lines. These represent the lines drawn by the marker when the box is shaken.

As the paper is being pulled through the box when it’s not shaking, the marker should just draw a straight line on the paper. When you shake the box back and forth, the paper moves with it. The cup on the other hand, is suspended by strings and has a heavy mass so it doesn’t move as much. This means that the paper moves back and forth under the (mostly) stationary marker, and a squiggly line is left on the paper. The size of these squiggles (called their amplitude) corresponds to how hard you shake the box. This is just like how the line drawn by a real seismograph corresponds to the strength of the earthquake!

Did you know?

The piece of paper with the squiggly lines is called a seismogram.

As tectonic plates slide against each other, they don’t move smoothly. There is so much friction and pressure between these huge slabs of rock that their movement is more of a series of stick-slip events. It's like when you’re going down a water slide and there isn't enough water so you keep getting stuck and have to keep pushing yourself forward. In plate tectonics, this means that the two plates will get stuck together, during which time pressure will build up. Once the pressure gets higher than the friction force holding them together, then the two plates will quickly slip past each other in a big jump. This big jump is what causes earthquakes! We can record these earthquakes to figure out where the boundaries between tectonic plates are located.

Does your seismograph work if you shake the box side-to-side or up and down? Can you design a seismograph that can record motion in multiple directions?

Can you design your own scale for measuring the strength of your “earthquakes”? Try using graph paper as your paper strip and see how different amounts of shaking measure up on your scale.

What’s happening?

As the paper is being pulled through the box when it’s not shaking, the marker should just draw a straight line on the paper. When you shake the box back and forth, the paper moves with it. The cup on the other hand, is suspended by strings and has a heavy mass so it doesn’t move as much. This means that the paper moves back and forth under the (mostly) stationary marker, and a squiggly line is left on the paper. The size of these squiggles (called their amplitude) corresponds to how hard you shake the box. This is just like how the line drawn by a real seismograph corresponds to the strength of the earthquake!

Did you know?

The piece of paper with the squiggly lines is called a seismogram.

Why does it matter?

As tectonic plates slide against each other, they don’t move smoothly. There is so much friction and pressure between these huge slabs of rock that their movement is more of a series of stick-slip events. It's like when you’re going down a water slide and there isn't enough water so you keep getting stuck and have to keep pushing yourself forward. In plate tectonics, this means that the two plates will get stuck together, during which time pressure will build up. Once the pressure gets higher than the friction force holding them together, then the two plates will quickly slip past each other in a big jump. This big jump is what causes earthquakes! We can record these earthquakes to figure out where the boundaries between tectonic plates are located.

Investigate further!

Does your seismograph work if you shake the box side-to-side or up and down? Can you design a seismograph that can record motion in multiple directions?

Can you design your own scale for measuring the strength of your “earthquakes”? Try using graph paper as your paper strip and see how different amounts of shaking measure up on your scale.