Plant Life Cycle
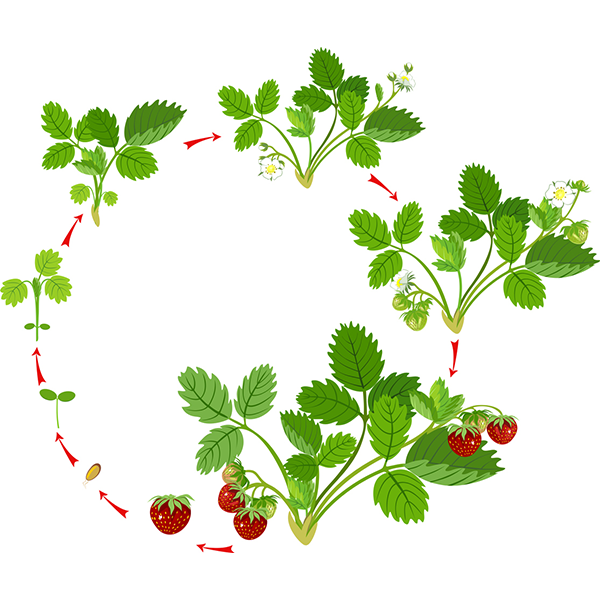
Life cycle of strawberry plant (mariaflaya, iStockphoto)
Life cycle of strawberry plant (mariaflaya, iStockphoto)
How does this align with my curriculum?
Students develop and apply the skills of observing, comparing & contrasting, and communicating as they explore life cycles of familiar plants.
Overview
Students will use their observation skills to compare & contrast seeds and bulbs as they learn various ways of starting new plants and observe plant life cycles.
Timing
30-45 minutes
Setting the Stage
Science has a classification system for organizing all living things, including plants. Botanists (scientists who study plants) must find a way to categorize the millions of different plant species that exist on Earth.
All plants are made up of similar parts that are essential in maintaining their survival (e.g., roots, stems, leaves). But these parts often look and behave differently. For example, one way botanists classify plants is by looking at how they take in water and nutrients. Another way botanists classify plants is by looking at how plants reproduce. For example, plants in the grass family reproduce by sending out underground stems called rhizomes while other plants grow from seeds or spores.
In this inquiry, students will use their observation skills to compare & contrast seeds and bulbs as they learn various ways of starting new plants. As they explore the life cycles of plants grown from seeds and bulbs, students will begin to recognize the link between themselves and other living things and appreciate the benefits and responsibilities they have for the care of these organisms.
Safety First!
When preparing to work with plants, students should understand the importance of never tasting or ingesting any part of a plant and of washing their hands after handling any part of a plant.
This inquiry could begin from:
- Questions and/or comments from students about a vase of flowers on a table in the classroom. Discuss using questions such as:
- "What do we know about these flowers?" (They are living things, they are plants,. etc.)
- "What are some parts of the plants that you can see? What parts can't you see?"
- "Where do plants like these come from?" (Some students may have experience with planting bulbs or seeds to grow flowers.)

- Questions and/or comments from students about a collection of conifer cones brought into the classroom. Discuss using questions such as:
- "Where might you find cones like these?"
- "What role do they play for conifer trees? (They are where we find the seeds.)
- “What do you notice about the scales of these cones?” (They overlap.) "Why do you think they are designed this way?" (To protect the seeds inside)
- "How do you think the conifer seeds get dispersed?"(When the cones fall from the trees; when an animal or the wind carries the cones to another place.)

- Watching a video such as From From Seed to Flower (Nova) and reading a book such as From Seed to Plant. Discuss using questions such as:
- "How would you describe some of the steps a plant goes through when it is growing from a seed to a full-grown plant?"
- "What are some of the parts of plants we saw in the video? What parts did we not see? Why are some parts easier to show in a video than others?"
- "What does each part of the plant do to help the plant’s growth and development?" (The stamens make pollen; the petals attract pollinators to the plant; the roots carry water and nutrients to the rest of the plant; etc.)
- "Does a seed need the same things to survive as a full-grown plant needs? What is the same and what is different about their needs?"

Details
- a collection of seeds (Examples: sunflower seeds, pumpkin seeds, poppy seeds, sesame seeds, pinto beans, soy beans, tomato seeds, coffee beans, seeds from flowers, fruits and vegetables) (Note: when considering seeds for planting, think about fast-growing ones like nasturtium, morning glory, sunflower, tomato, beet or radish seeds, if available.)
- bulbs
- hand lenses
- paper towels or other white material on which to place seeds for observing
- samples of other ways in which plants get started: cuttings, grafts (optional)
- small containers for planting (Note: some local woodworking/home and garden stores sell devices for making your own pots from newspaper, eliminating the need for plastic pots.)
- potting soil or peat pots (Note: If using soil, consider using sterilised compost for safety purposes, or have students wear disposable gloves when handling soil.)
- spoons for scooping soil
- disposable gloves (optional)
- newspaper for covering tables while planting

Safety First!
Most bulbs are poisonous if ingested. For safety, consider using edible bulbs like onions, green onions or leeks, or have the children wear disposable gloves when handling the bulbs.
- Educators may wish to:
- place samples of seeds in small snack bags ahead of time for easy distribution to students
- place samples of flowering bulbs in snack bags for safe observation (optional)
- pre-measure soil for planting (if using soil)

Students develop and apply the skills of comparing & contrasting, observing and communicating as they explore the life cycles of familiar plants.
Students:
- Observe the collections of seeds with their eyes and then through a hand lens.
- Educator facilitates discussions, encouraging students to observe and describe the features of seeds such as size, shape, colour, markings, etc.
- Record what is observed and thoughts that arise from the discussions.
- Observe examples of bulbs and compare and contrast them to the seeds.
- Educator facilitates discussions, encouraging students to observe and describe the features of bulbs such as size, shape, colour, markings, etc.

- Select a seed or a bulb to grow.
- Educator asks students to predict what might grow from their seed or bulb - Will it be short or tall? Will it have a flower or no flower? Will it produce fruit? etc. Students may also notice that some bulbs have roots already showing, which can spark a discussion about plants that grow from seeds and where their roots are.
- Determine how students will record the changes their plant goes through in its life cycle, from seed/bulb to a full-grown plant, and the kind of care they will need to provide for the seeds to germinate and then to continue to grow.
- Educator facilitates discussions, discussing how students can keep track of the time it takes for the different stages of plants to appear, use of digital tools to record, how to describe what they see happening at each stage, etc.
- Plant their seeds/bulbs.

- Record changes they observe over time in the life cycle of their plant.
- Compare and contrast the stages of the life cycle of their plant with that of plants grown by others.
- Educator facilitates discussion, asking students to compare the time it took for their seeds to germinate, the speed at which their plant grew leaves, what differences were noted between plants grown from seeds and plants grown from bulbs, etc.
Observe and document, using anecdotal comments, photos and/or video recordings, students' ability to:
- Observe - students observe different kinds of seeds and bulbs with their eyes and through a hand lens
- Compare & Contrast - students compare & contrast different kinds of seeds and bulbs including observations made with a hand lens
- Communicate - students discuss and record observations
- Record Data - students use a variety of methods (e.g.,drawings, photos, labels) to record the growth and change in their seeds from germination to plant using appropriate vocabulary
| Students: Saying, Doing, Representing |
Educator Interactions: Responding, Challenging |
|---|---|
| Students observe seeds and bulbs using just their eyes, and then through a hand lens. |
|
| Students compare and contrast seeds and bulbs, including through observations made with a hand lens. |
|
| Students discuss and record observations. |
|
| Students record the growth and change in their seeds from germination to full-grown plant. |
|
Literacy
- Use words and phrases that will help convey meaning as specifically as possible (use comparative adjectives such as smaller, smallest; use appropriate scientific vocabulary such as germinate, stem, leaf, root, flower, stamen, pistil, etc.)
- Use a variety of forms (oral, written, graphic, multimedia, etc.) to communicate (e.g., create drawings or take photos for a science journal to track plant growth)
Mathematical Thinking
- Measure using standard units (measure time from planting to germination; measure growth of a plant over time, etc.)
Visual Arts
- Create two-dimensional and three-dimensional works of art that express ideas inspired by observations of nature (e.g., create illustrations that show observations made about seeds and bulbs, seed germination, plant growth and change)
If your students are interested in learning more, the following may provoke their curiosity:
- Some students may be interested in exploring other ways of starting plants. Provide examples and/or pictures of cuttings and grafts and discuss using questions such as:
- "What do you predict we mean when we say we can grow new plants from cuttings?" (A cutting is a piece of the stem of a plant that is cut from the parent plant and repotted.)
- "What would be some of the advantages of growing a plant from a cutting?"
- "What do you predict we mean when we say we can grow new plants by grafting?"
- "What would be some of the advantages of growing new plants by grafting?" (Grafting allows growers to get exact duplicates of a plant that has been very successful - one that has produced perfect juicy peaches or gorgeous roses, for example. Also, grafted plants grow faster than plants grown from seeds so growers get the product much sooner than they might otherwise.)
- "What types of plants do you think would lend themselves to being grown from cuttings or from grafting?"
- Students may be unaware that strawberries grow in fields or that carrots grow in the ground. Educators may wish to set up provocations that provide opportunities to explore the "food from farm to fork" concept. A farm visit would be ideal, but where that is not possible books and videos such as the ones suggested below provide a starting point for further explorations.


.png)
Videos
- From Seed to Flower (2003) Nova via WGBH Educational Foundation -- This video segment (1:07 min.) depicts plant growth in time-lapse format, allowing the viewer to observe in just a few seconds some of the most important life stages of a plant, from germination to the formation of a flower, and several phases in between.
- Where do fruit and vegetables come from? (2014) Wondergrove Kids -- Food that grows on trees, vines, and in the ground (3:08 min.).
- Where does food come from? (2016) Tracey Kastnaras -- Focuses on tomatoes from farms, looks inside the tomatoes at the seeds, and shows tomato plant growth (2:33, watch from 1:05 to the end).
- Remarkable Rice: how does rice grow (2014) Eat Happy Project -- A good overview of how rice is grown (2:45 min.).
- Baked Bread: How is bread made? (2014) Eat Happy Project -- An overview of how bread is made, from field to the grocery store (2:47 min.).
Books

From Seed to Plant
by Gail Gibbons
This book introduces young readers to the processes of pollination, seed production and germination. It also has instructions for a seed-growing project.
978-0823410255
Where Does Fruit Come From?
Where Do Vegetables Come From?
Where Do Grains Come From?
all by Linda Staniford
These books look at how fruits, vegetables and grains are planted, grown and harvested before they get to our tables
ISBNs:
Where do Grains Come From? 978-1484633533
Where Do Vegetables Come From? 978-1484633557
Where Does Fruit Come From? 978-1484633564
Pictures
Plants: Seeds (Picture Collections)
6 images of some seeds which are the fertilized part of a plant used for germinating new plants such as fennel, kiwis and pumpkins
Plants: Germination (Picture Collections)
6 images of some seedlings sprouting as one of the stages towards full plant growth
Parts of a Plant (Backgrounders)
What are the main parts of plants and what functions do these parts they serve for plants?
How do Plants Reproduce? (Backgrounders)
Learn about pollination and other forms of sexual reproduction in plants. And did you know that plants can also reproduce asexually?
Materials
- a collection of seeds (Examples: sunflower seeds, pumpkin seeds, poppy seeds, sesame seeds, pinto beans, soy beans, tomato seeds, coffee beans, seeds from flowers, fruits and vegetables) (Note: when considering seeds for planting, think about fast-growing ones like nasturtium, morning glory, sunflower, tomato, beet or radish seeds, if available.)
- bulbs
- hand lenses
- paper towels or other white material on which to place seeds for observing
- samples of other ways in which plants get started: cuttings, grafts (optional)
- small containers for planting (Note: some local woodworking/home and garden stores sell devices for making your own pots from newspaper, eliminating the need for plastic pots.)
- potting soil or peat pots (Note: If using soil, consider using sterilised compost for safety purposes, or have students wear disposable gloves when handling soil.)
- spoons for scooping soil
- disposable gloves (optional)
- newspaper for covering tables while planting
Safety First!
Most bulbs are poisonous if ingested. For safety, consider using edible bulbs like onions, green onions or leeks, or have the children wear disposable gloves when handling the bulbs.
Preparation
- Educators may wish to:
- place samples of seeds in small snack bags ahead of time for easy distribution to students
- place samples of flowering bulbs in snack bags for safe observation (optional)
- pre-measure soil for planting (if using soil)
What to Do
Students develop and apply the skills of comparing & contrasting, observing and communicating as they explore the life cycles of familiar plants.
Students:
- Observe the collections of seeds with their eyes and then through a hand lens.
- Educator facilitates discussions, encouraging students to observe and describe the features of seeds such as size, shape, colour, markings, etc.
- Record what is observed and thoughts that arise from the discussions.
- Observe examples of bulbs and compare and contrast them to the seeds.
- Educator facilitates discussions, encouraging students to observe and describe the features of bulbs such as size, shape, colour, markings, etc.
- Select a seed or a bulb to grow.
- Educator asks students to predict what might grow from their seed or bulb - Will it be short or tall? Will it have a flower or no flower? Will it produce fruit? etc. Students may also notice that some bulbs have roots already showing, which can spark a discussion about plants that grow from seeds and where their roots are.
- Determine how students will record the changes their plant goes through in its life cycle, from seed/bulb to a full-grown plant, and the kind of care they will need to provide for the seeds to germinate and then to continue to grow.
- Educator facilitates discussions, discussing how students can keep track of the time it takes for the different stages of plants to appear, use of digital tools to record, how to describe what they see happening at each stage, etc.
- Plant their seeds/bulbs.
- Record changes they observe over time in the life cycle of their plant.
- Compare and contrast the stages of the life cycle of their plant with that of plants grown by others.
- Educator facilitates discussion, asking students to compare the time it took for their seeds to germinate, the speed at which their plant grew leaves, what differences were noted between plants grown from seeds and plants grown from bulbs, etc.
Assessment
Observe and document, using anecdotal comments, photos and/or video recordings, students' ability to:
- Observe - students observe different kinds of seeds and bulbs with their eyes and through a hand lens
- Compare & Contrast - students compare & contrast different kinds of seeds and bulbs including observations made with a hand lens
- Communicate - students discuss and record observations
- Record Data - students use a variety of methods (e.g.,drawings, photos, labels) to record the growth and change in their seeds from germination to plant using appropriate vocabulary
Co-constructed Learning
| Students: Saying, Doing, Representing |
Educator Interactions: Responding, Challenging |
|---|---|
| Students observe seeds and bulbs using just their eyes, and then through a hand lens. |
|
| Students compare and contrast seeds and bulbs, including through observations made with a hand lens. |
|
| Students discuss and record observations. |
|
| Students record the growth and change in their seeds from germination to full-grown plant. |
|
Cross-curricular Connections
Literacy
- Use words and phrases that will help convey meaning as specifically as possible (use comparative adjectives such as smaller, smallest; use appropriate scientific vocabulary such as germinate, stem, leaf, root, flower, stamen, pistil, etc.)
- Use a variety of forms (oral, written, graphic, multimedia, etc.) to communicate (e.g., create drawings or take photos for a science journal to track plant growth)
Mathematical Thinking
- Measure using standard units (measure time from planting to germination; measure growth of a plant over time, etc.)
Visual Arts
- Create two-dimensional and three-dimensional works of art that express ideas inspired by observations of nature (e.g., create illustrations that show observations made about seeds and bulbs, seed germination, plant growth and change)
Extending the Learning
If your students are interested in learning more, the following may provoke their curiosity:
- Some students may be interested in exploring other ways of starting plants. Provide examples and/or pictures of cuttings and grafts and discuss using questions such as:
- "What do you predict we mean when we say we can grow new plants from cuttings?" (A cutting is a piece of the stem of a plant that is cut from the parent plant and repotted.)
- "What would be some of the advantages of growing a plant from a cutting?"
- "What do you predict we mean when we say we can grow new plants by grafting?"
- "What would be some of the advantages of growing new plants by grafting?" (Grafting allows growers to get exact duplicates of a plant that has been very successful - one that has produced perfect juicy peaches or gorgeous roses, for example. Also, grafted plants grow faster than plants grown from seeds so growers get the product much sooner than they might otherwise.)
- "What types of plants do you think would lend themselves to being grown from cuttings or from grafting?"
- Students may be unaware that strawberries grow in fields or that carrots grow in the ground. Educators may wish to set up provocations that provide opportunities to explore the "food from farm to fork" concept. A farm visit would be ideal, but where that is not possible books and videos such as the ones suggested below provide a starting point for further explorations.
Supporting Media
Videos
- From Seed to Flower (2003) Nova via WGBH Educational Foundation -- This video segment (1:07 min.) depicts plant growth in time-lapse format, allowing the viewer to observe in just a few seconds some of the most important life stages of a plant, from germination to the formation of a flower, and several phases in between.
- Where do fruit and vegetables come from? (2014) Wondergrove Kids -- Food that grows on trees, vines, and in the ground (3:08 min.).
- Where does food come from? (2016) Tracey Kastnaras -- Focuses on tomatoes from farms, looks inside the tomatoes at the seeds, and shows tomato plant growth (2:33, watch from 1:05 to the end).
- Remarkable Rice: how does rice grow (2014) Eat Happy Project -- A good overview of how rice is grown (2:45 min.).
- Baked Bread: How is bread made? (2014) Eat Happy Project -- An overview of how bread is made, from field to the grocery store (2:47 min.).
Books
From Seed to Plant
by Gail Gibbons
This book introduces young readers to the processes of pollination, seed production and germination. It also has instructions for a seed-growing project.
978-0823410255
Where Does Fruit Come From?
Where Do Vegetables Come From?
Where Do Grains Come From?
all by Linda Staniford
These books look at how fruits, vegetables and grains are planted, grown and harvested before they get to our tables
ISBNs:
Where do Grains Come From? 978-1484633533
Where Do Vegetables Come From? 978-1484633557
Where Does Fruit Come From? 978-1484633564
Pictures
Plants: Seeds (Picture Collections)
6 images of some seeds which are the fertilized part of a plant used for germinating new plants such as fennel, kiwis and pumpkins
Plants: Germination (Picture Collections)
6 images of some seedlings sprouting as one of the stages towards full plant growth
Learn More
Parts of a Plant (Backgrounders)
What are the main parts of plants and what functions do these parts they serve for plants?
How do Plants Reproduce? (Backgrounders)
Learn about pollination and other forms of sexual reproduction in plants. And did you know that plants can also reproduce asexually?