What is soil made of?
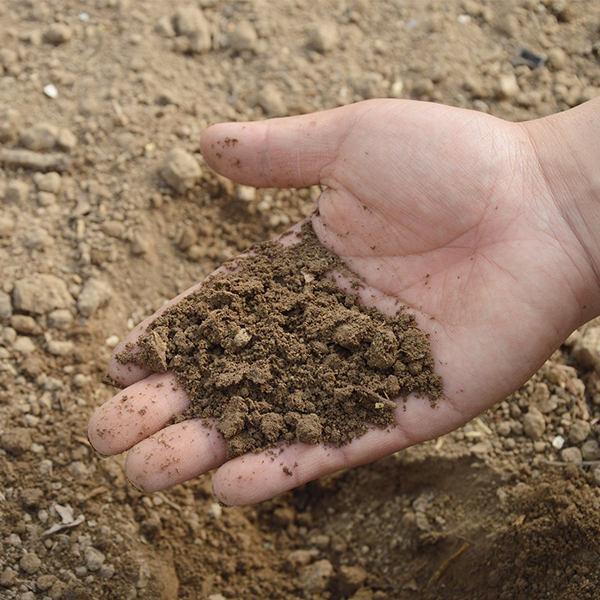
Hand holding soil (Jing, Pixabay)

Hand holding soil (Jing, Pixabay)
How does this align with my curriculum?
| Grade | Course | Topic |
|---|
Students will explore the composition and characteristics of different local soils and learn about what makes soil healthy.
Overview
| Activities | Timing | Student Grouping | Description |
|---|---|---|---|
| Minds-On: Introduction to Soils | 10 minutes | Large group | Students will learn about the parts and layers of soil |
| Action: Soil Exploration Centres | 4 x 15 min. each (60 minutes total) | Small group | Students will participate in centre activities about soil |
| Consolidation: All about My Soil | 20 minutes | Individual | Students will describe, in detail, the sample of soil they collected and explored |
This lesson can be done over a few days.
Students will:
- Learn about the living and nonliving components of soil
- Explore different types of soil
Learning Goals
Students will:
- Learn about the living and nonliving components of soil
- Explore different types of soil
Students can:
- Describe different characteristics of soil based on observation and exploration
- Compare different types of soil and record observations using graphic organisers
Success Criteria
Students can:
- Describe different characteristics of soil based on observation and exploration
- Compare different types of soil and record observations using graphic organisers
This icon
indicates potential assessment opportunities.
Observations
- Observe and record students’ responses to questions asked about the parts of soils based on listening to a book or video (Minds-on)
Conversations
- Listen to and record students as they share observations of soils (Action)
- Listen to and record students as they classify soil by feel (Action)
Products
- Students could do labelled drawings of their soil/water mixtures before and after shaking in a science journal or on the Soil Viewer Observations reproducible for Centre 2 (Action)
- Students could compare and contrast two samples of soil in a science journal or on the Comparing Soil Venn Diagram reproducible (Action)
- Students could add text and words about the soil they collected in a science journal or on the All about My Soil reproducible (Consolidation)
Evidence of Student Learning
This icon
indicates potential assessment opportunities.
Observations
- Observe and record students’ responses to questions asked about the parts of soils based on listening to a book or video (Minds-on)
Conversations
- Listen to and record students as they share observations of soils (Action)
- Listen to and record students as they classify soil by feel (Action)
Products
- Students could do labelled drawings of their soil/water mixtures before and after shaking in a science journal or on the Soil Viewer Observations reproducible for Centre 2 (Action)
- Students could compare and contrast two samples of soil in a science journal or on the Comparing Soil Venn Diagram reproducible (Action)
- Students could add text and words about the soil they collected in a science journal or on the All about My Soil reproducible (Consolidation)
Students will:
- Learn about the living and nonliving components of soil
- Explore different types of soil
Learning Goals
Students will:
- Learn about the living and nonliving components of soil
- Explore different types of soil
Students can:
- Describe different characteristics of soil based on observation and exploration
- Compare different types of soil and record observations using graphic organisers
Success Criteria
Students can:
- Describe different characteristics of soil based on observation and exploration
- Compare different types of soil and record observations using graphic organisers
This icon
indicates potential assessment opportunities.
Observations
- Observe and record students’ responses to questions asked about the parts of soils based on listening to a book or video (Minds-on)
Conversations
- Listen to and record students as they share observations of soils (Action)
- Listen to and record students as they classify soil by feel (Action)
Products
- Students could do labelled drawings of their soil/water mixtures before and after shaking in a science journal or on the Soil Viewer Observations reproducible for Centre 2 (Action)
- Students could compare and contrast two samples of soil in a science journal or on the Comparing Soil Venn Diagram reproducible (Action)
- Students could add text and words about the soil they collected in a science journal or on the All about My Soil reproducible (Consolidation)
Evidence of Student Learning
This icon
indicates potential assessment opportunities.
Observations
- Observe and record students’ responses to questions asked about the parts of soils based on listening to a book or video (Minds-on)
Conversations
- Listen to and record students as they share observations of soils (Action)
- Listen to and record students as they classify soil by feel (Action)
Products
- Students could do labelled drawings of their soil/water mixtures before and after shaking in a science journal or on the Soil Viewer Observations reproducible for Centre 2 (Action)
- Students could compare and contrast two samples of soil in a science journal or on the Comparing Soil Venn Diagram reproducible (Action)
- Students could add text and words about the soil they collected in a science journal or on the All about My Soil reproducible (Consolidation)
Materials and Preparation
| Material/Technology/Setting | Quantity |
|---|---|
|
1 per student |
|
For all centres
|
|
|
Centre Activity 1: Exploring Soil
|
1 (for a centre-based exploration) |
|
Centre Activity 2: Soil Layers Viewer
|
I set per student |
|
Centre Activity 3: Soil Close Up
|
1 set per student |
|
Centre Activity 4: Comparing Soil
|
I set per student |
|
4 per centre |
Materials
| Material/Technology/Setting | Quantity |
|---|---|
|
1 per student |
|
For all centres
|
|
|
Centre Activity 1: Exploring Soil
|
1 (for a centre-based exploration) |
|
Centre Activity 2: Soil Layers Viewer
|
I set per student |
|
Centre Activity 3: Soil Close Up
|
1 set per student |
|
Centre Activity 4: Comparing Soil
|
I set per student |
|
4 per centre |
- Working with soils is messy. Consider having students explore soils outdoors or if working indoors, cover tables with newspaper or plastic tablecloths or have students work within large cardboard boxes or trays.
- Laminate the Soil Layers Viewer Activity Card and Soil Texture by Feel Activity Cards or put them in plastic sleeves.
- Set up materials for centre activities. If you wish, you could set up the exploration centres in an outdoor space.
- You may wish to do all or only some of the centre activities.
For the Exploring Soil centre activity, put the sand, gravel and potting soil in different parts of the bin.
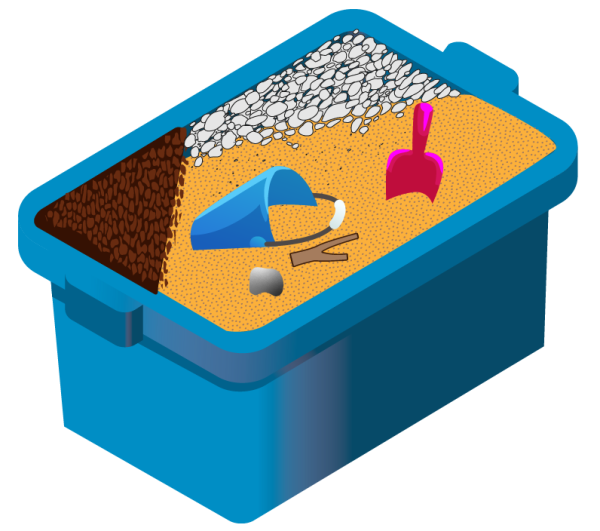
Image - text version
Shown is a colour illustration of a rectangular bin filled with three different materials. A scoop, bucket, twig and stone sit on the surface.
The blue bin is shown on an angle. The top left corner is filled with dark brown soil. The top right corner is filled with pale grey gravel. The rest is filled with golden sand. A child's pink scoop and blue bucket are half covered in sand. A small brown twig and a grey stone sit on the surface.
Preparation
- Working with soils is messy. Consider having students explore soils outdoors or if working indoors, cover tables with newspaper or plastic tablecloths or have students work within large cardboard boxes or trays.
- Laminate the Soil Layers Viewer Activity Card and Soil Texture by Feel Activity Cards or put them in plastic sleeves.
- Set up materials for centre activities. If you wish, you could set up the exploration centres in an outdoor space.
- You may wish to do all or only some of the centre activities.
For the Exploring Soil centre activity, put the sand, gravel and potting soil in different parts of the bin.

Image - text version
Shown is a colour illustration of a rectangular bin filled with three different materials. A scoop, bucket, twig and stone sit on the surface.
The blue bin is shown on an angle. The top left corner is filled with dark brown soil. The top right corner is filled with pale grey gravel. The rest is filled with golden sand. A child's pink scoop and blue bucket are half covered in sand. A small brown twig and a grey stone sit on the surface.
- Working independently at a centre.
- Following directions in a flow chart.
- Basic understanding of living and nonliving things.
Student Prior Knowledge and Skills
- Working independently at a centre.
- Following directions in a flow chart.
- Basic understanding of living and nonliving things.
| Material/Technology/Setting | Quantity |
|---|---|
|
1 per student |
|
For all centres
|
|
|
Centre Activity 1: Exploring Soil
|
1 (for a centre-based exploration) |
|
Centre Activity 2: Soil Layers Viewer
|
I set per student |
|
Centre Activity 3: Soil Close Up
|
1 set per student |
|
Centre Activity 4: Comparing Soil
|
I set per student |
|
4 per centre |
Materials
| Material/Technology/Setting | Quantity |
|---|---|
|
1 per student |
|
For all centres
|
|
|
Centre Activity 1: Exploring Soil
|
1 (for a centre-based exploration) |
|
Centre Activity 2: Soil Layers Viewer
|
I set per student |
|
Centre Activity 3: Soil Close Up
|
1 set per student |
|
Centre Activity 4: Comparing Soil
|
I set per student |
|
4 per centre |
- Working with soils is messy. Consider having students explore soils outdoors or if working indoors, cover tables with newspaper or plastic tablecloths or have students work within large cardboard boxes or trays.
- Laminate the Soil Layers Viewer Activity Card and Soil Texture by Feel Activity Cards or put them in plastic sleeves.
- Set up materials for centre activities. If you wish, you could set up the exploration centres in an outdoor space.
- You may wish to do all or only some of the centre activities.
For the Exploring Soil centre activity, put the sand, gravel and potting soil in different parts of the bin.

Image - text version
Shown is a colour illustration of a rectangular bin filled with three different materials. A scoop, bucket, twig and stone sit on the surface.
The blue bin is shown on an angle. The top left corner is filled with dark brown soil. The top right corner is filled with pale grey gravel. The rest is filled with golden sand. A child's pink scoop and blue bucket are half covered in sand. A small brown twig and a grey stone sit on the surface.
Preparation
- Working with soils is messy. Consider having students explore soils outdoors or if working indoors, cover tables with newspaper or plastic tablecloths or have students work within large cardboard boxes or trays.
- Laminate the Soil Layers Viewer Activity Card and Soil Texture by Feel Activity Cards or put them in plastic sleeves.
- Set up materials for centre activities. If you wish, you could set up the exploration centres in an outdoor space.
- You may wish to do all or only some of the centre activities.
For the Exploring Soil centre activity, put the sand, gravel and potting soil in different parts of the bin.

Image - text version
Shown is a colour illustration of a rectangular bin filled with three different materials. A scoop, bucket, twig and stone sit on the surface.
The blue bin is shown on an angle. The top left corner is filled with dark brown soil. The top right corner is filled with pale grey gravel. The rest is filled with golden sand. A child's pink scoop and blue bucket are half covered in sand. A small brown twig and a grey stone sit on the surface.
- Working independently at a centre.
- Following directions in a flow chart.
- Basic understanding of living and nonliving things.
Student Prior Knowledge and Skills
- Working independently at a centre.
- Following directions in a flow chart.
- Basic understanding of living and nonliving things.
Teaching and Learning Activities
Minds-On: Introduction to Soils (10 min.)
| Instructions | Teaching Tips |
|---|---|
| Have students watch a video such as What’s the dirt on dirt? (3:43 min.) or read a book such as Dirt, the Scoop on Soil (a read aloud can also be viewed here) to learn about the main parts and layers of soil. |
DiscussionsDiscussion prompts can include:
Images and VideosFor students who are visually impaired, pause to describe images in the video or book. |
Action: Soil Exploration Centres (60 min.)
| Instructions | Teaching Tips |
|---|---|
|
Provide each student with a bag for collecting soil. These soil samples will be used during the Action activities. Students could collect samples of soil from:
Students should divide their sample of soil in half. Half will be used for Centre 2 and the other half used in Centres 3 and 4. |
SafetyReview safety procedures for taking part in outdoor activities at school. If collecting soil near home, have students go with an adult and only collect soil in appropriate places. ConnectionsIf students are unable to collect soil samples, you could provide students with samples using the soil from Centre Activity 1. |
| Divide students into groups to do centre activities. Activities could be done concurrently or sequentially. | |
|
Centre Activity 1: Exploring Soils Students freely explore the soils, tools and objects in the bin. Prompt students to share observations of the soil using their senses (sight, smell and touch). |
LanguageMake sure students have access to a word wall of descriptive words such as smooth, gritty, rough, etc. DiscussionsDiscussion prompts can include:
SafetyReview how to safely explore the materials (e.g., keeping the soil in the bin). IdeaStudents with visual impairments could work with a buddy who could describe the colour of the soil. |
|
Centre Activity 2: Soil Layers Viewer Students explore soil components by mixing soil and water and allowing it to settle out by weight. Students independently follow the steps on the Soil Layers Viewer Activity Card reproducible [Google doc] [Word doc] [PDF]. Students should fill their containers about ¾ full of water and then add about half of the soil they collected. 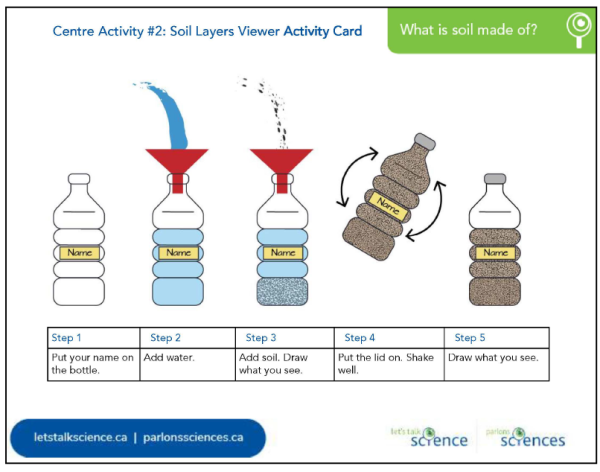
Students can record observations of the soil viewer before shaking, after shaking, and after settling overnight in a science journal, on paper or on the Soil Layers Viewer Observations reproducible [Google doc] [Word doc] [PDF]. Observations can include labelled drawings or photographs. 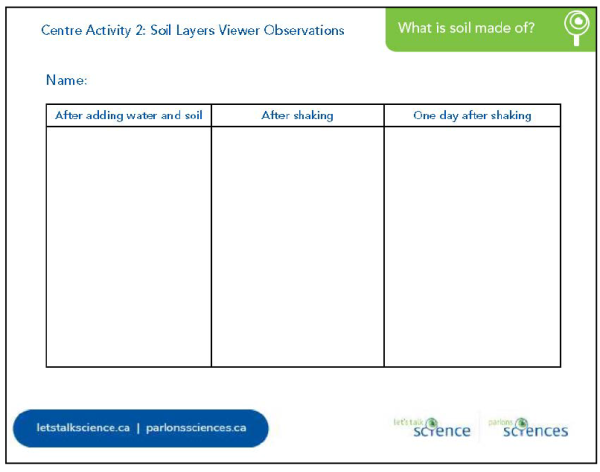
Click here to view a video version of this activity. |
IdeaPermanent marker is best when labelling things that may get wet. SafetyAny spilled water should be cleaned up immediately. IdeaStudents with visual impairments could work with a buddy who could describe what is seen inside the container. |
|
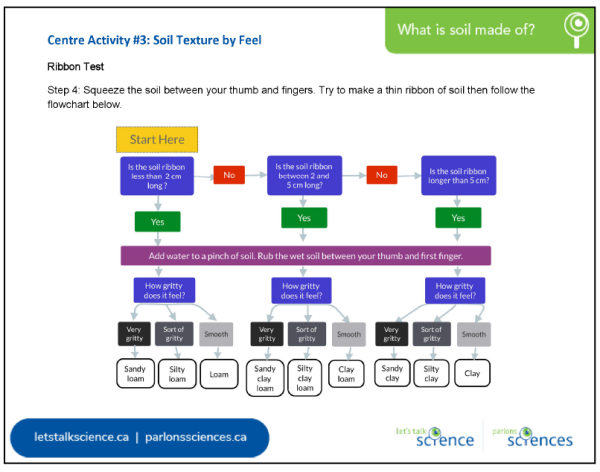
Centre Activity 3: Soil Texture by Feel Students identify the type of soil they have by feel using the Soil Texture by Feel Activity Card reproducible [Google doc] [Word doc] [PDF]. In it they will explore the texture of soil using a:
Using a handful of soil, demonstrate the process of doing both tests and following the flowchart. Click here to see a video of this process being demonstrated as well as explanations of how to determine soil type. 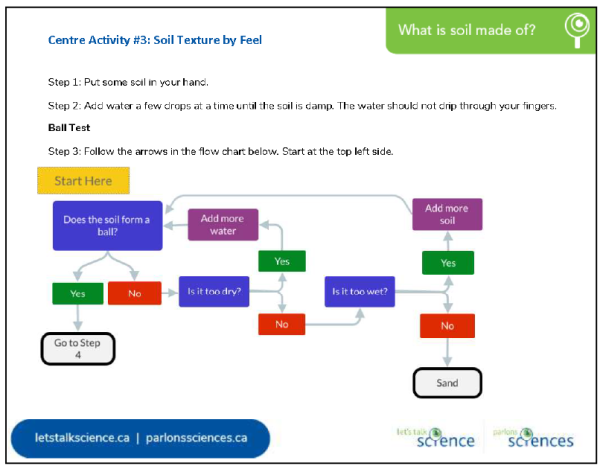
|
IdeaIf students are not familiar with following a flowchart, teach a mini-lesson on how to do so before this activity. IdeaStudents with visual impairments could work with a buddy who could describe what is seen during testing. |
|
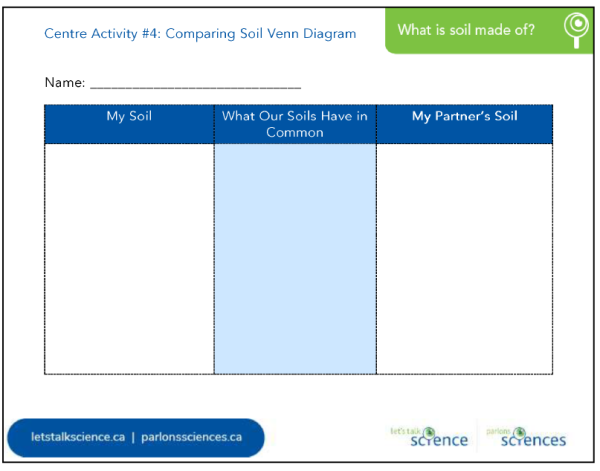
Centre Activity 4: Comparing Soil Students compare and contrast the characteristics of different soil samples with a partner. Students each put their soil on a plastic plate and spread it around so all parts of the soil are visible. Encourage students to select their own criteria for comparison such as colour, particle size, amount of organic matter, smell, and ability to pour. Prompt students to provide descriptive words to characterize the soil samples. Students can record observations of the soil in a science journal, on paper or on the Comparing Soil Venn Diagram reproducible [Google doc] [Word doc] [PDF].
|
IdeaStudents with visual impairments could work with a buddy who could describe what is seen in each soil sample. |
Consolidation: All About My Soil (20 min.)
| Instructions | Teaching Tips |
|---|---|
|
Have students consolidate their learning about the characteristics of the soil they collected and explored. Students could do this on a piece of paper, in a science journal, or on the All about My Soil reproducible [Google doc] [Word doc] [PDF] 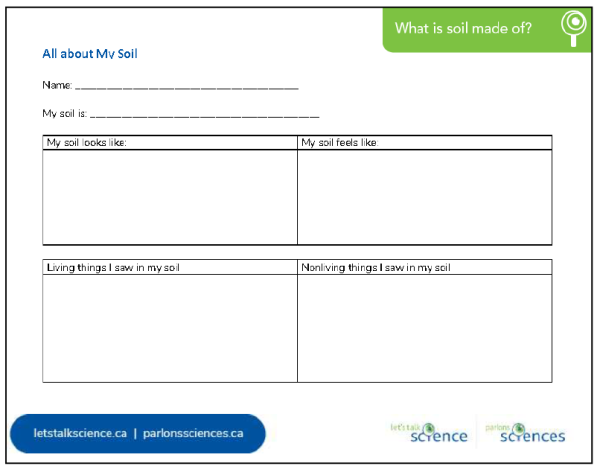
|
LanguageMake sure students have access to a word wall of terminology used to describe soil. Incorporate vocabulary in other relevant languages as well (e.g., French). |
Background Information for Teachers
Soil Texture
Texture is one of the most important properties of a soil. It is directly related to a soil’s ability to hold water and nutrients. There are several ways to determine the texture of soil. Soil may be sent to a laboratory for analysis. It can also be tested using the two methods used by students - the jar method and testing by feel. These two methods are less precise than laboratory methods, but they do give people, like farmers, a good estimation of the components in soil.
The texture of soil is classified according to the percentages of sand, silt and clay it contains. This is often represented using a soil texture triangle.
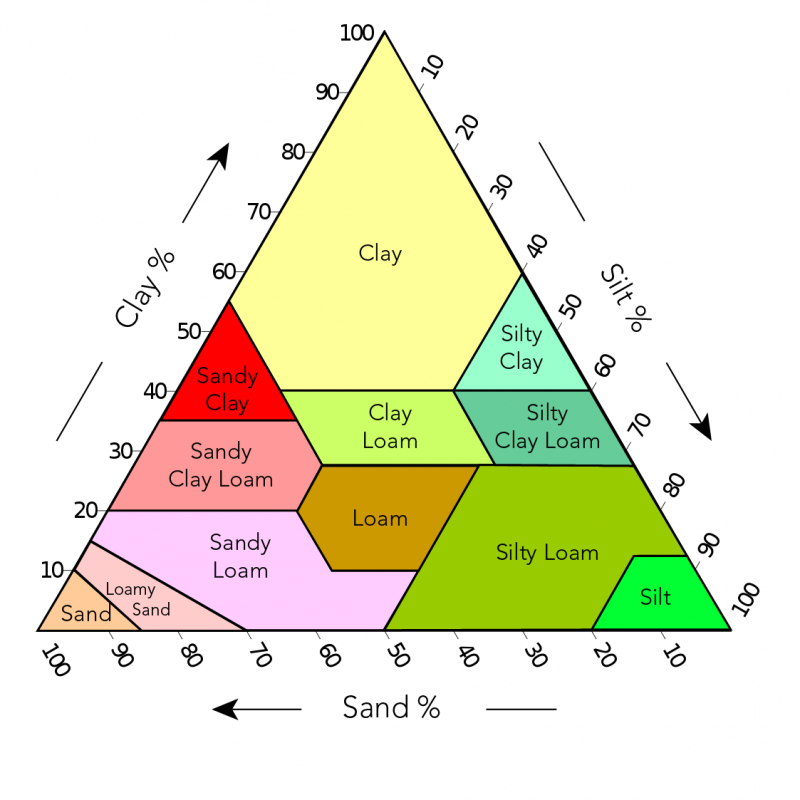
Image - Text version
Shown is a colour graphic illustrating the names for soil according to the percentages of clay, silt, and sand it contains.
The illustration is triangular. The triangle is divided into 12 sections of different shapes and sizes. Each section has a different colour and is labelled with a different name. The three sides of the triangle are each marked with the numbers from 0 to 100 at regular intervals.
The left edge is labelled Clay %, with an arrow pointing up. The names of the sections along this edge are: Sand at 0 to 10%, Loamy Sand at 10 to15%, Sandy Loam at 15 to 20%, Sandy Clay Loam at 20 to 35%, Sandy Clay from 35 to 55%, and Clay from 55 to 100%.
The right edge of the triangle is labelled Silt%, with an arrow pointing down. The names of the sections along this edge are: Clay at 0 to 40%, Silty Clay at 40 to 60%, Silty Clay Loam at 60 to 73%, Silty Loam at 73 to 87%, and Silt from 87 to 100%.
The bottom edge of the triangle is labelled Sand %, with an arrow pointing to the left. The names of the sections along the edge are: Silt at 0 to 20%, Silty Loam at 20 to 60%, Sandy Loam at 50 to 70%, Loamy Sand at 70 to 96%, and Sand from 96 to 100%.
There are two sections in the centre of the triangle, which don't touch any edges. The first is Clay Loam, just under the large Clay section. The second is Loam, just under the Clay loam section.
Additional Resources
Reproducibles
- Soil Layers Viewer Activity Card reproducible [Google doc] [Word doc] [PDF]
- Soil Layers Viewer Observations reproducible [Google doc] [Word doc] [PDF]
- Comparing Soil Venn Diagram reproducible [Google doc] [Word doc] [PDF]
- Soil Texture by Feel Activity Card reproducible [Google doc] [Word doc] [PDF]
- All about My Soil reproducible [Google doc] [Word doc] [PDF]
Books
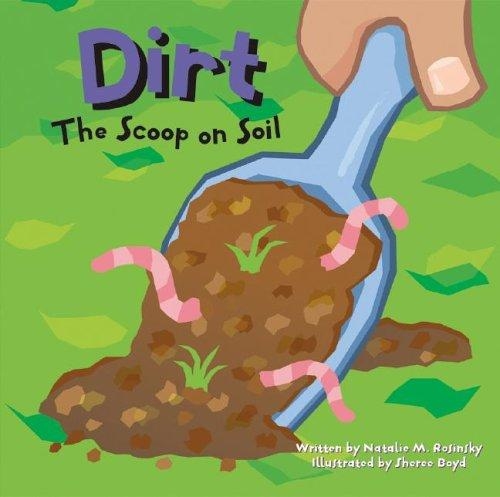
Dirt, The Scoop on Soil
By Natalie M. Rosinsky
Amazing Science-Delve into the how’s and why’s of science in this fact-filled series. These books answer kids’ questions about the world around them—and encourage them to ask more.
ISBN: 1404800123
Videos
What’s the dirt on dirt? (2015) by SciShow kids (3:43 min.)
A SciShow Kids viewer asked: What is dirt made of? Join Jessi to get the dirt on … dirt!
Reproducibles and Media
Reproducibles
- Soil Layers Viewer Activity Card reproducible [Google doc] [Word doc] [PDF]
- Soil Layers Viewer Observations reproducible [Google doc] [Word doc] [PDF]
- Comparing Soil Venn Diagram reproducible [Google doc] [Word doc] [PDF]
- Soil Texture by Feel Activity Card reproducible [Google doc] [Word doc] [PDF]
- All about My Soil reproducible [Google doc] [Word doc] [PDF]
Books
Dirt, The Scoop on Soil
By Natalie M. Rosinsky
Amazing Science-Delve into the how’s and why’s of science in this fact-filled series. These books answer kids’ questions about the world around them—and encourage them to ask more.
ISBN: 1404800123

Videos
What’s the dirt on dirt? (2015) by SciShow kids (3:43 min.)
A SciShow Kids viewer asked: What is dirt made of? Join Jessi to get the dirt on … dirt!
Science
- Students could apply their learning and skills from this inquiry to Design & Build a Soil Sifter, in which students design and construct a prototype soil sifting system that separates a soil mixture into large, medium and small particles.
- Students can learn about soil health by doing the Healthy Soil lesson.
Mathematical Thinking
- Measure and describe the relative sizes of soil particles using non-standard measurement (e.g., large, medium, small, very small or fine).
- Use standard units to measure the size of certain particles (e.g., "The gravel pieces in this sample are about 3 to 5 mm in diameter," “The ribbon of soil is 3 cm long).
Computational Thinking
- Students could rewrite the flowchart as pseudocode for programming. For example, the ball test could look like this:
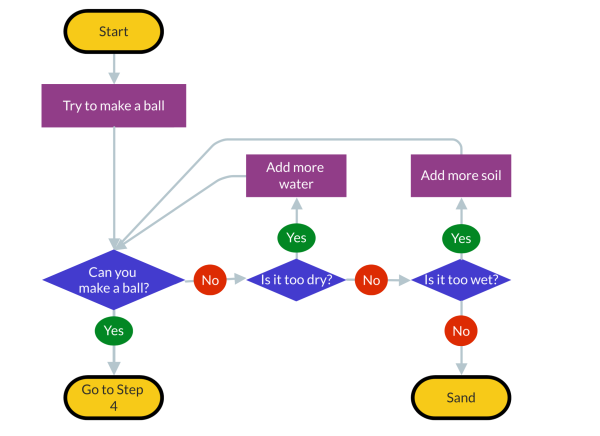
Image - Text version
Shown is a colour flowchart of questions and answers in different coloured shapes, connected by grey arrows.
In the top left corner is a yellow oblong with rounded ends, containing the word "start". Below, a grey arrow leads to a long purple rectangle with the phrase "Try to make a ball". Below, an arrow leads to a blue diamond that reads "Can you make a ball?"
Below, an arrow leads through a green oval with the word "Yes", to a yellow oblong reading "Go to step 4".
To the right of the blue diamond, a second arrow leads through a red circle with the word "No" to another blue diamond. This contains the phrase "Is it too dry?"
Above, an arrow leads through a green oval with the word "Yes" to a purple rectangle with the phrase "Add more water". Another arrow leads from the purple rectangle, left and down to the blue diamond reading "Can you make a ball?"
To the right of the blue diamond reading "Is it too dry?" An arrow leads through a red circle with the word "No", to a third blue diamond. This one reads "Is it too wet?"
Above, an arrow leads through a green oval with the word "Yes", to a purple rectangle reading "Add more soil". From the top of this rectangle, an arrow leads back to the first blue diamond, which reads "Can you make a ball?".
Below the diamond reading "Is it too wet?", a second arrow leads through a red circle reading "No", to a yellow oblong with the word "Sand". This shape is the final one of the chart, in the bottom right corner.
You may need to teach a mini-lesson on flowchart shapes and their meaning.
- Students could write code for the soil texture tests (ball test and ribbon test) in a program such as ScratchJr.
Extensions
Science
- Students could apply their learning and skills from this inquiry to Design & Build a Soil Sifter, in which students design and construct a prototype soil sifting system that separates a soil mixture into large, medium and small particles.
- Students can learn about soil health by doing the Healthy Soil lesson.
Mathematical Thinking
- Measure and describe the relative sizes of soil particles using non-standard measurement (e.g., large, medium, small, very small or fine).
- Use standard units to measure the size of certain particles (e.g., "The gravel pieces in this sample are about 3 to 5 mm in diameter," “The ribbon of soil is 3 cm long).
Computational Thinking
- Students could rewrite the flowchart as pseudocode for programming. For example, the ball test could look like this:

Image - Text version
Shown is a colour flowchart of questions and answers in different coloured shapes, connected by grey arrows.
In the top left corner is a yellow oblong with rounded ends, containing the word "start". Below, a grey arrow leads to a long purple rectangle with the phrase "Try to make a ball". Below, an arrow leads to a blue diamond that reads "Can you make a ball?"
Below, an arrow leads through a green oval with the word "Yes", to a yellow oblong reading "Go to step 4".
To the right of the blue diamond, a second arrow leads through a red circle with the word "No" to another blue diamond. This contains the phrase "Is it too dry?"
Above, an arrow leads through a green oval with the word "Yes" to a purple rectangle with the phrase "Add more water". Another arrow leads from the purple rectangle, left and down to the blue diamond reading "Can you make a ball?"
To the right of the blue diamond reading "Is it too dry?" An arrow leads through a red circle with the word "No", to a third blue diamond. This one reads "Is it too wet?"
Above, an arrow leads through a green oval with the word "Yes", to a purple rectangle reading "Add more soil". From the top of this rectangle, an arrow leads back to the first blue diamond, which reads "Can you make a ball?".
Below the diamond reading "Is it too wet?", a second arrow leads through a red circle reading "No", to a yellow oblong with the word "Sand". This shape is the final one of the chart, in the bottom right corner.
You may need to teach a mini-lesson on flowchart shapes and their meaning.
- Students could write code for the soil texture tests (ball test and ribbon test) in a program such as ScratchJr.
What is soil?
This Backgrounder, by Let’s Talk Science, includes a definition of soil and information about soil texture and a description of the various layers of soil.
How to Make a Flowchart for Programming Easy to Understand
This blog article has learning strategies and tips for using flowcharts to teach programming.
Learn More
What is soil?
This Backgrounder, by Let’s Talk Science, includes a definition of soil and information about soil texture and a description of the various layers of soil.
How to Make a Flowchart for Programming Easy to Understand
This blog article has learning strategies and tips for using flowcharts to teach programming.
Jaja, N (2016). Understanding the Texture of Your Soil for Agricultural Productivity. Virginia Cooperative Extension, Virginia State University.
Scot .Environment (Sept 4, 2015). Soil Texture [Video]. YouTube. https://youtu.be/wspKtgHzT-c
References
Jaja, N (2016). Understanding the Texture of Your Soil for Agricultural Productivity. Virginia Cooperative Extension, Virginia State University.
Scot .Environment (Sept 4, 2015). Soil Texture [Video]. YouTube. https://youtu.be/wspKtgHzT-c
Reproducibles
- Soil Layers Viewer Activity Card reproducible [Google doc] [Word doc] [PDF]
- Soil Layers Viewer Observations reproducible [Google doc] [Word doc] [PDF]
- Comparing Soil Venn Diagram reproducible [Google doc] [Word doc] [PDF]
- Soil Texture by Feel Activity Card reproducible [Google doc] [Word doc] [PDF]
- All about My Soil reproducible [Google doc] [Word doc] [PDF]
Books
Dirt, The Scoop on Soil
By Natalie M. Rosinsky
Amazing Science-Delve into the how’s and why’s of science in this fact-filled series. These books answer kids’ questions about the world around them—and encourage them to ask more.
ISBN: 1404800123

Videos
What’s the dirt on dirt? (2015) by SciShow kids (3:43 min.)
A SciShow Kids viewer asked: What is dirt made of? Join Jessi to get the dirt on … dirt!
Reproducibles and Media
Reproducibles
- Soil Layers Viewer Activity Card reproducible [Google doc] [Word doc] [PDF]
- Soil Layers Viewer Observations reproducible [Google doc] [Word doc] [PDF]
- Comparing Soil Venn Diagram reproducible [Google doc] [Word doc] [PDF]
- Soil Texture by Feel Activity Card reproducible [Google doc] [Word doc] [PDF]
- All about My Soil reproducible [Google doc] [Word doc] [PDF]
Books
Dirt, The Scoop on Soil
By Natalie M. Rosinsky
Amazing Science-Delve into the how’s and why’s of science in this fact-filled series. These books answer kids’ questions about the world around them—and encourage them to ask more.
ISBN: 1404800123

Videos
What’s the dirt on dirt? (2015) by SciShow kids (3:43 min.)
A SciShow Kids viewer asked: What is dirt made of? Join Jessi to get the dirt on … dirt!
Science
- Students could apply their learning and skills from this inquiry to Design & Build a Soil Sifter, in which students design and construct a prototype soil sifting system that separates a soil mixture into large, medium and small particles.
- Students can learn about soil health by doing the Healthy Soil lesson.
Mathematical Thinking
- Measure and describe the relative sizes of soil particles using non-standard measurement (e.g., large, medium, small, very small or fine).
- Use standard units to measure the size of certain particles (e.g., "The gravel pieces in this sample are about 3 to 5 mm in diameter," “The ribbon of soil is 3 cm long).
Computational Thinking
- Students could rewrite the flowchart as pseudocode for programming. For example, the ball test could look like this:

Image - Text version
Shown is a colour flowchart of questions and answers in different coloured shapes, connected by grey arrows.
In the top left corner is a yellow oblong with rounded ends, containing the word "start". Below, a grey arrow leads to a long purple rectangle with the phrase "Try to make a ball". Below, an arrow leads to a blue diamond that reads "Can you make a ball?"
Below, an arrow leads through a green oval with the word "Yes", to a yellow oblong reading "Go to step 4".
To the right of the blue diamond, a second arrow leads through a red circle with the word "No" to another blue diamond. This contains the phrase "Is it too dry?"
Above, an arrow leads through a green oval with the word "Yes" to a purple rectangle with the phrase "Add more water". Another arrow leads from the purple rectangle, left and down to the blue diamond reading "Can you make a ball?"
To the right of the blue diamond reading "Is it too dry?" An arrow leads through a red circle with the word "No", to a third blue diamond. This one reads "Is it too wet?"
Above, an arrow leads through a green oval with the word "Yes", to a purple rectangle reading "Add more soil". From the top of this rectangle, an arrow leads back to the first blue diamond, which reads "Can you make a ball?".
Below the diamond reading "Is it too wet?", a second arrow leads through a red circle reading "No", to a yellow oblong with the word "Sand". This shape is the final one of the chart, in the bottom right corner.
You may need to teach a mini-lesson on flowchart shapes and their meaning.
- Students could write code for the soil texture tests (ball test and ribbon test) in a program such as ScratchJr.
Extensions
Science
- Students could apply their learning and skills from this inquiry to Design & Build a Soil Sifter, in which students design and construct a prototype soil sifting system that separates a soil mixture into large, medium and small particles.
- Students can learn about soil health by doing the Healthy Soil lesson.
Mathematical Thinking
- Measure and describe the relative sizes of soil particles using non-standard measurement (e.g., large, medium, small, very small or fine).
- Use standard units to measure the size of certain particles (e.g., "The gravel pieces in this sample are about 3 to 5 mm in diameter," “The ribbon of soil is 3 cm long).
Computational Thinking
- Students could rewrite the flowchart as pseudocode for programming. For example, the ball test could look like this:

Image - Text version
Shown is a colour flowchart of questions and answers in different coloured shapes, connected by grey arrows.
In the top left corner is a yellow oblong with rounded ends, containing the word "start". Below, a grey arrow leads to a long purple rectangle with the phrase "Try to make a ball". Below, an arrow leads to a blue diamond that reads "Can you make a ball?"
Below, an arrow leads through a green oval with the word "Yes", to a yellow oblong reading "Go to step 4".
To the right of the blue diamond, a second arrow leads through a red circle with the word "No" to another blue diamond. This contains the phrase "Is it too dry?"
Above, an arrow leads through a green oval with the word "Yes" to a purple rectangle with the phrase "Add more water". Another arrow leads from the purple rectangle, left and down to the blue diamond reading "Can you make a ball?"
To the right of the blue diamond reading "Is it too dry?" An arrow leads through a red circle with the word "No", to a third blue diamond. This one reads "Is it too wet?"
Above, an arrow leads through a green oval with the word "Yes", to a purple rectangle reading "Add more soil". From the top of this rectangle, an arrow leads back to the first blue diamond, which reads "Can you make a ball?".
Below the diamond reading "Is it too wet?", a second arrow leads through a red circle reading "No", to a yellow oblong with the word "Sand". This shape is the final one of the chart, in the bottom right corner.
You may need to teach a mini-lesson on flowchart shapes and their meaning.
- Students could write code for the soil texture tests (ball test and ribbon test) in a program such as ScratchJr.
What is soil?
This Backgrounder, by Let’s Talk Science, includes a definition of soil and information about soil texture and a description of the various layers of soil.
How to Make a Flowchart for Programming Easy to Understand
This blog article has learning strategies and tips for using flowcharts to teach programming.
Learn More
What is soil?
This Backgrounder, by Let’s Talk Science, includes a definition of soil and information about soil texture and a description of the various layers of soil.
How to Make a Flowchart for Programming Easy to Understand
This blog article has learning strategies and tips for using flowcharts to teach programming.
Jaja, N (2016). Understanding the Texture of Your Soil for Agricultural Productivity. Virginia Cooperative Extension, Virginia State University.
Scot .Environment (Sept 4, 2015). Soil Texture [Video]. YouTube. https://youtu.be/wspKtgHzT-c
References
Jaja, N (2016). Understanding the Texture of Your Soil for Agricultural Productivity. Virginia Cooperative Extension, Virginia State University.
Scot .Environment (Sept 4, 2015). Soil Texture [Video]. YouTube. https://youtu.be/wspKtgHzT-c